Icon

How Open Box Delivery (OBD) Works

To outline the Open Box Delivery (OBD) process for riders, ensuring smooth order handling, product verification, and customer satisfaction.

By Pranav Goli

Overview

The Open Box Delivery (OBD) process is a specialized workflow for riders delivering orders that require product inspection upon delivery. Riders manage orders from assignment to completion, updating statuses, verifying products, collecting payments, and documenting delivery. This guide explains the process in five key phases.


The OBD Process

Phase 1: Order Assignment and Pickup Preparation

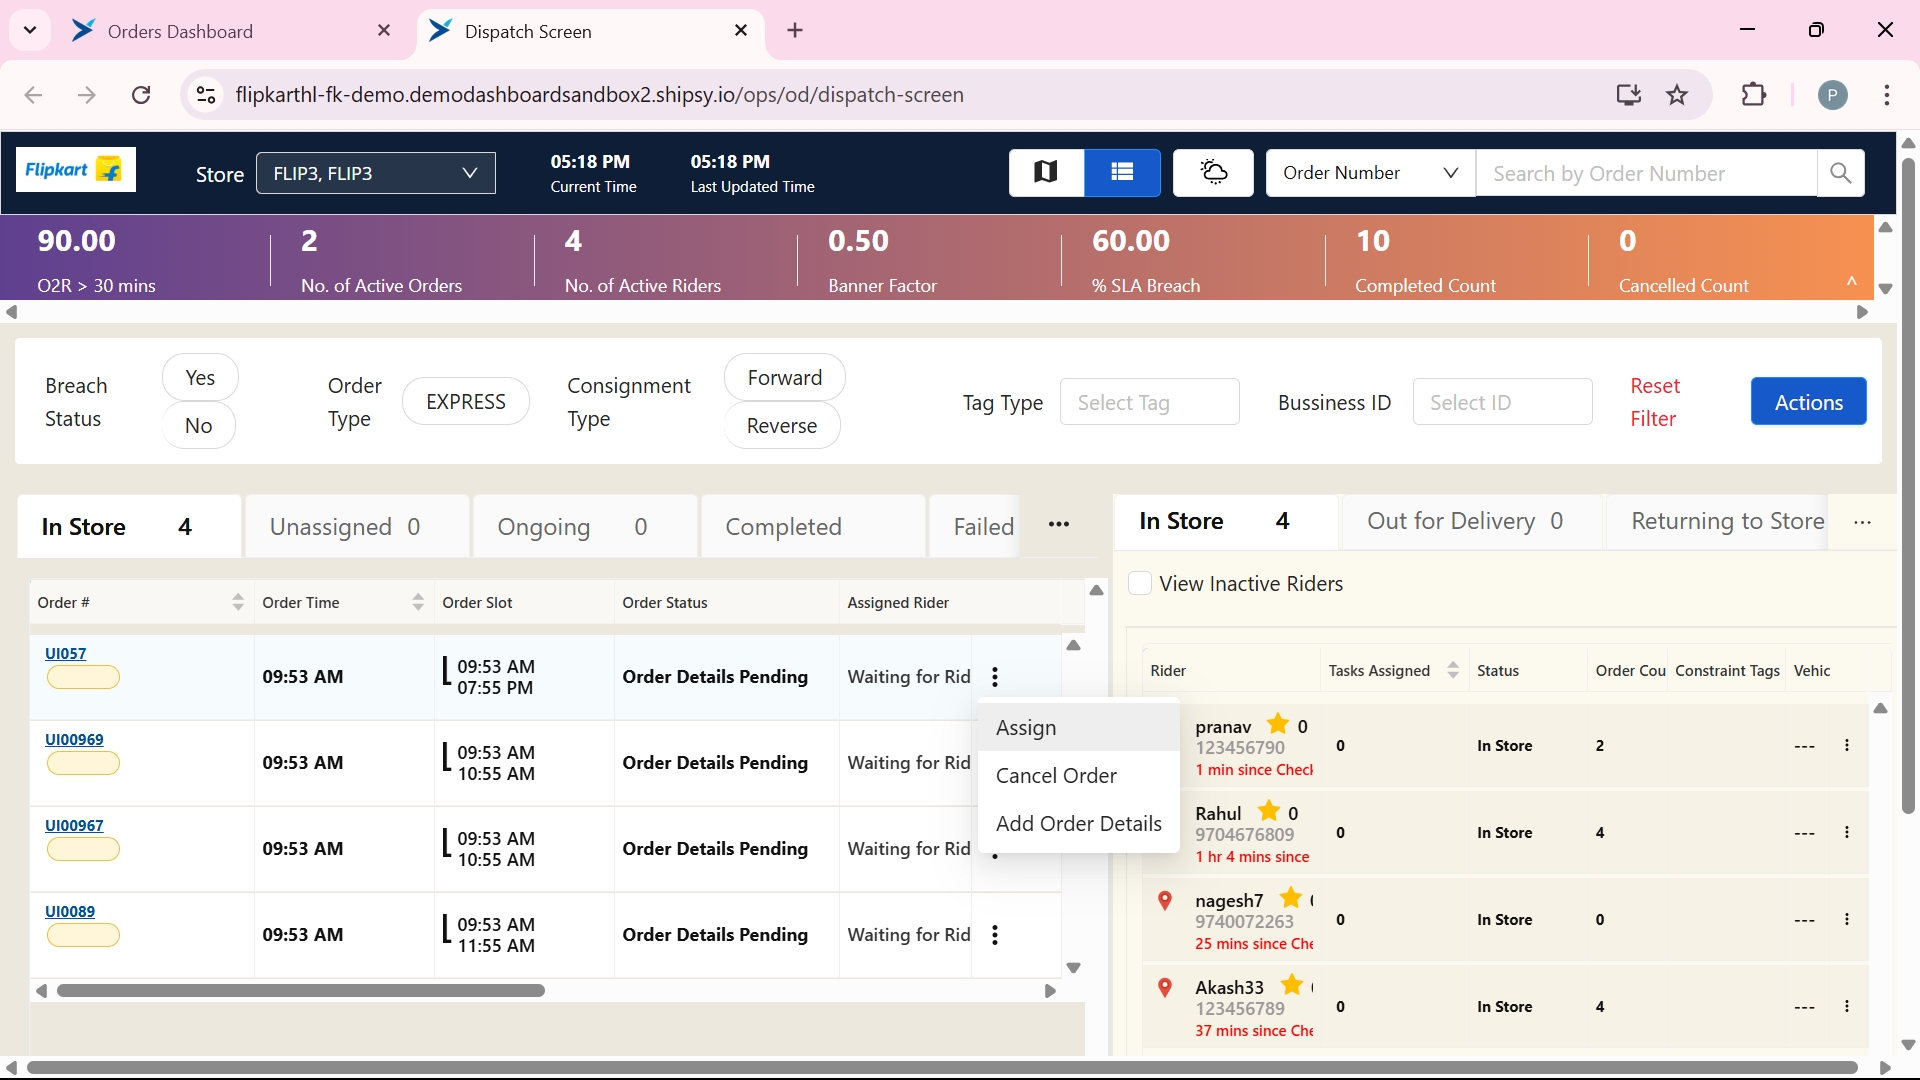
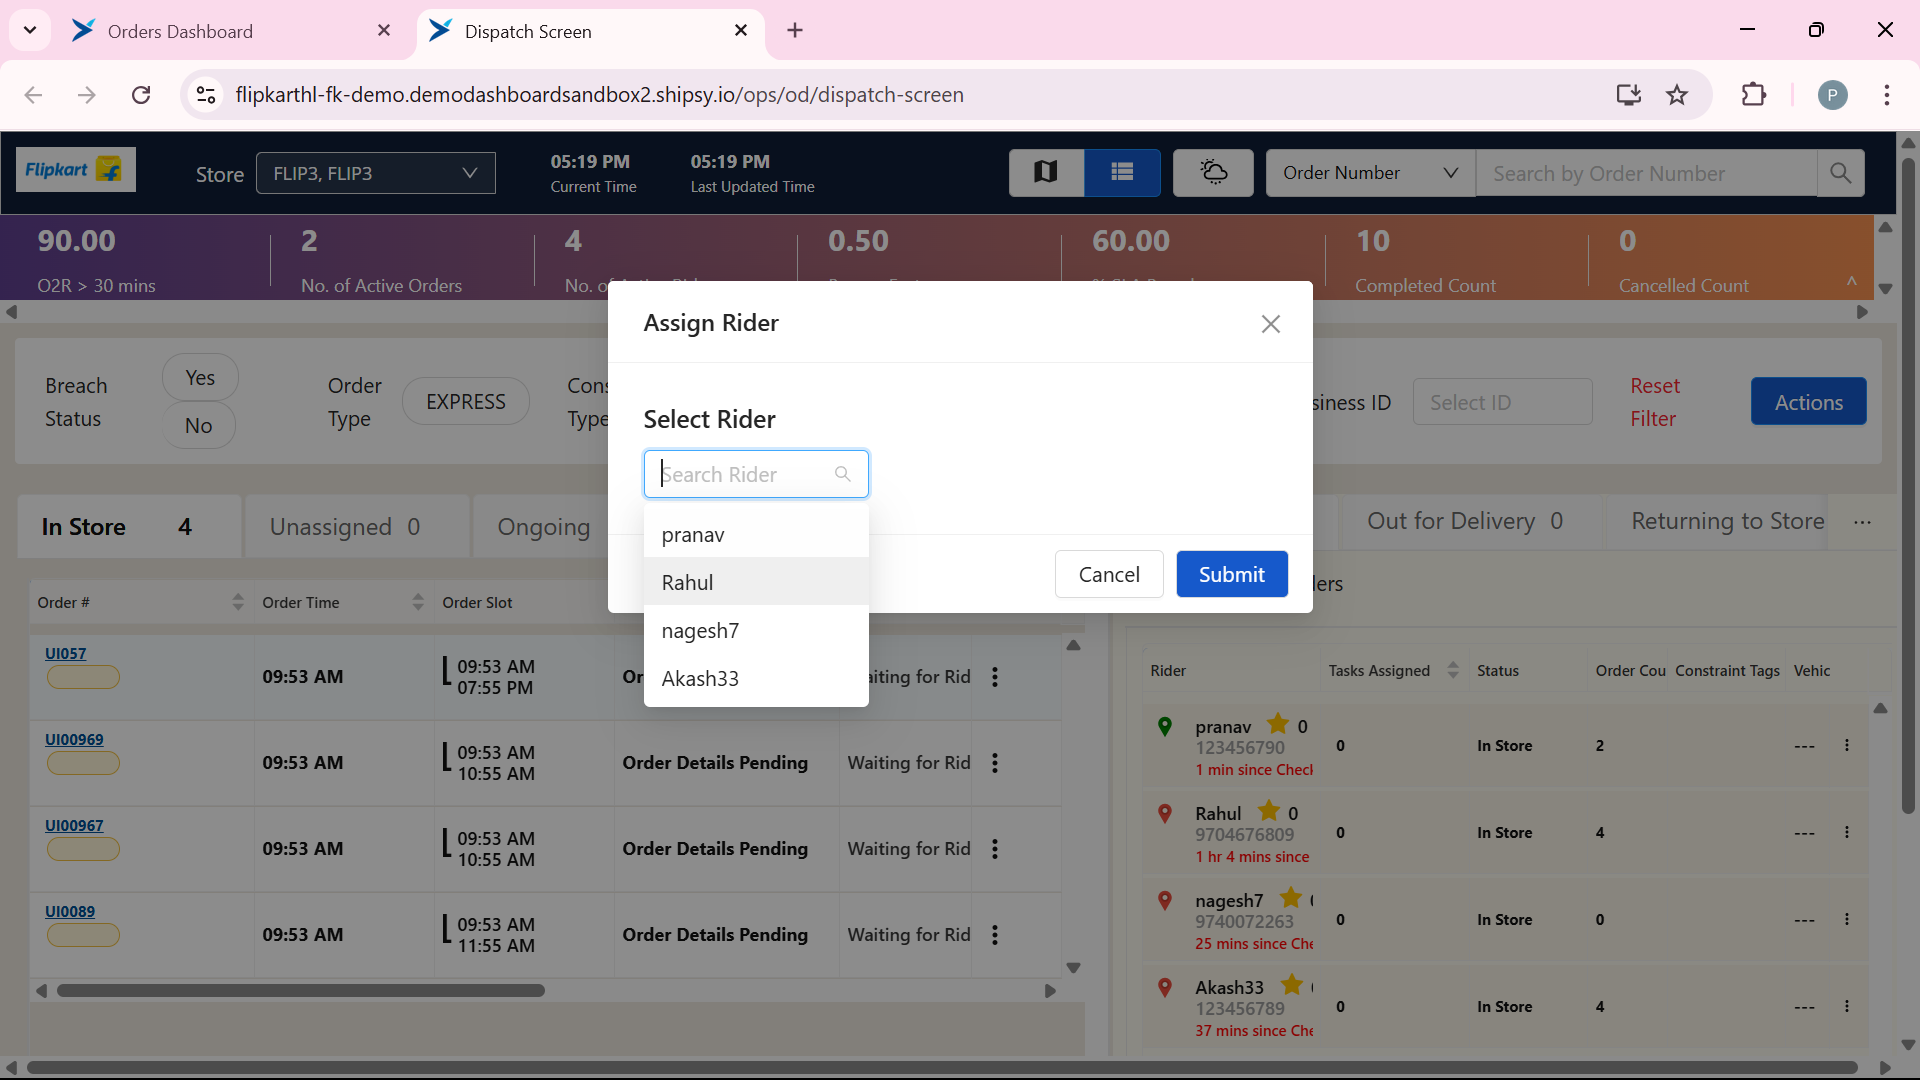
  • What Happens: An order is assigned to rider via the app, transitioning from "Waiting for rider" to "Assigned Rider." You confirm your assignment and prepare to pick up the items.

  • Key Actions: Select yourself as the rider, submit the assignment, and add the pickup location.

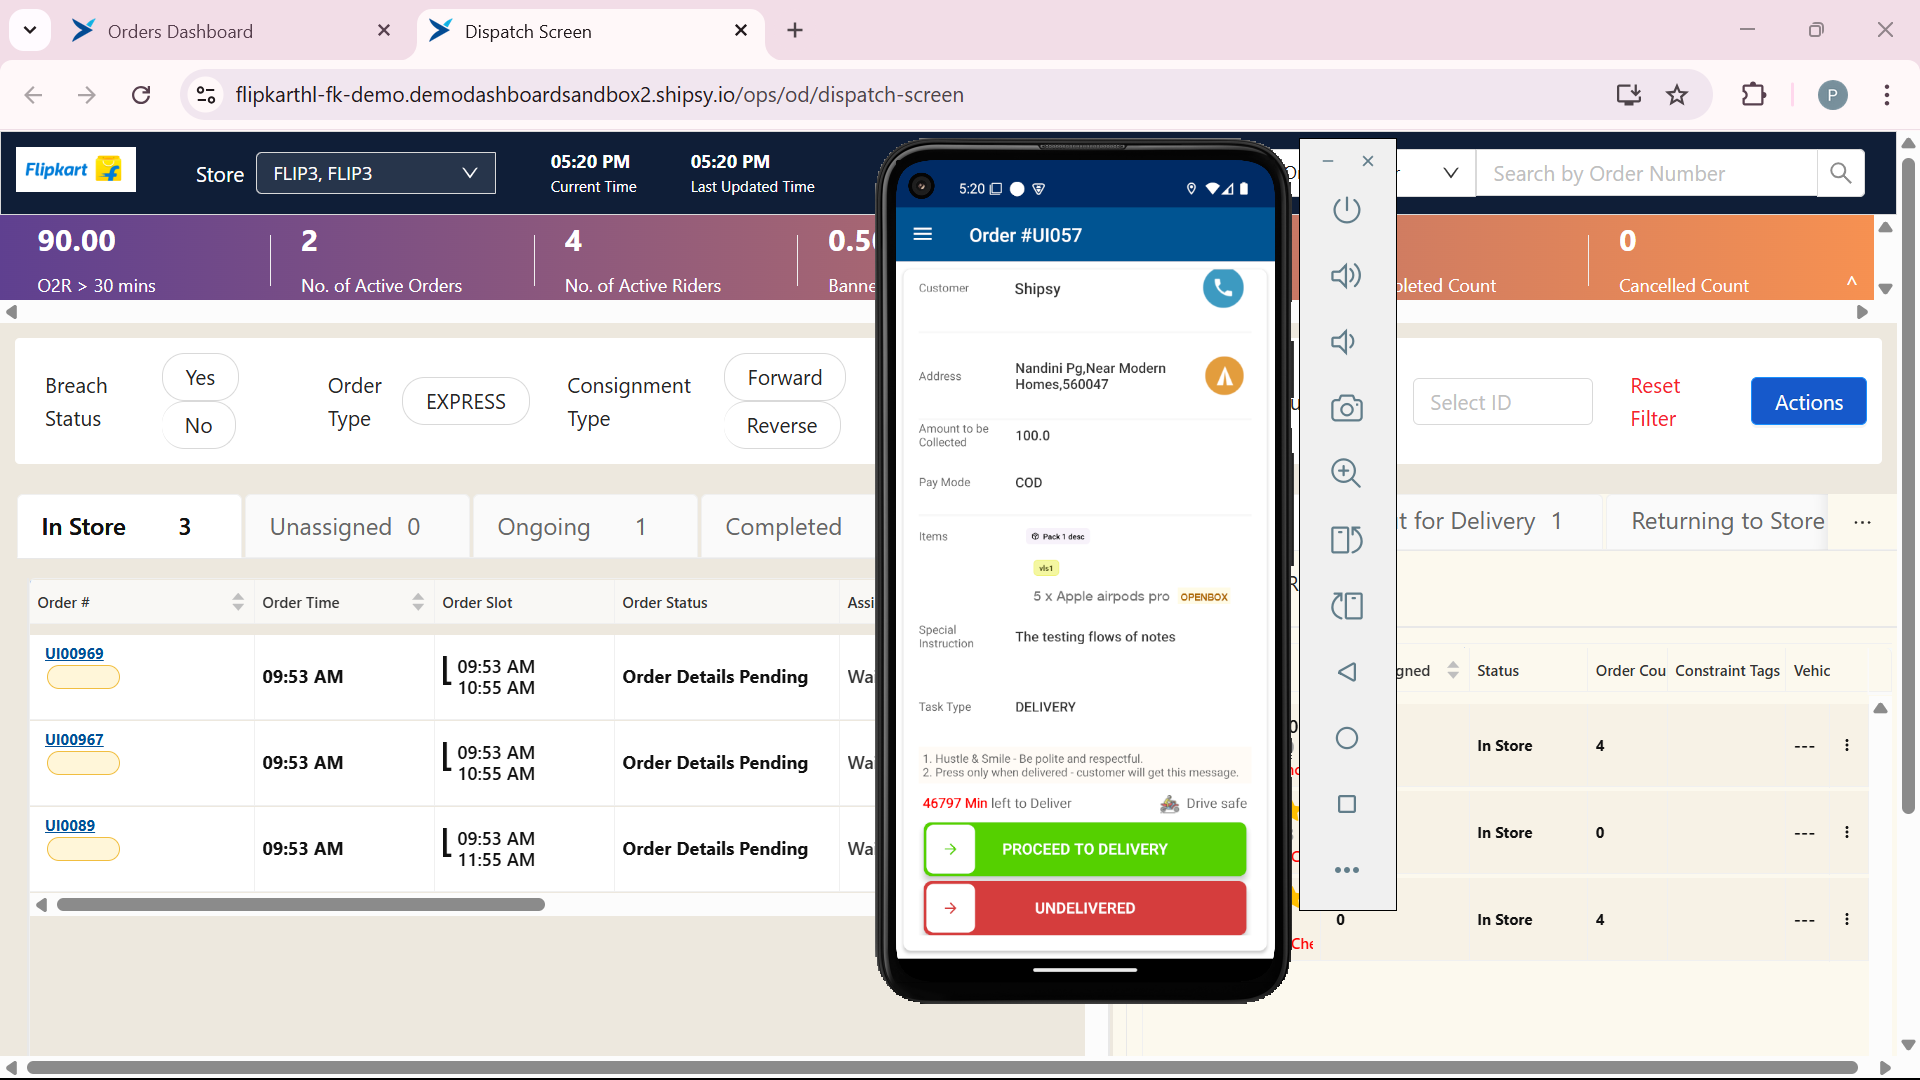
  • App Indicators: Look for "OPENBOX" with an order ID for OBD orders.

  • Purpose: Ensures the right rider is linked to the order and knows where to pick it up.

Phase 2: Item Pickup and Verification

  • What Happens: Rider picks up the items, scan the store location, and mark the pickup as complete in the app.

  • Key Actions: Slide "Picking Up Started" to begin, scan the Store location, and slide "Pickup Completed" when done.

  • App Indicators: Status updates from "Picking Up Started" to "Pickup Completed."

  • Purpose: Confirms the items are collected and ready for delivery.

Phase 3: Delivery to Customer

  • What Happens: You travel to the customer’s location and update the app upon arrival.

  • Key Actions: Slide "Reached Gate" when you arrive at the delivery point.

  • App Indicators: Status shifts to "Reached Gate."

  • Purpose: Notifies the system you’re at the customer’s location, ready for the next steps.

Phase 4: Product Inspection and Payment

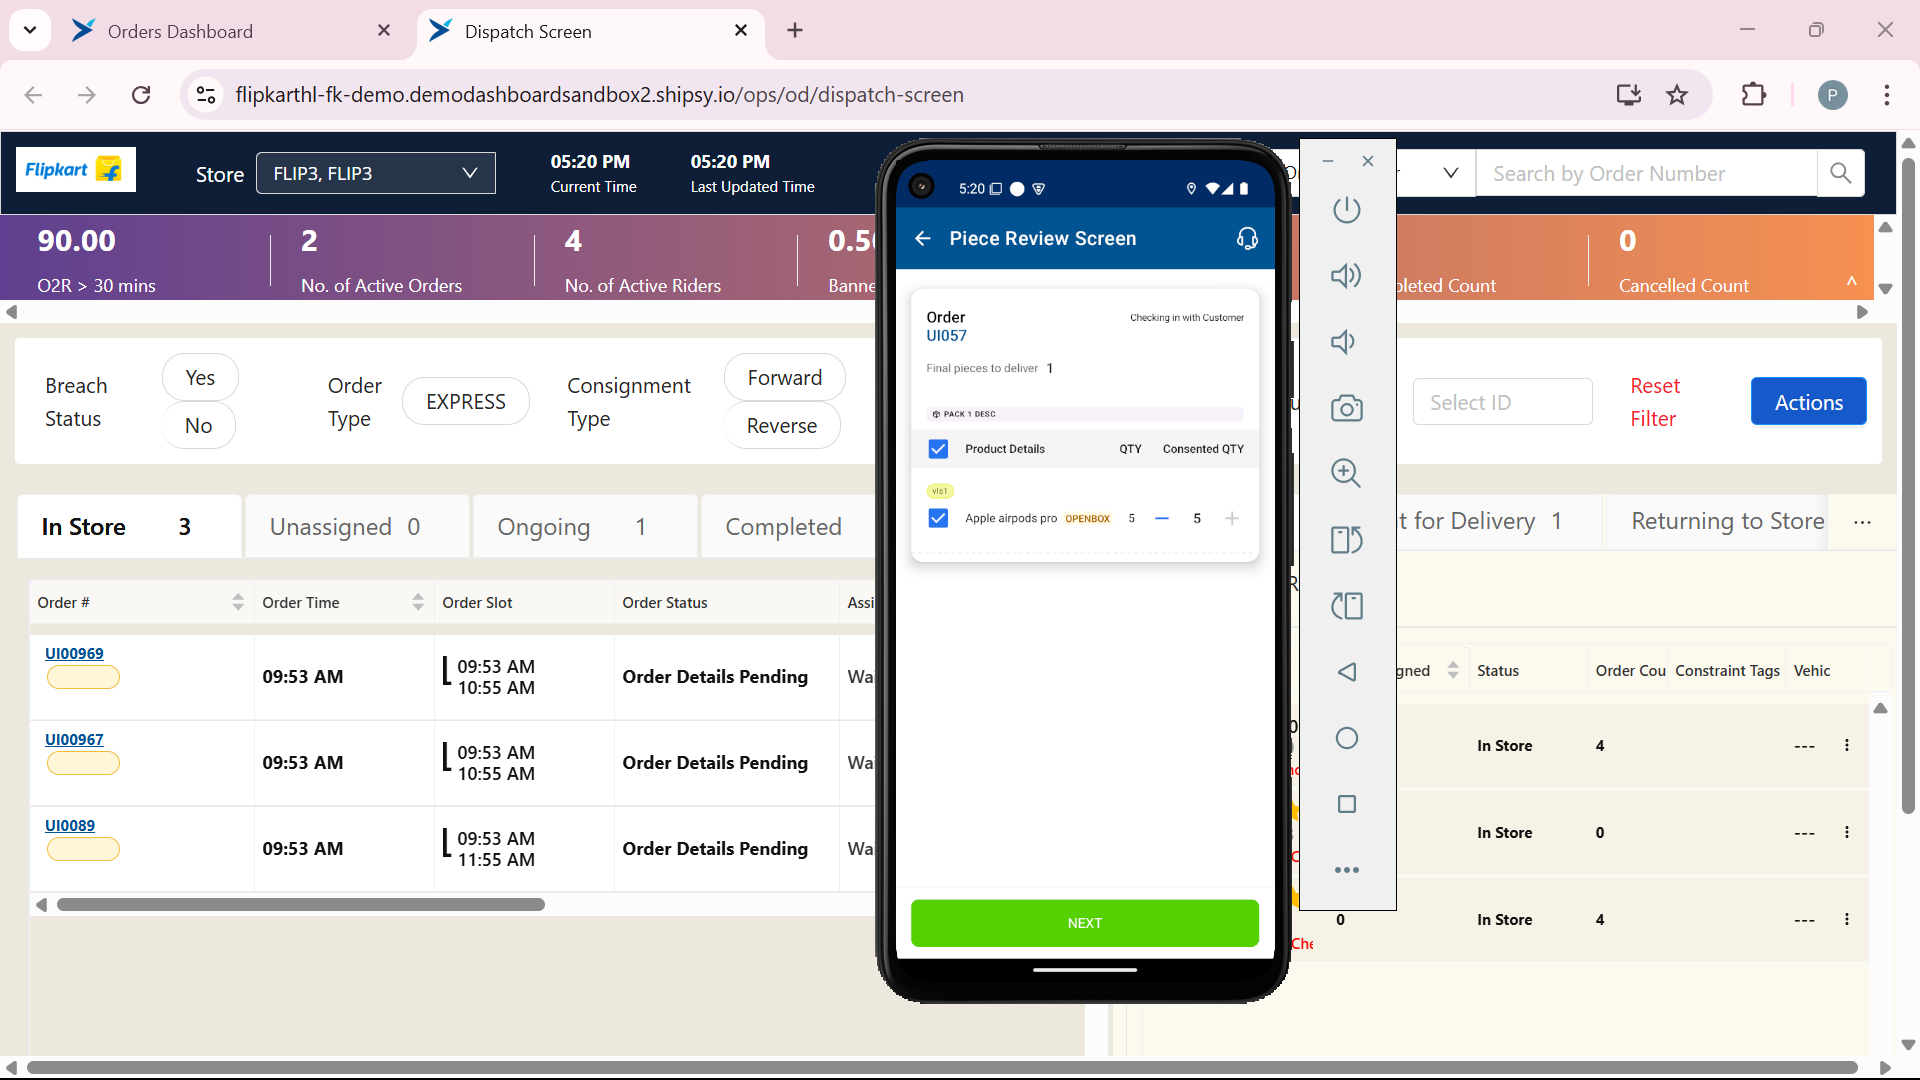
  • What Happens: You verify the order type (OBD or NON-OBD), check product quantity and condition with the customer, and process payment.

  • Key Actions: Confirm product count and condition (Yes/No), collect payment via the app, and proceed through confirmation screens.

  • App Indicators: Multiple "Next" and "Yes, Proceed" prompts guide you; "OPENBOX" signals OBD-specific checks.

  • Purpose: Ensures the product meets expectations before finalizing the transaction, a core OBD feature.

Phase 5: Delivery Completion and Return

  • What Happens: You finalize delivery by collecting an OTP, photographing the product, and marking it delivered, then return to the store workflow.

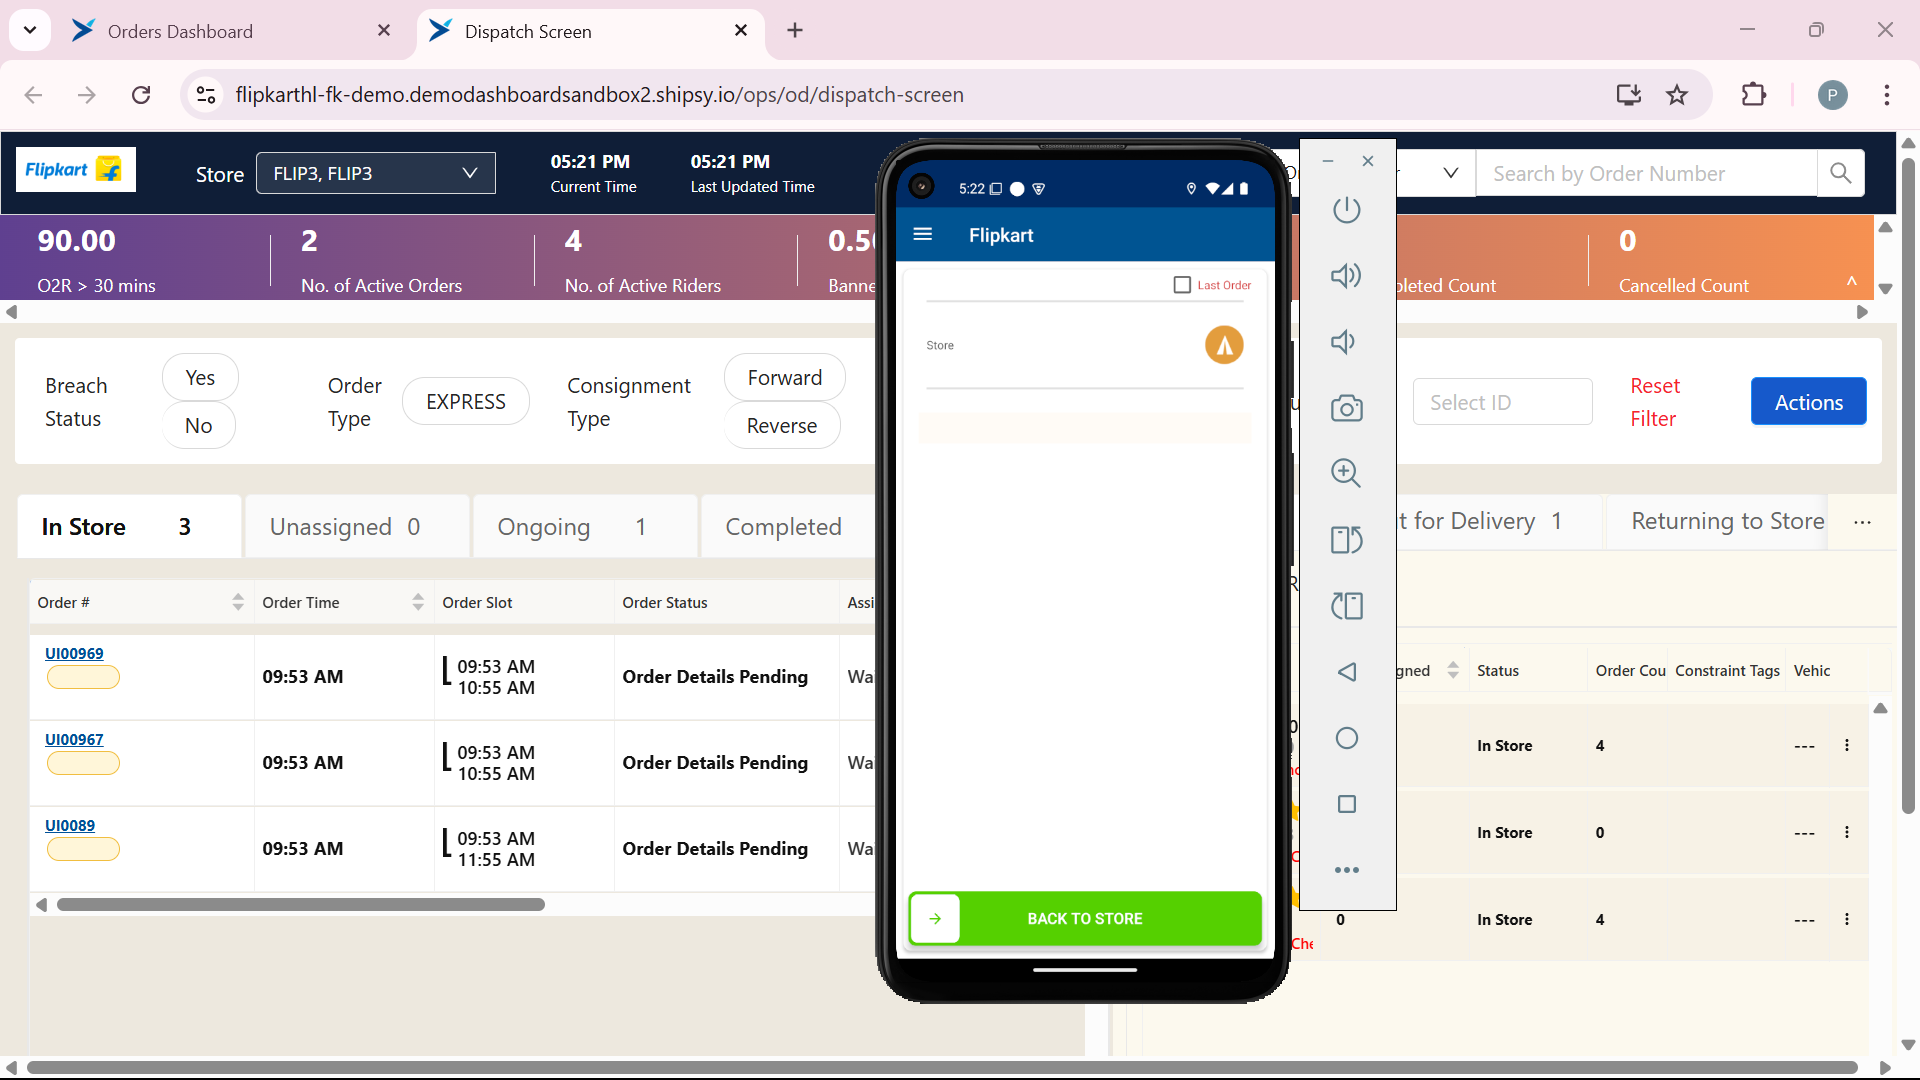
  • Key Actions: Submit the customer’s OTP, take and accept a product photo, slide "Delivered," and slide "Back to Store" after receiving your payment.

  • App Indicators: Status updates to "Delivered," then returns to the normal orders page.

  • Purpose: Verifies delivery to the correct customer, documents proof, and completes the rider’s task.


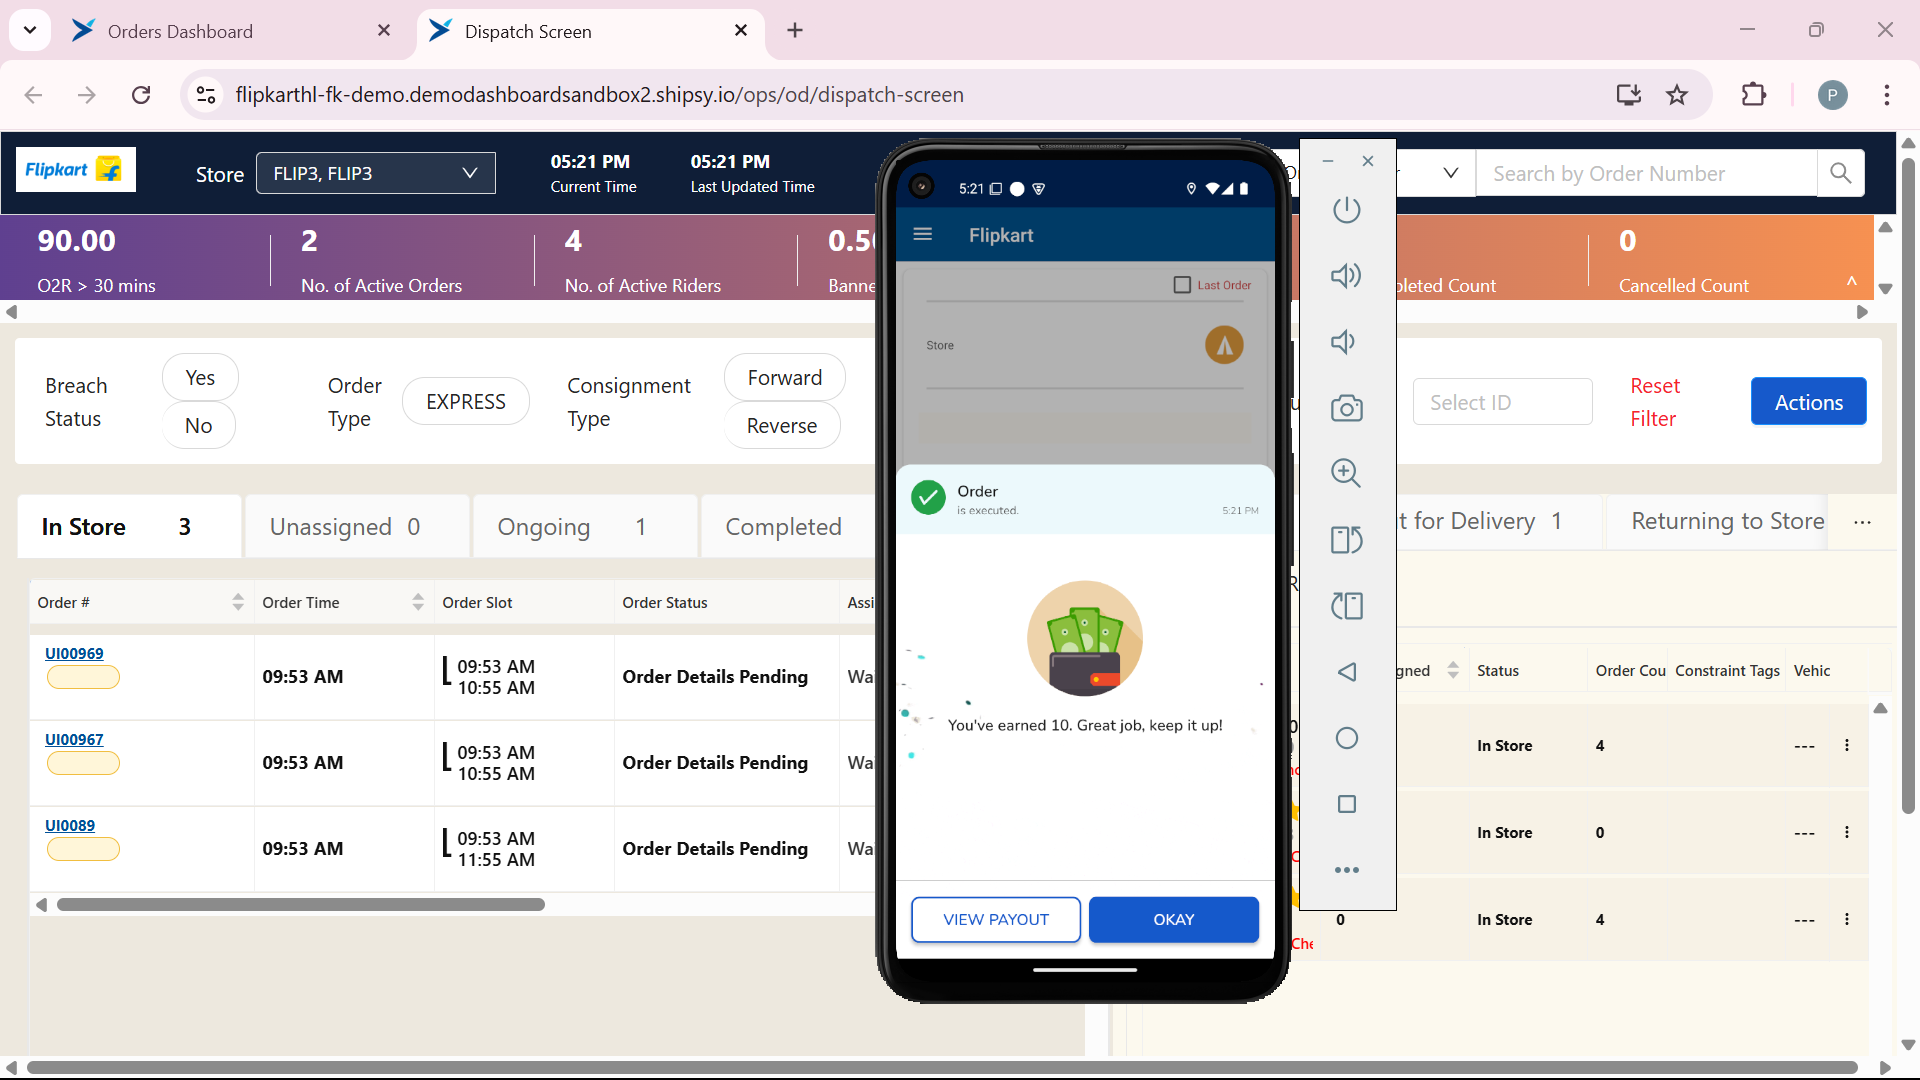
Tips for Riders

  • OBD Focus: Always inspect products for OBD orders—look for "OPENBOX" and follow verification steps.

  • App Flow: Use status sliders (e.g., "Reached Gate," "Delivered") to keep the process moving.

  • Customer Steps: Politely collect OTP and payment; ensure they’re satisfied with the product.


Process Summary

The OBD process starts with order assignment, moves through pickup and delivery, includes critical product verification and payment collection, and ends with documented completion. Each phase updates the app status, ensuring transparency and accuracy. Riders receive payment after delivery, then return to regular orders.
1
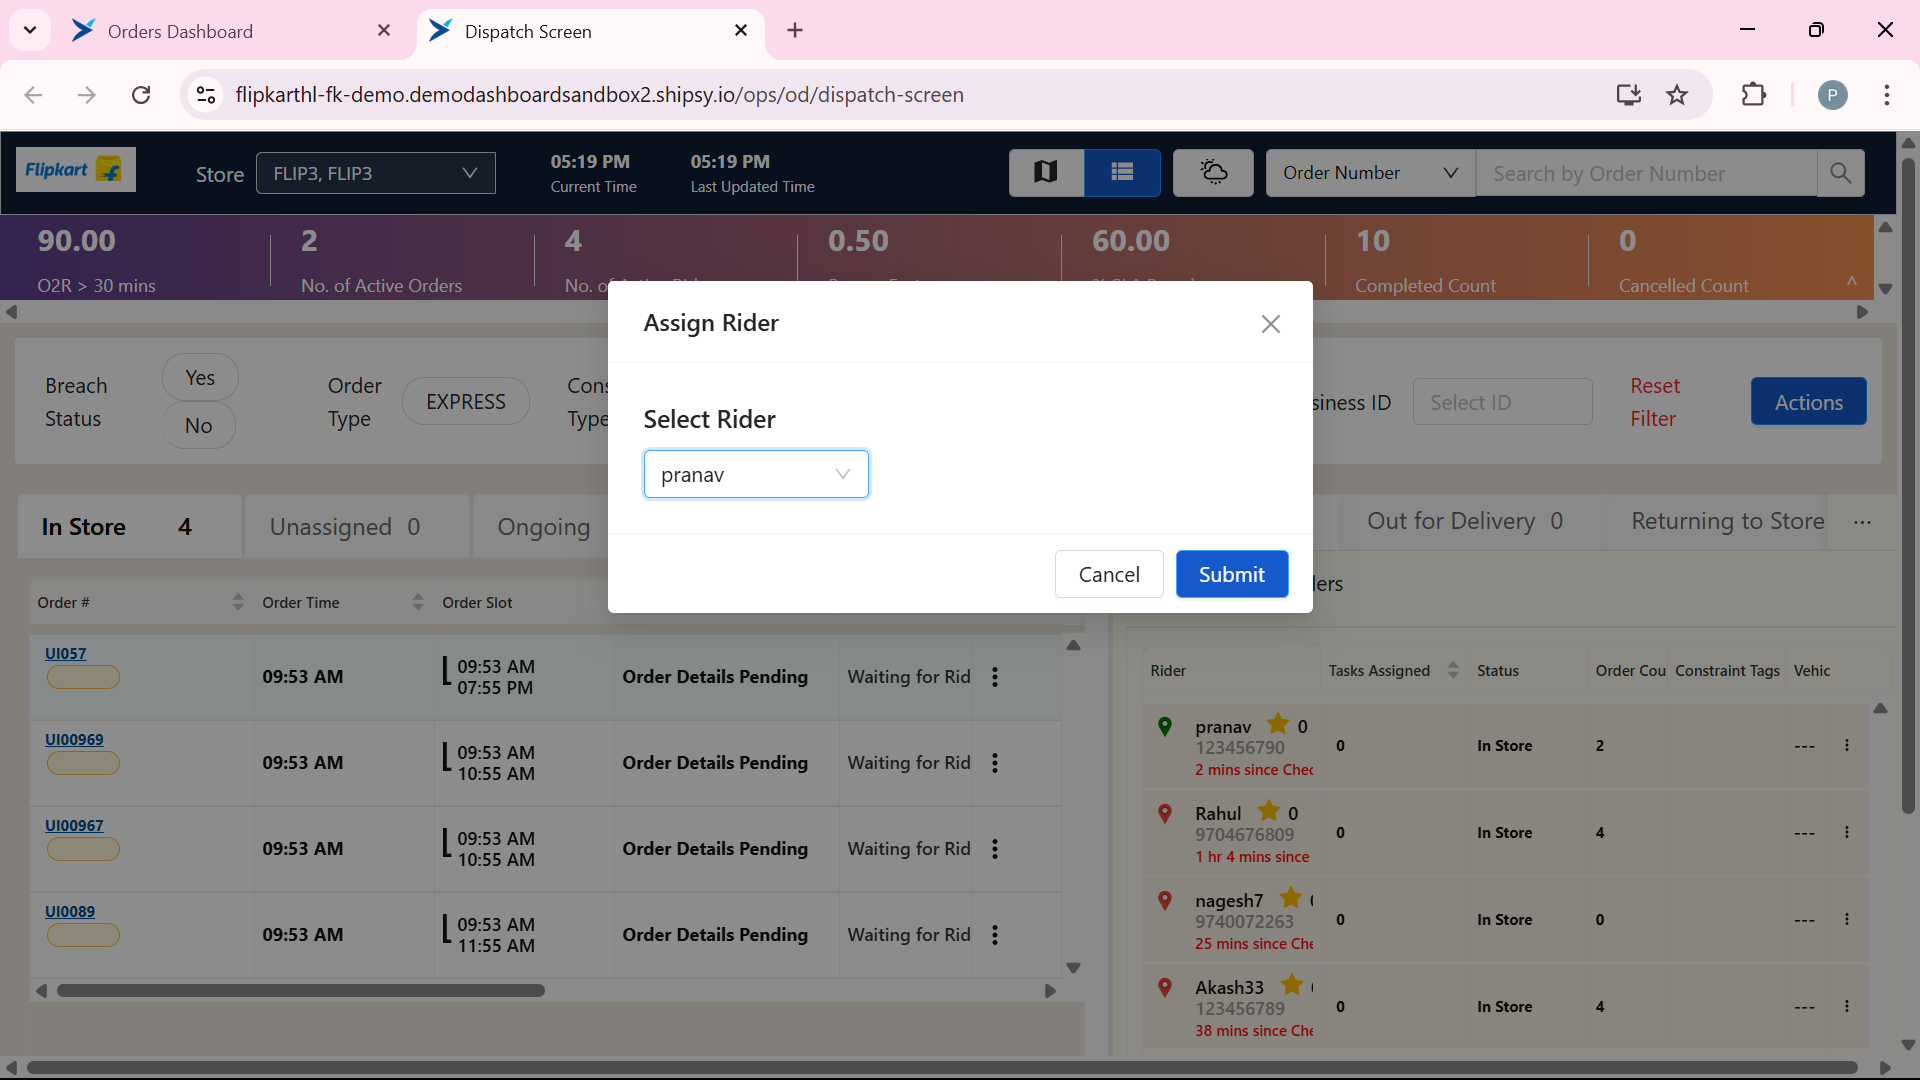
Order gets Assigned to Rider
Step #1: Order gets Assigned to Rider
2
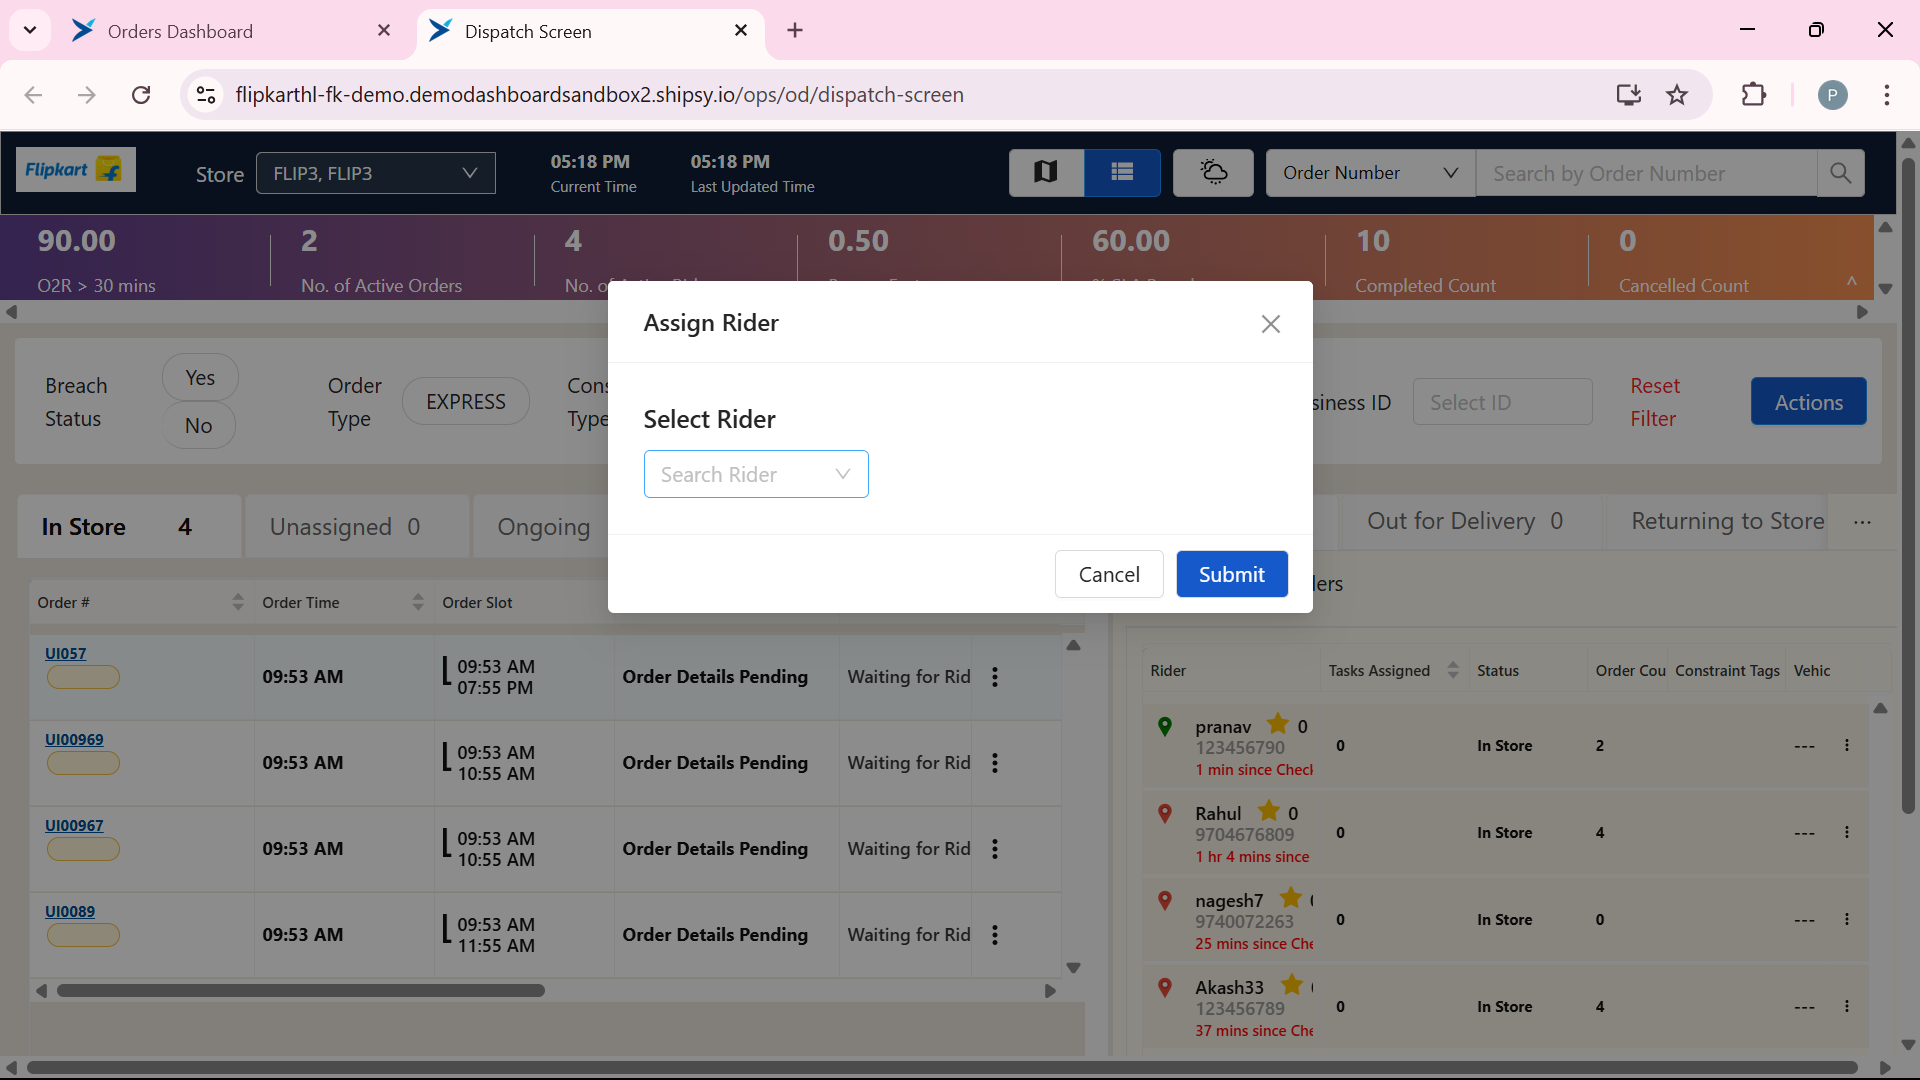
Select the rider
Step #2: Select the rider
3
Choose the rider from active riders
Step #3: Choose the rider from active riders
4
Click on Submit.
Step #4: Click on Submit.
5
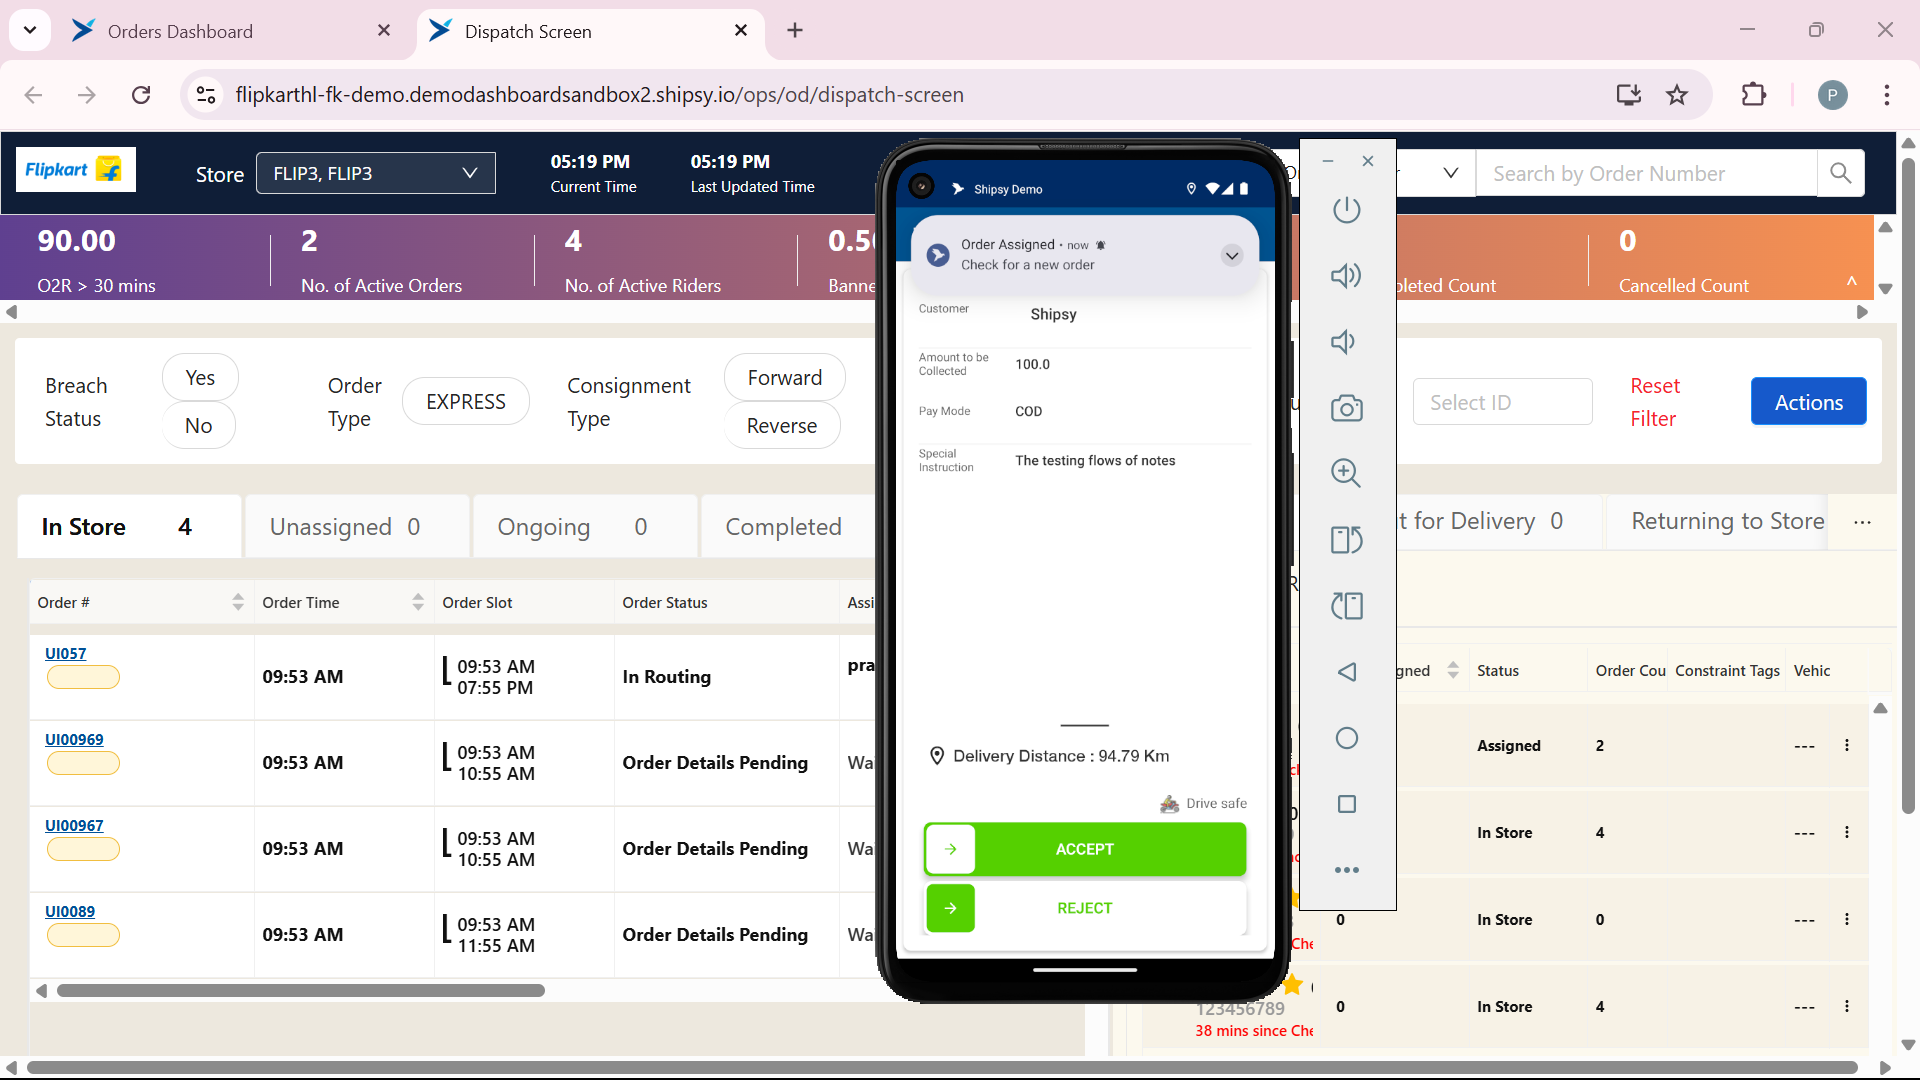
Rider gets the Order Slide the arrow to right on ACCEPT button
Step #5: Rider gets the Order Slide the arrow to right on ACCEPT  button
6
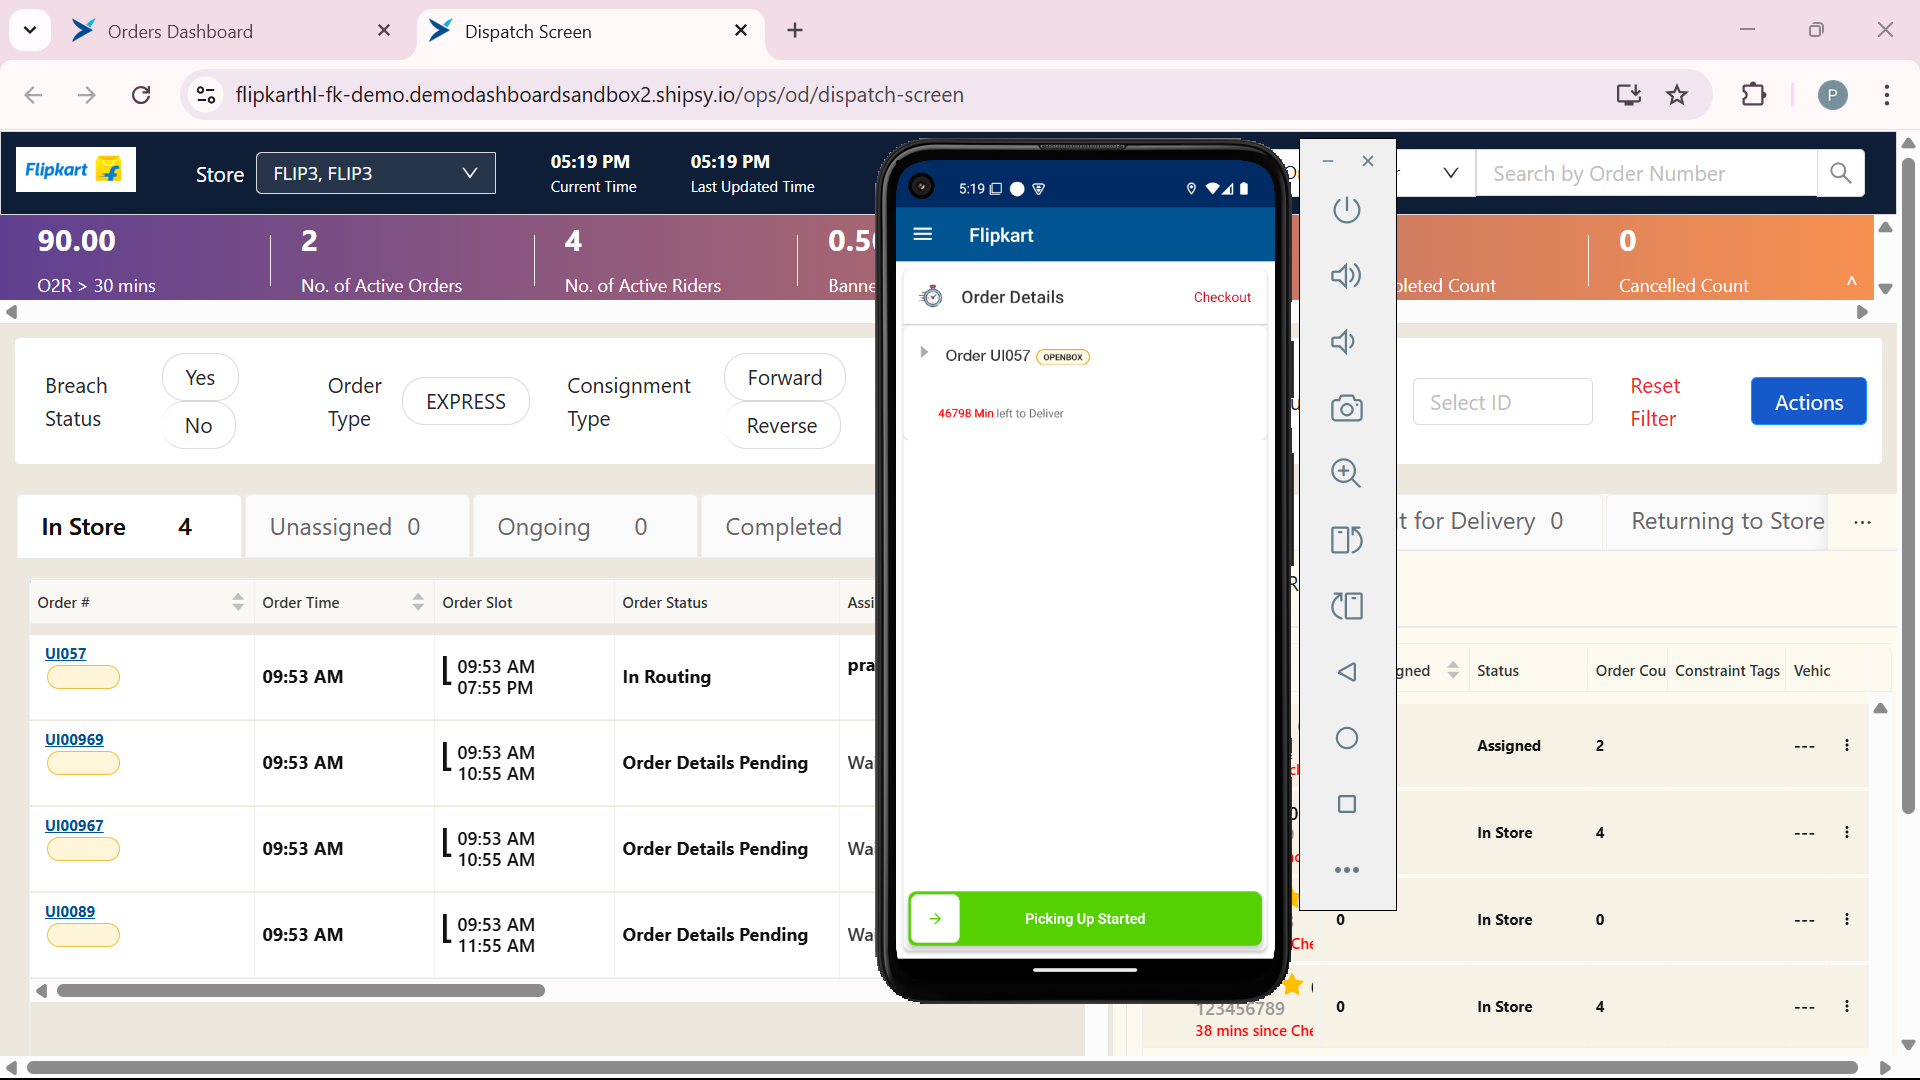
After Accepting the order Picking Up Started screen appears with order details Slide the arrow to right on Picking Up Started. You can see the order type If it is OBD then it shows OPENBOX with order id.
Step #6: After Accepting the order Picking Up Started screen appears with order details Slide the arrow to right on Picking Up Started. You can see the order type If it is OBD then it shows OPENBOX with order id.
7
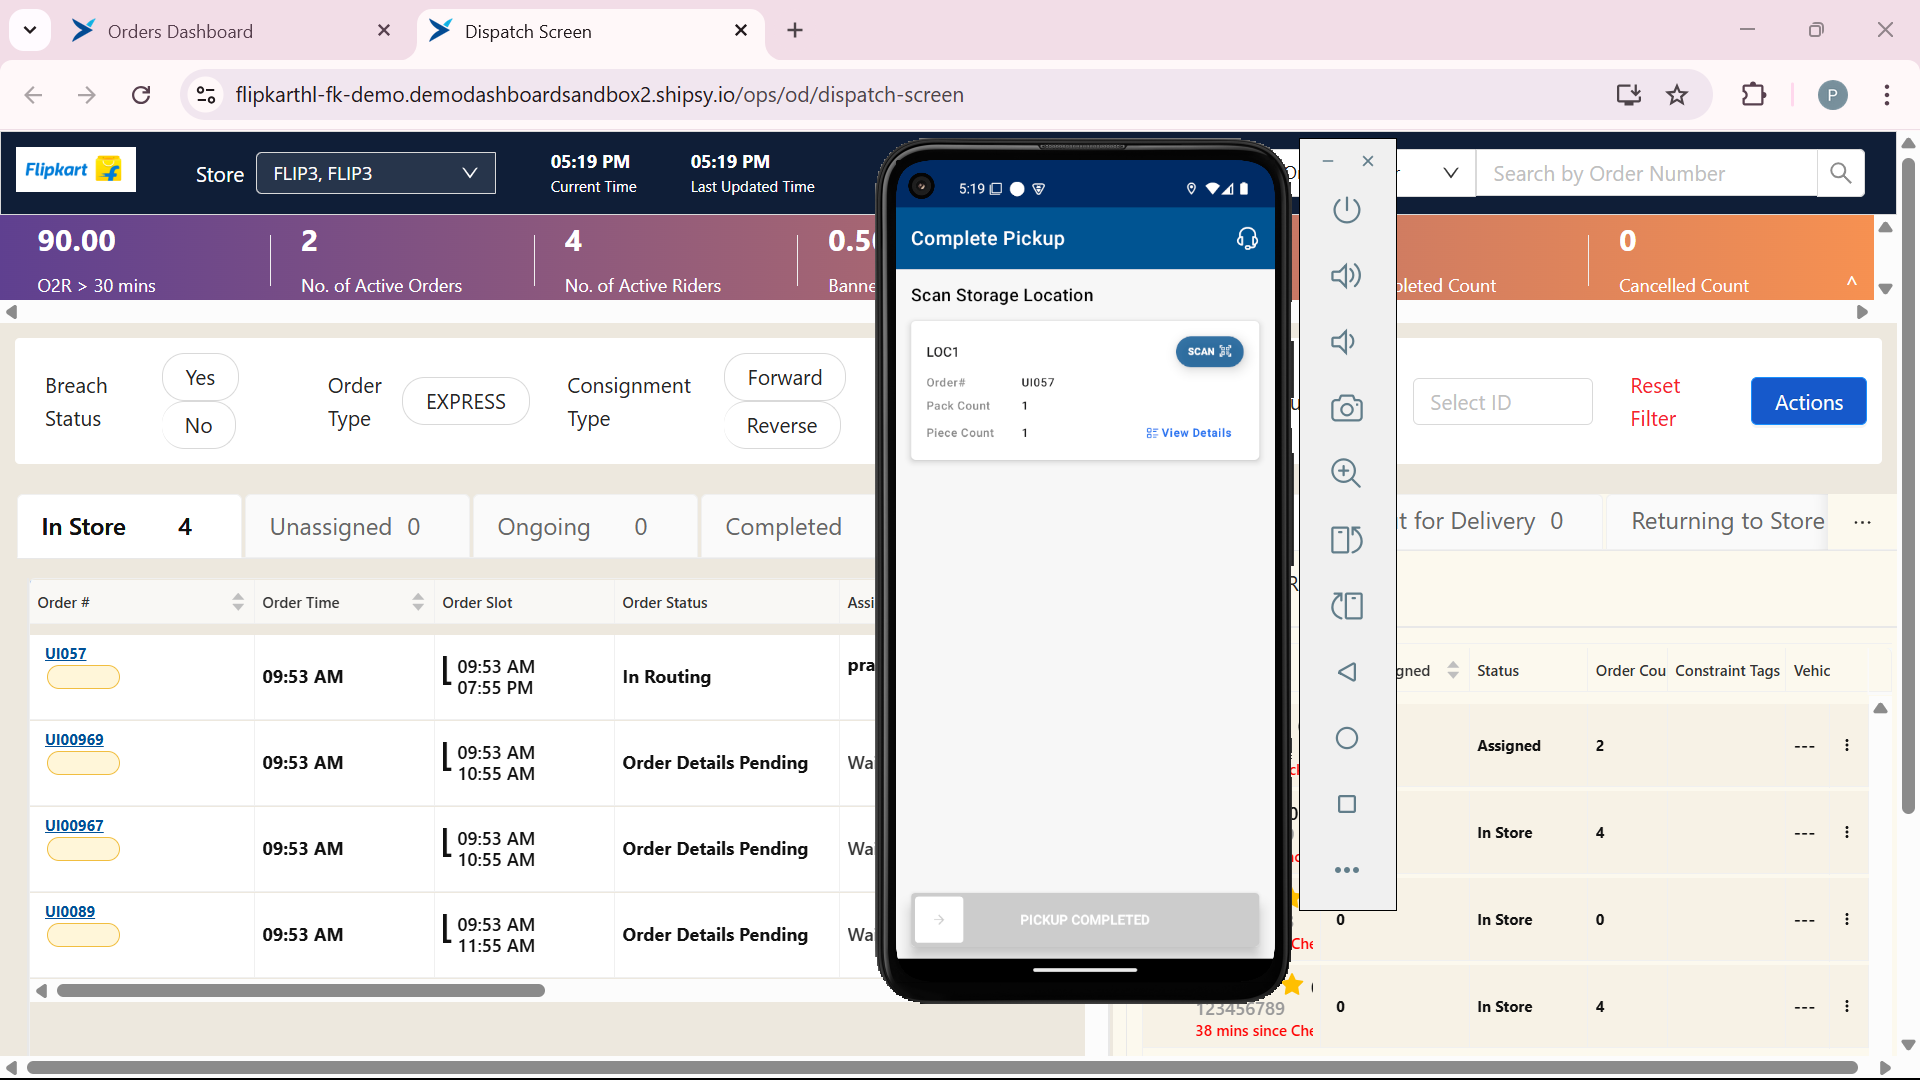
Click on "SCAN"
Step #7: Click on "SCAN"
8
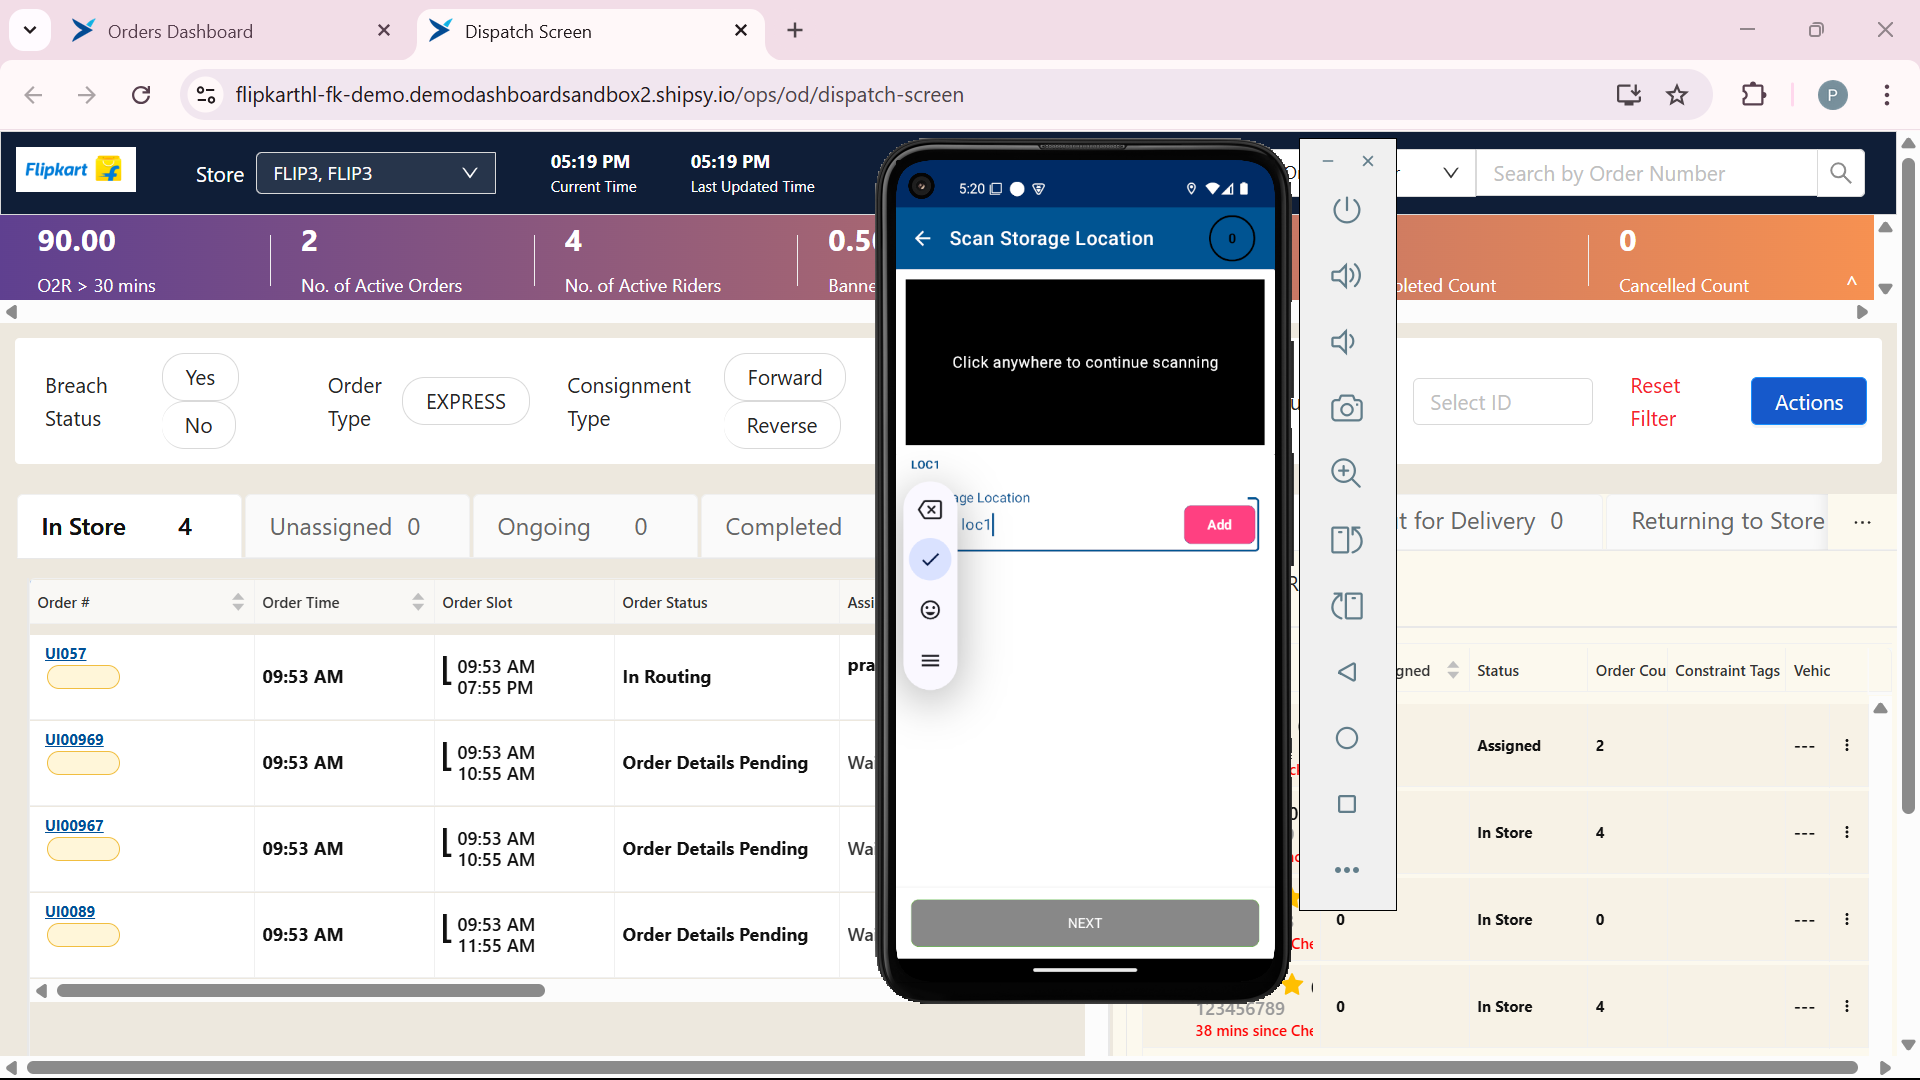
Type the location name and Click on "Add" to add the location
Step #8: Type the location name and Click on "Add" to add the location
9
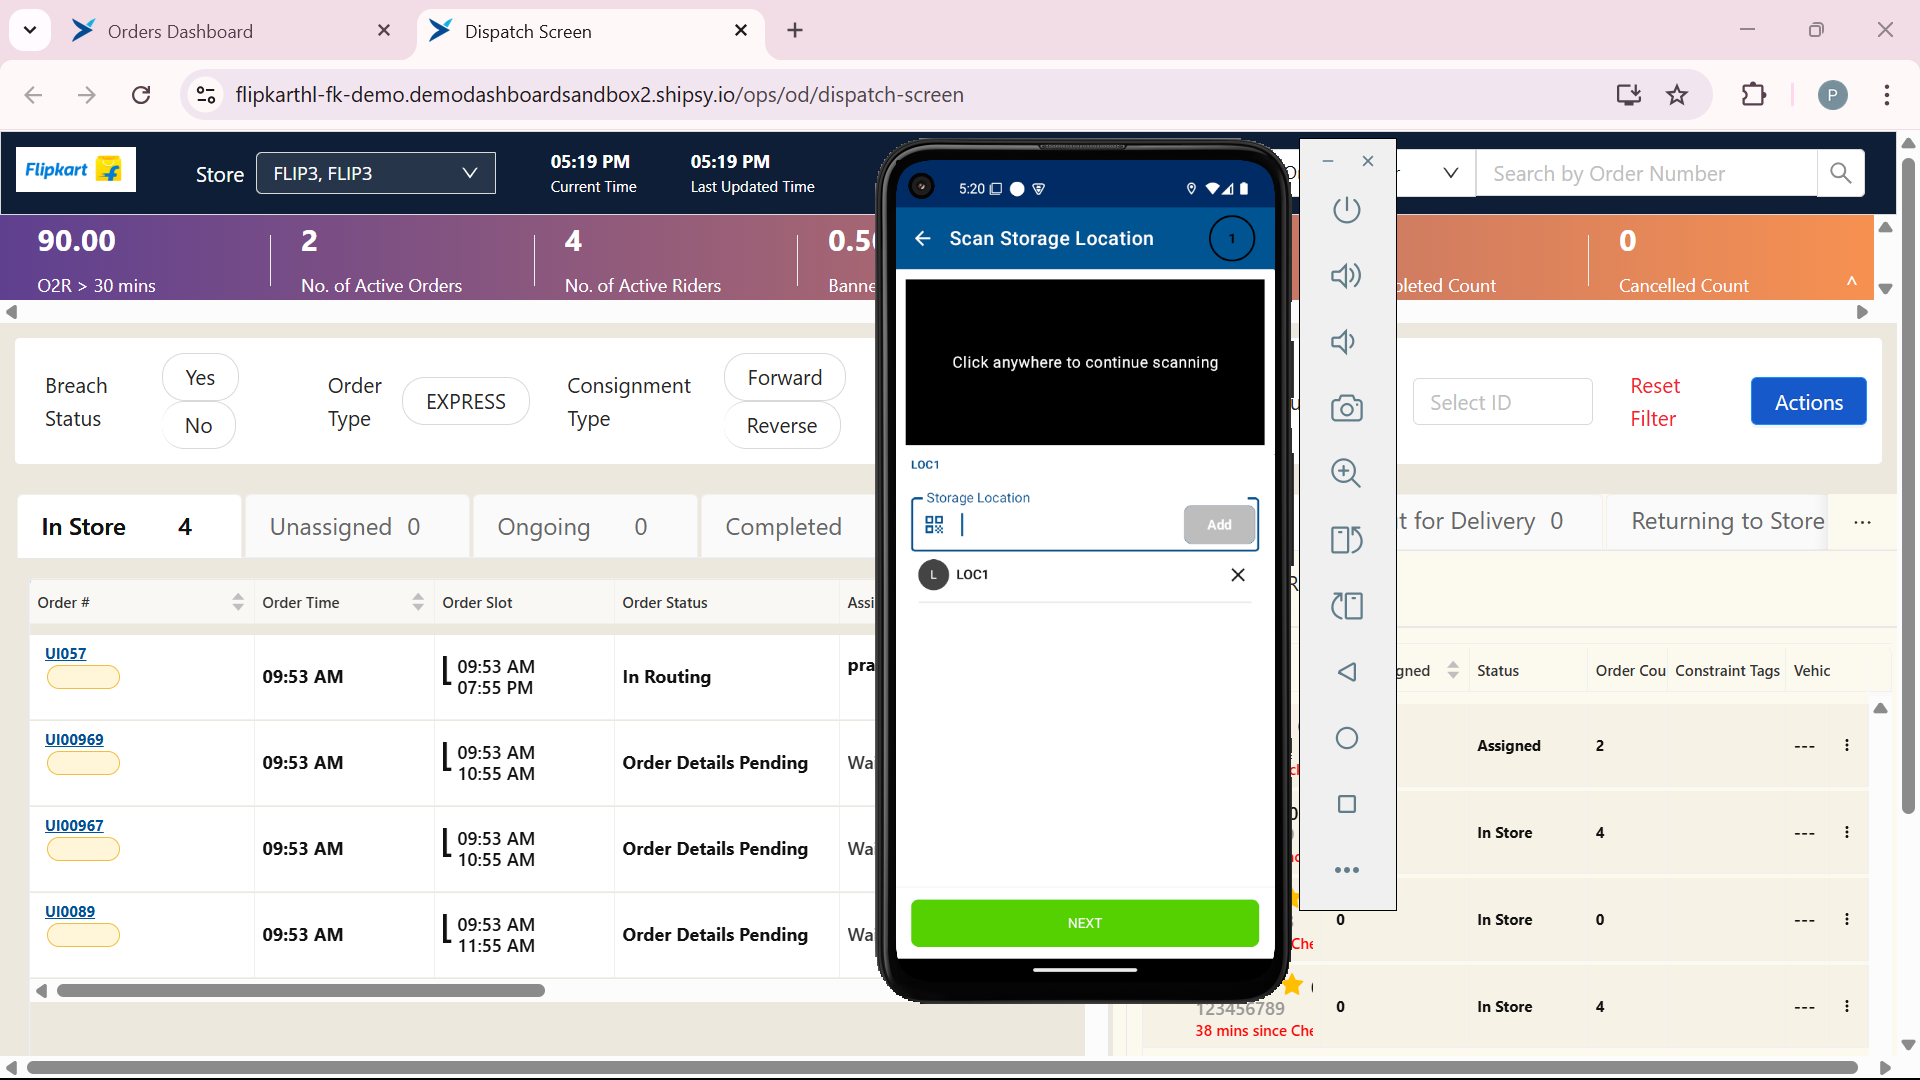
After Adding the location click on next
Step #9: After Adding the location click on next
10
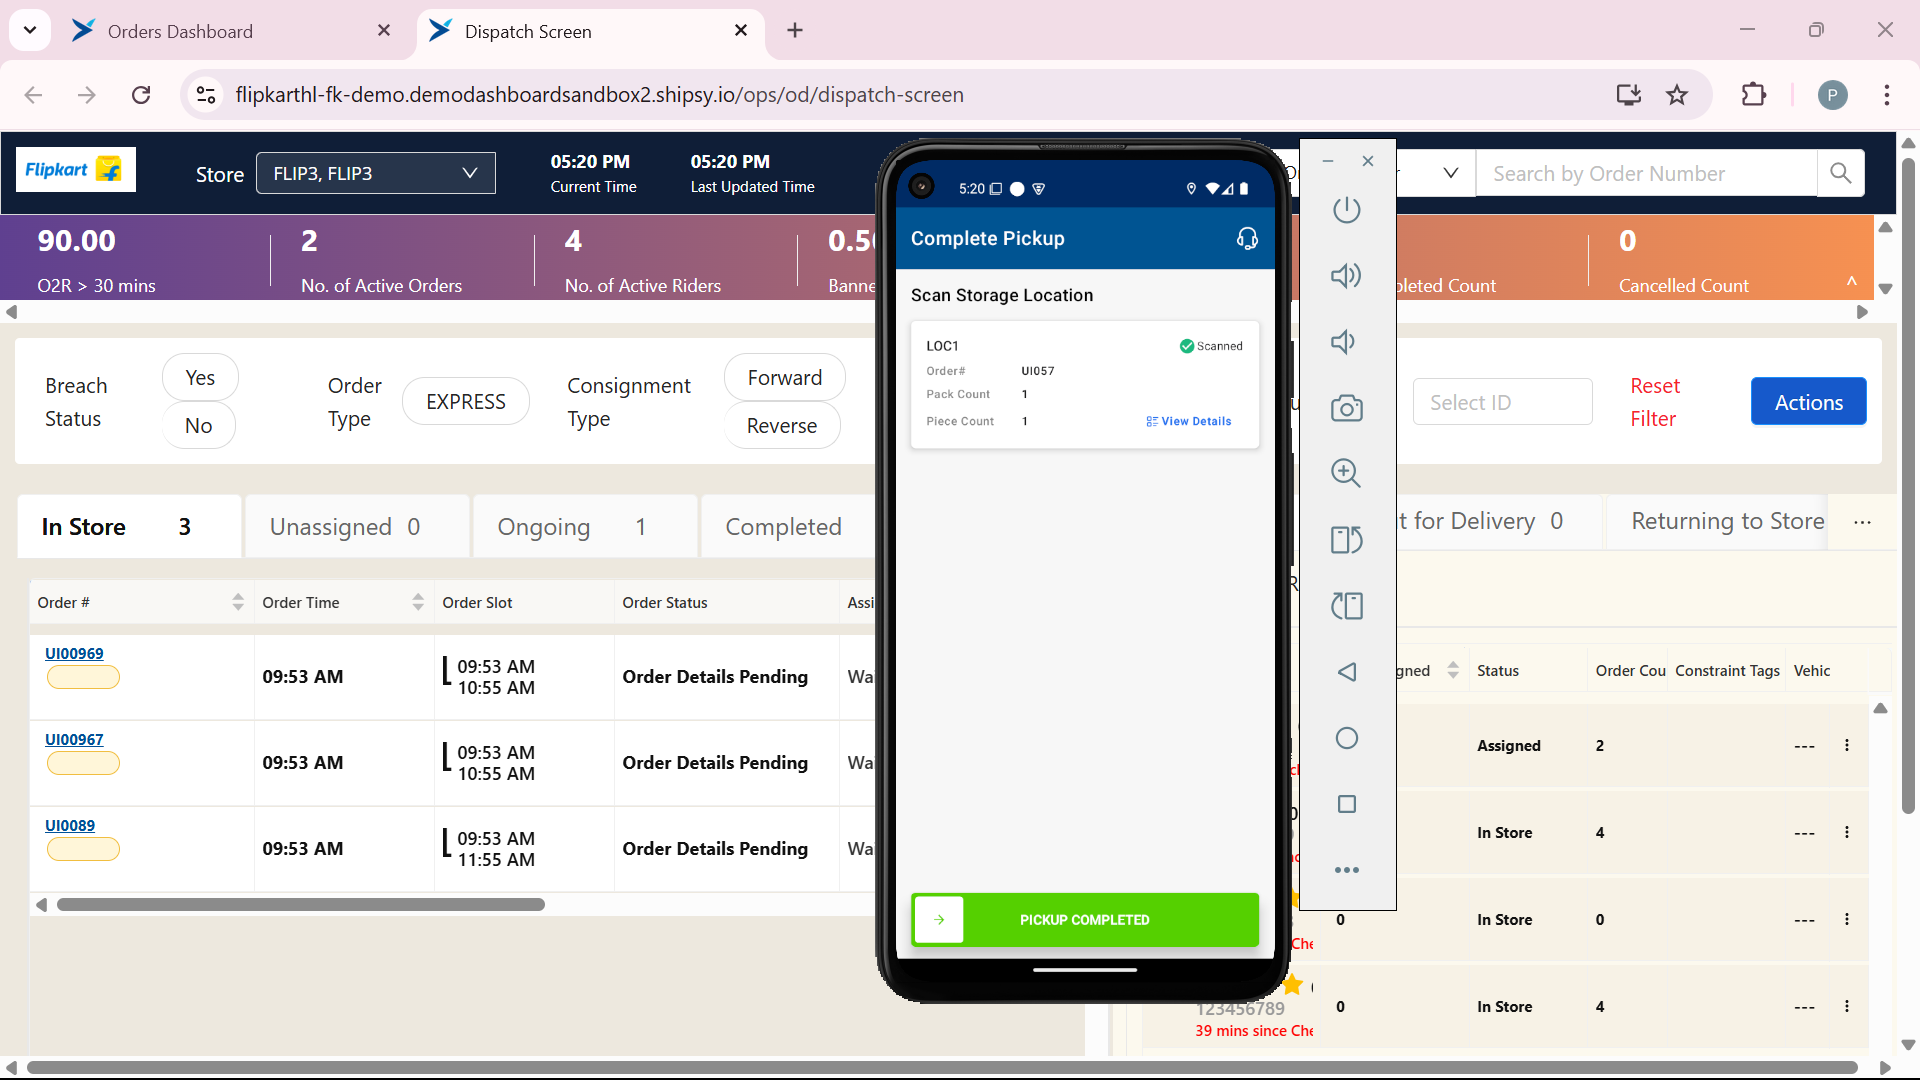
After adding the location completed the picking up the items pickup completed screen will appear. Slide the arrow to right on PICKUP COMPLETED. This will updated the rider status from picking up started to pickup completed
Step #10: After adding the location completed the picking up the items pickup completed screen will appear. Slide the arrow to right on PICKUP COMPLETED. This will updated the rider status from picking up started to pickup completed
11
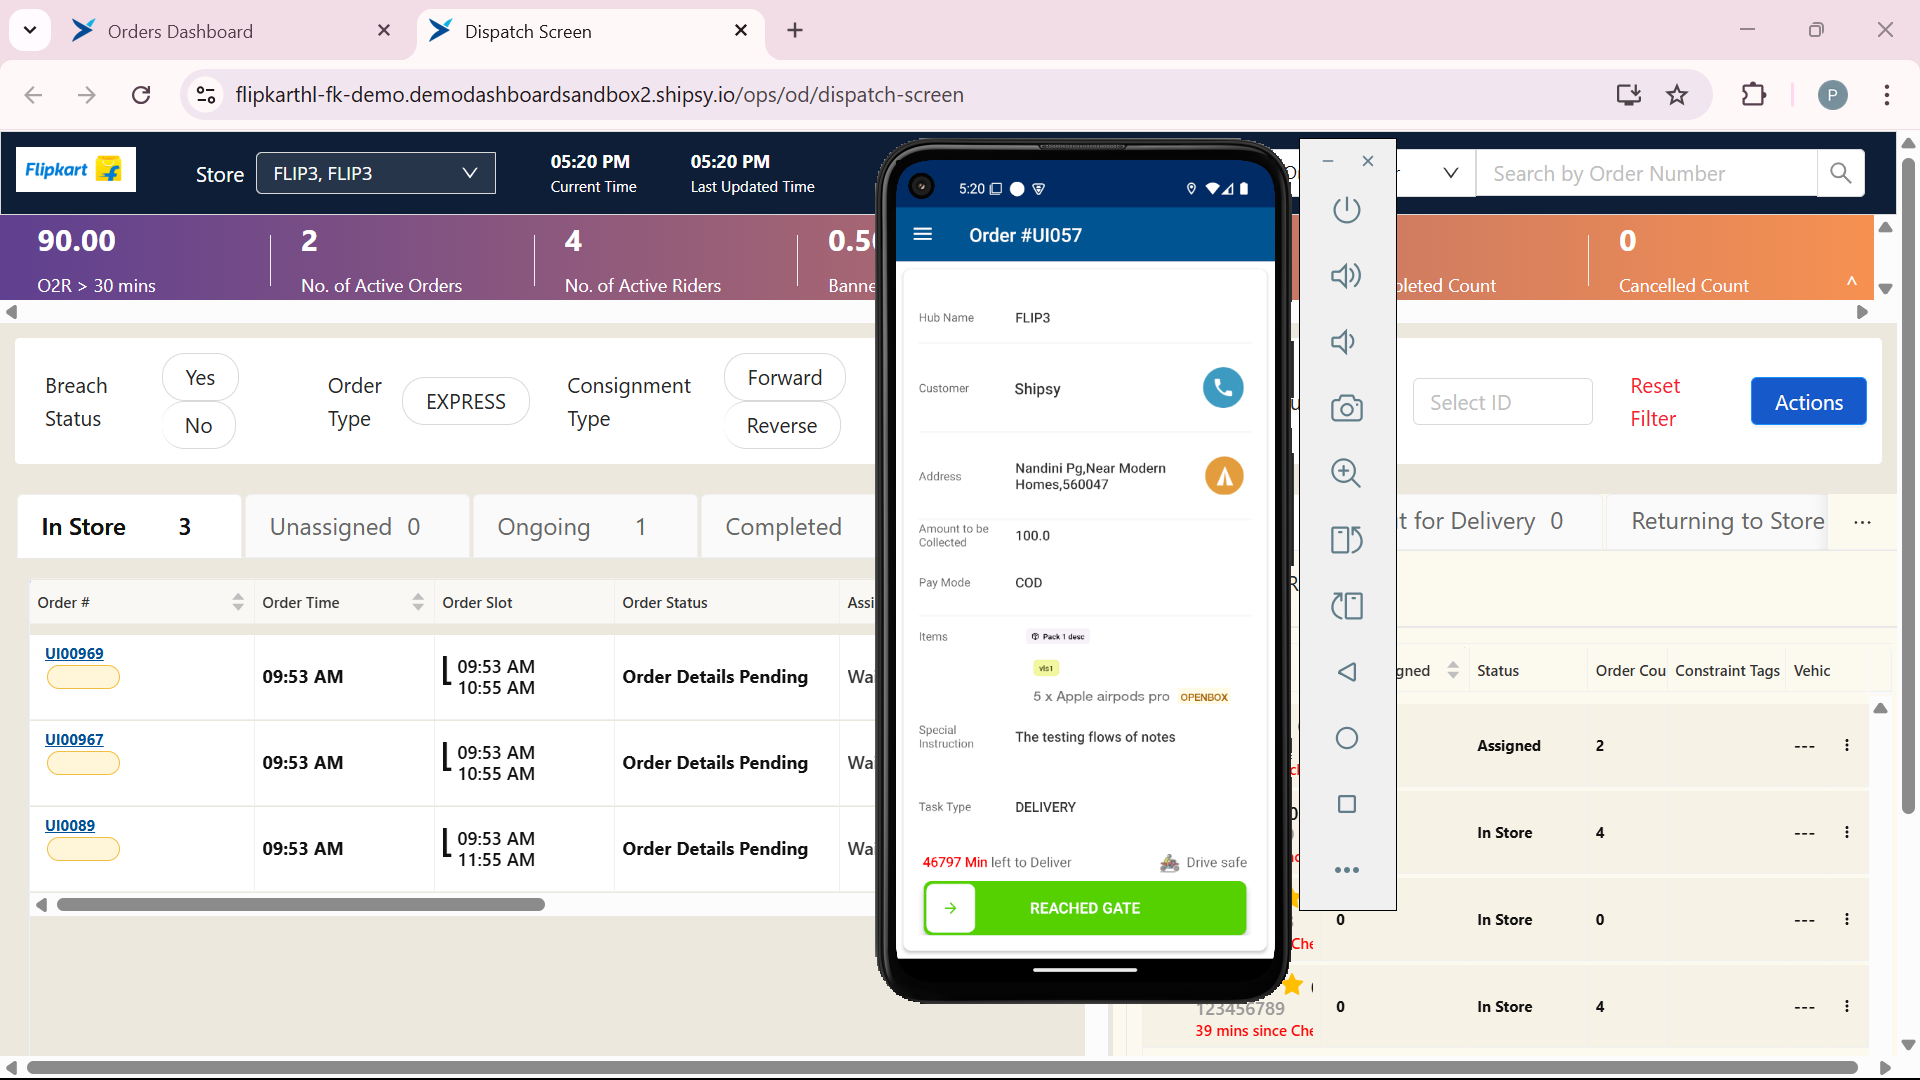
Rider reaches the customer location. Slide the arrow to right on REACHED GATE. This will update the rider status to reached gate from pickup completed
Step #11: Rider reaches the customer location. Slide the arrow to right on REACHED GATE. This will update the rider status to reached gate from pickup completed
12
You can see type of order OBC or NON-OBC. Slide the arrow to right
Step #12: You can see type of order OBC or NON-OBC. Slide the arrow to right
13
Check how many products are available. Click on next
Step #13: Check how many products are available. Click on next
14
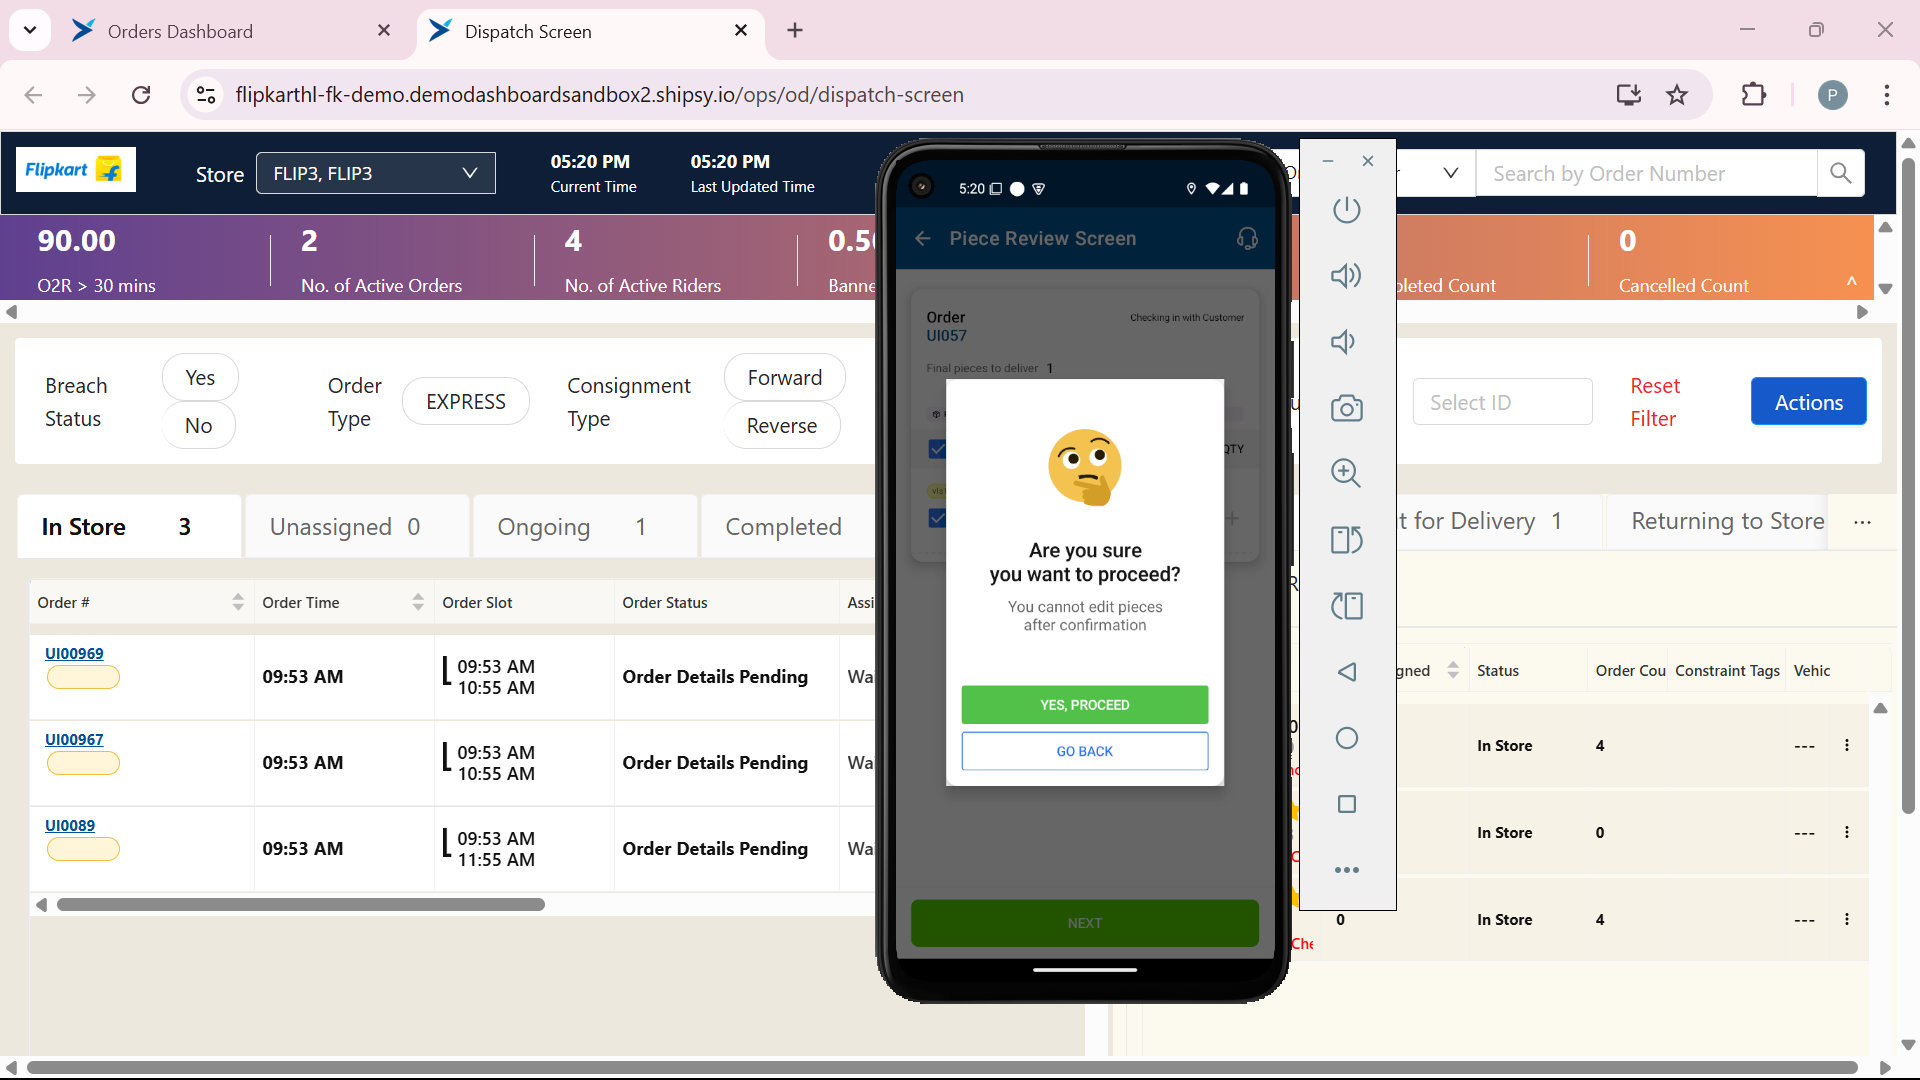
Click on "YES, PROCEED" after confirming to proceed further
Step #14: Click on "YES, PROCEED" after confirming to proceed further
15
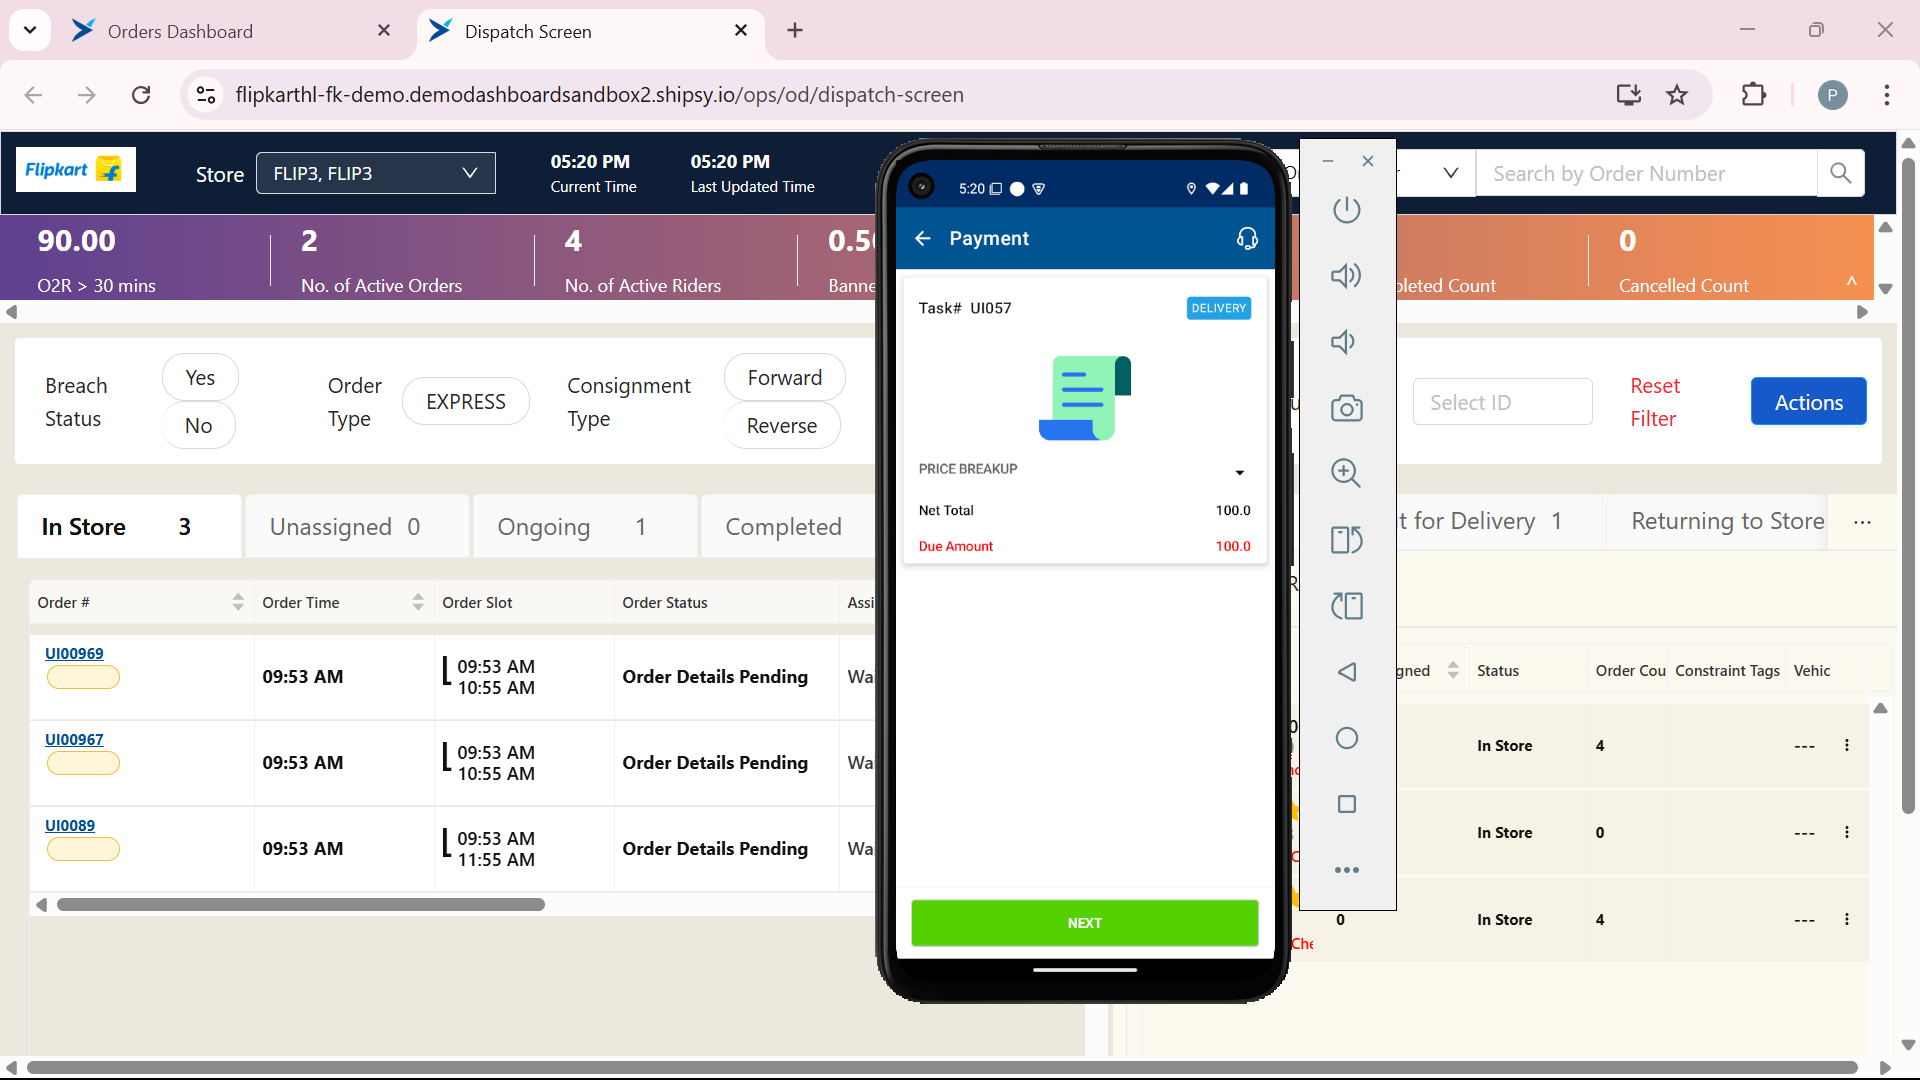
Click on Next to proceed with payment process
Step #15: Click on Next to proceed with payment process
16
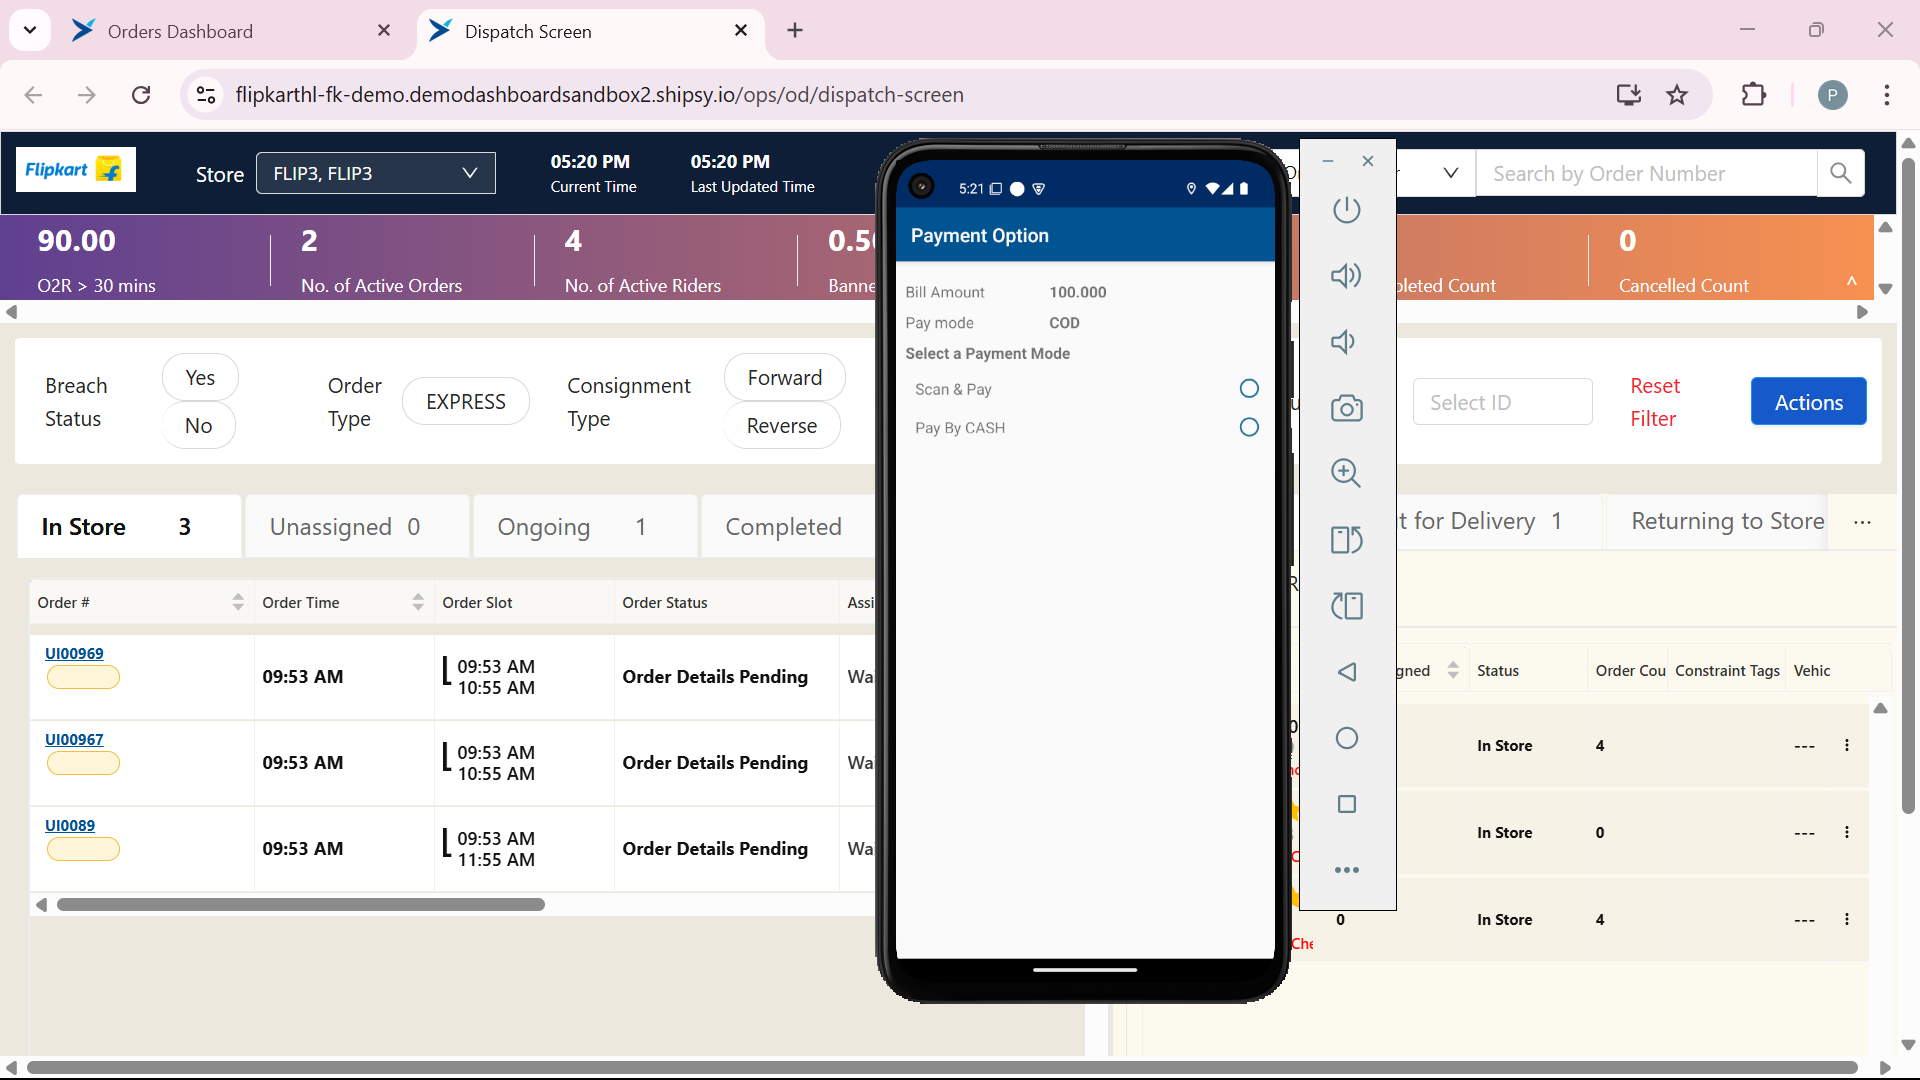
Select the payment method.
Step #16: Select the payment method.
17
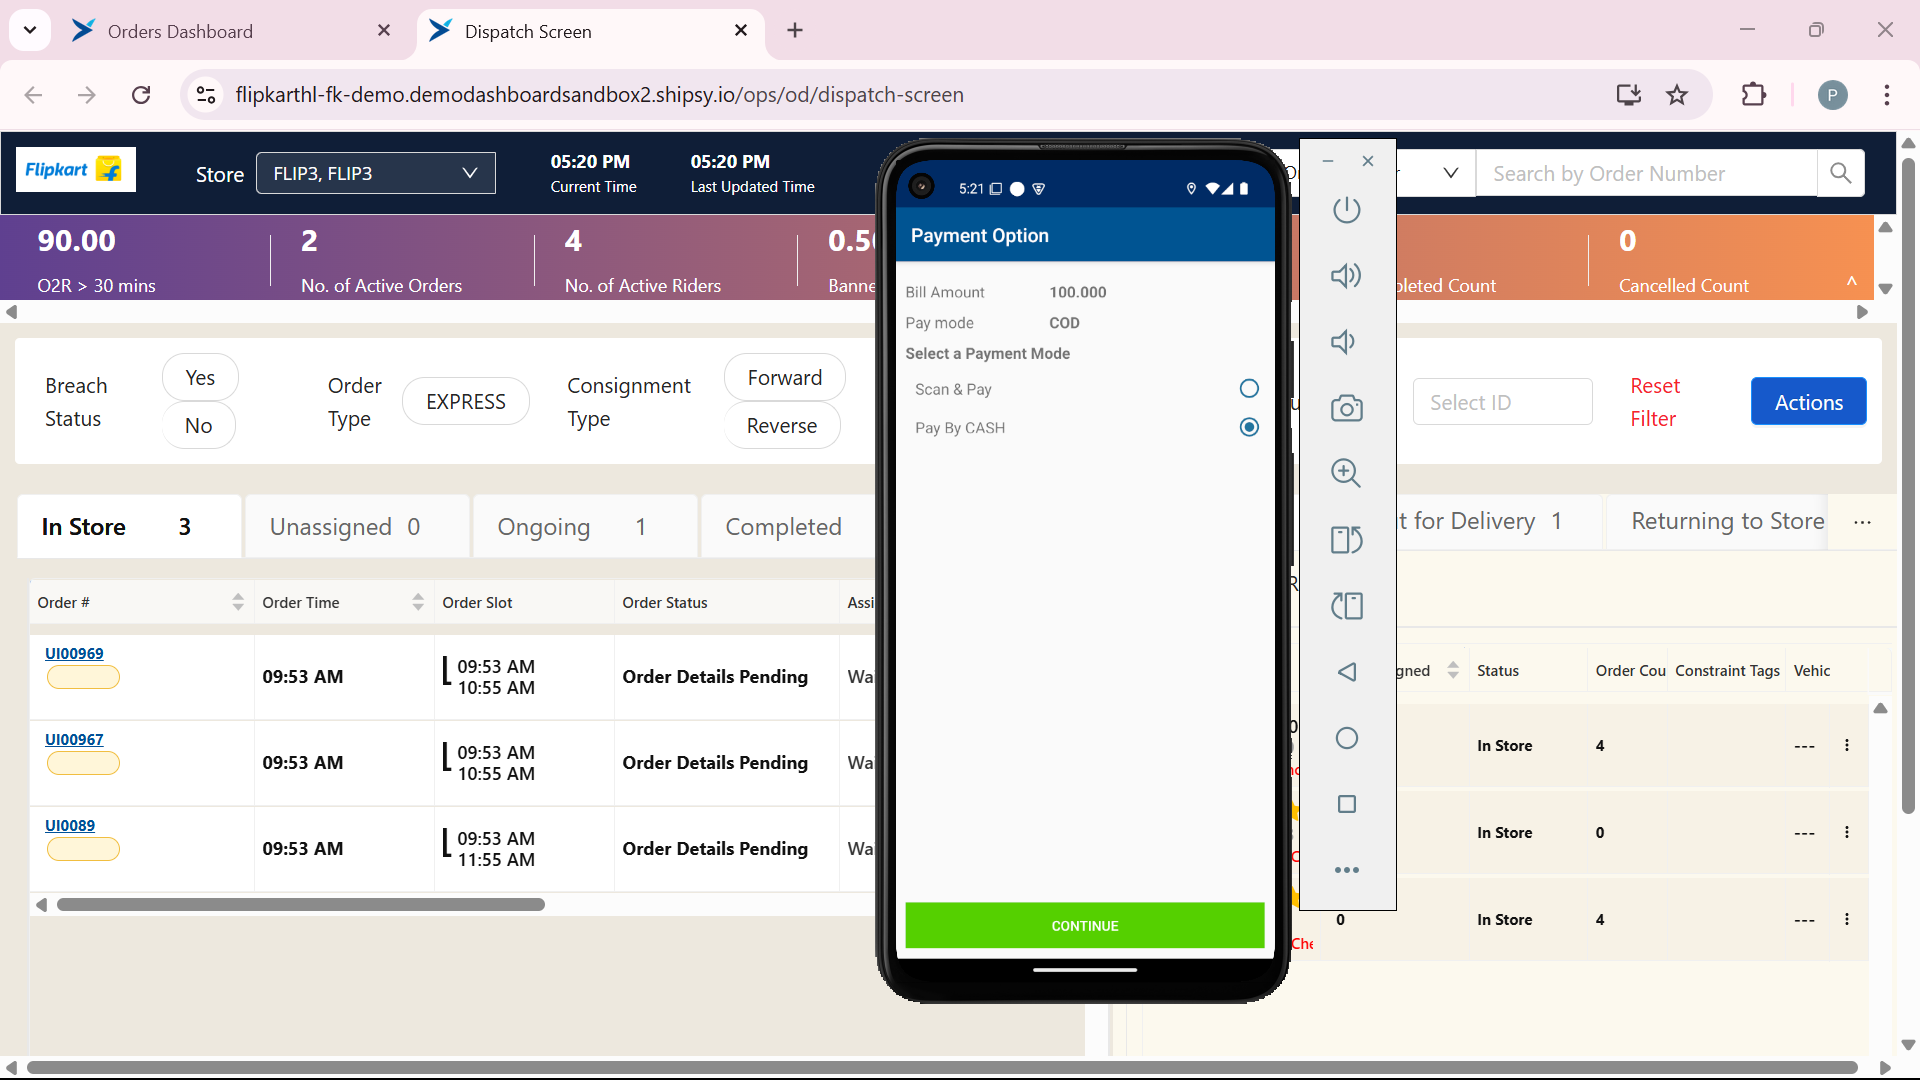
Click on "CONTINUE". After selecting the payment mode
Step #17: Click on "CONTINUE". After selecting the payment mode
18
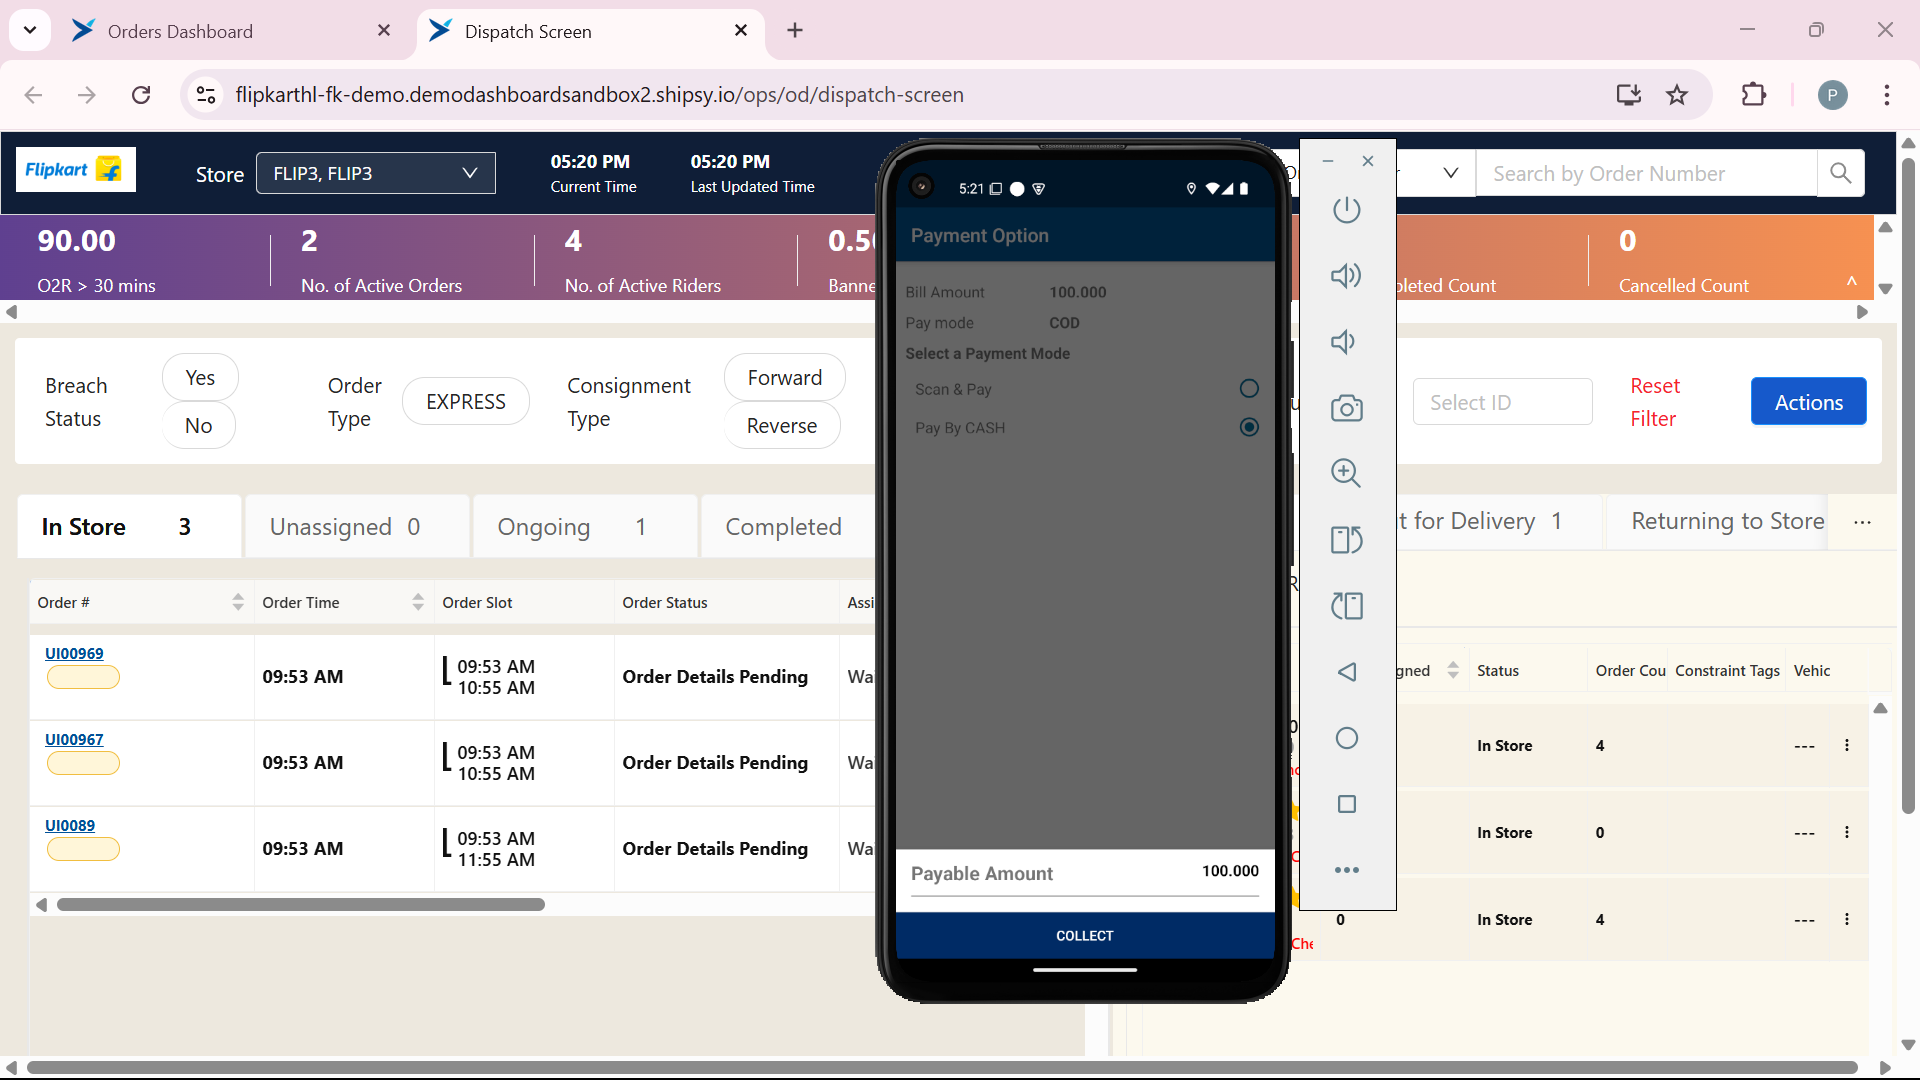
Click on "COLLECT". to collect the amount from the customer.
Step #18: Click on "COLLECT". to collect the amount from the customer.
19
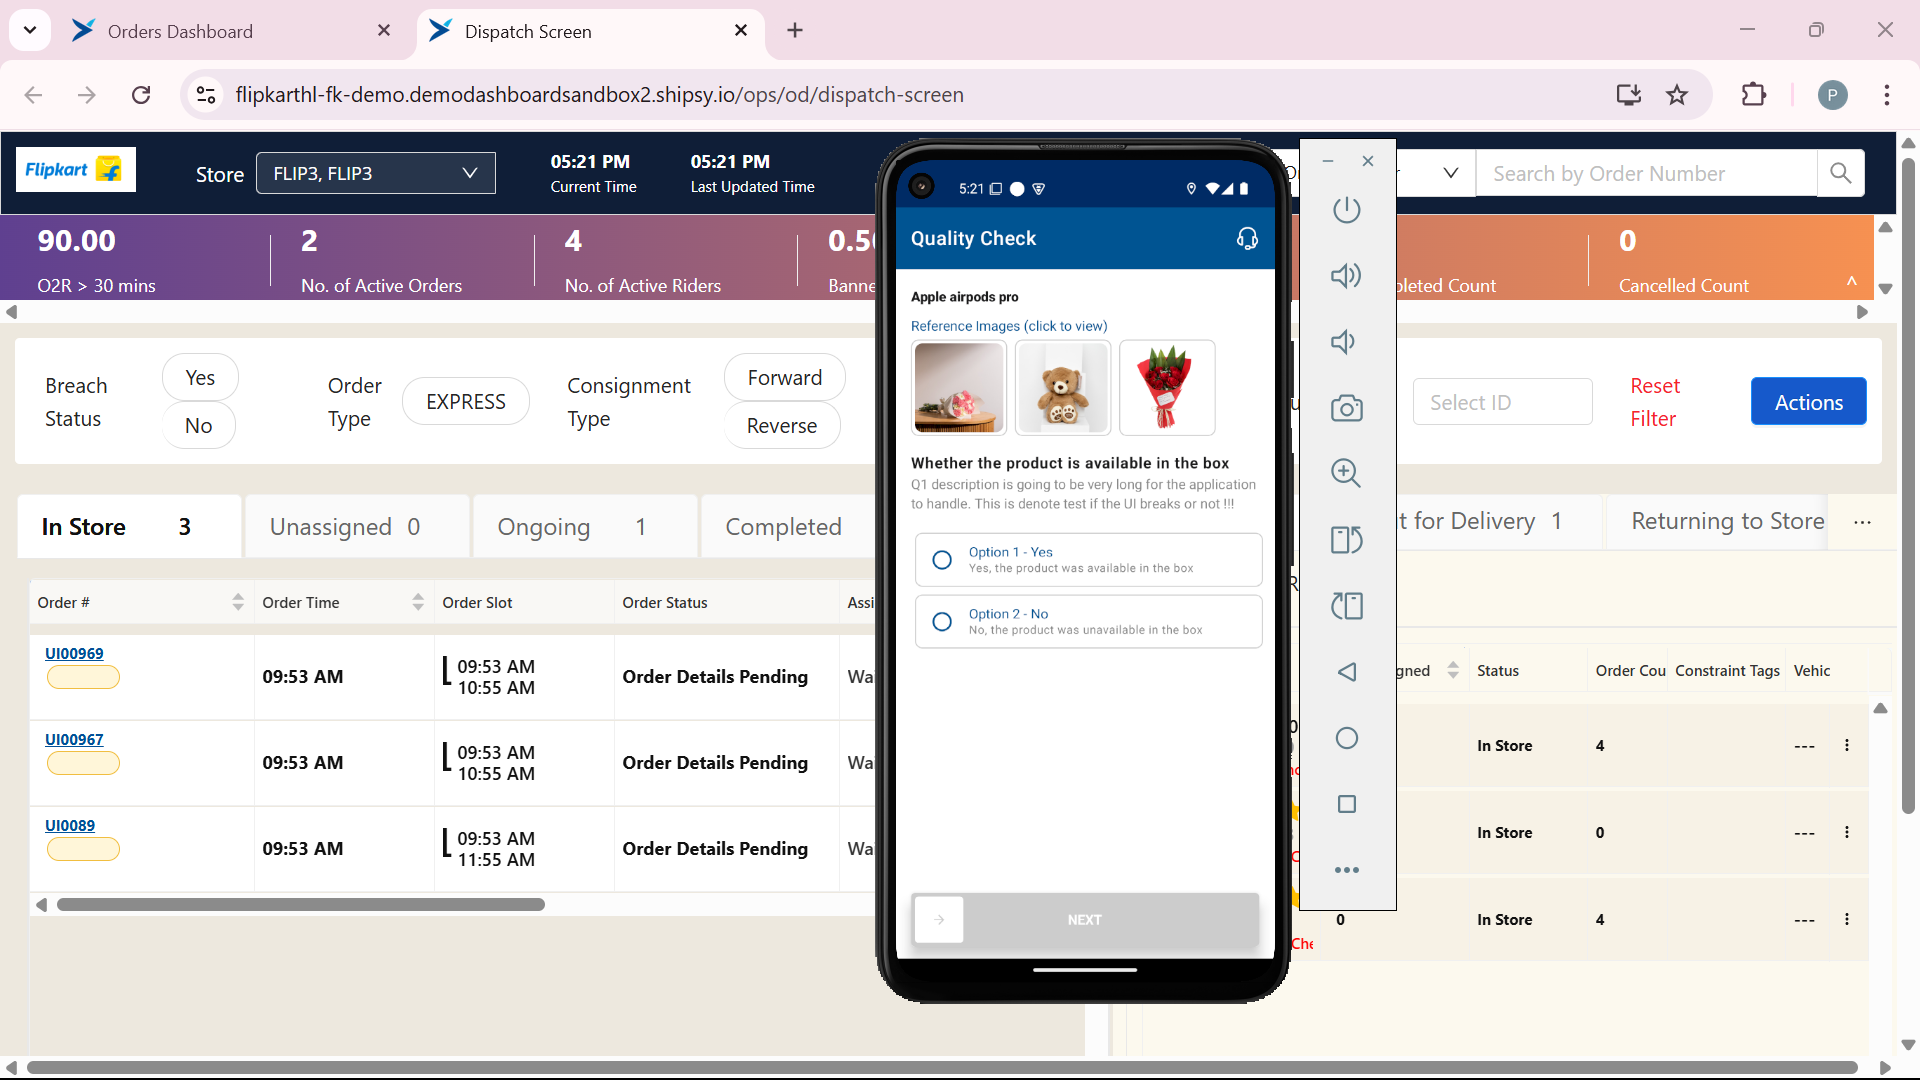
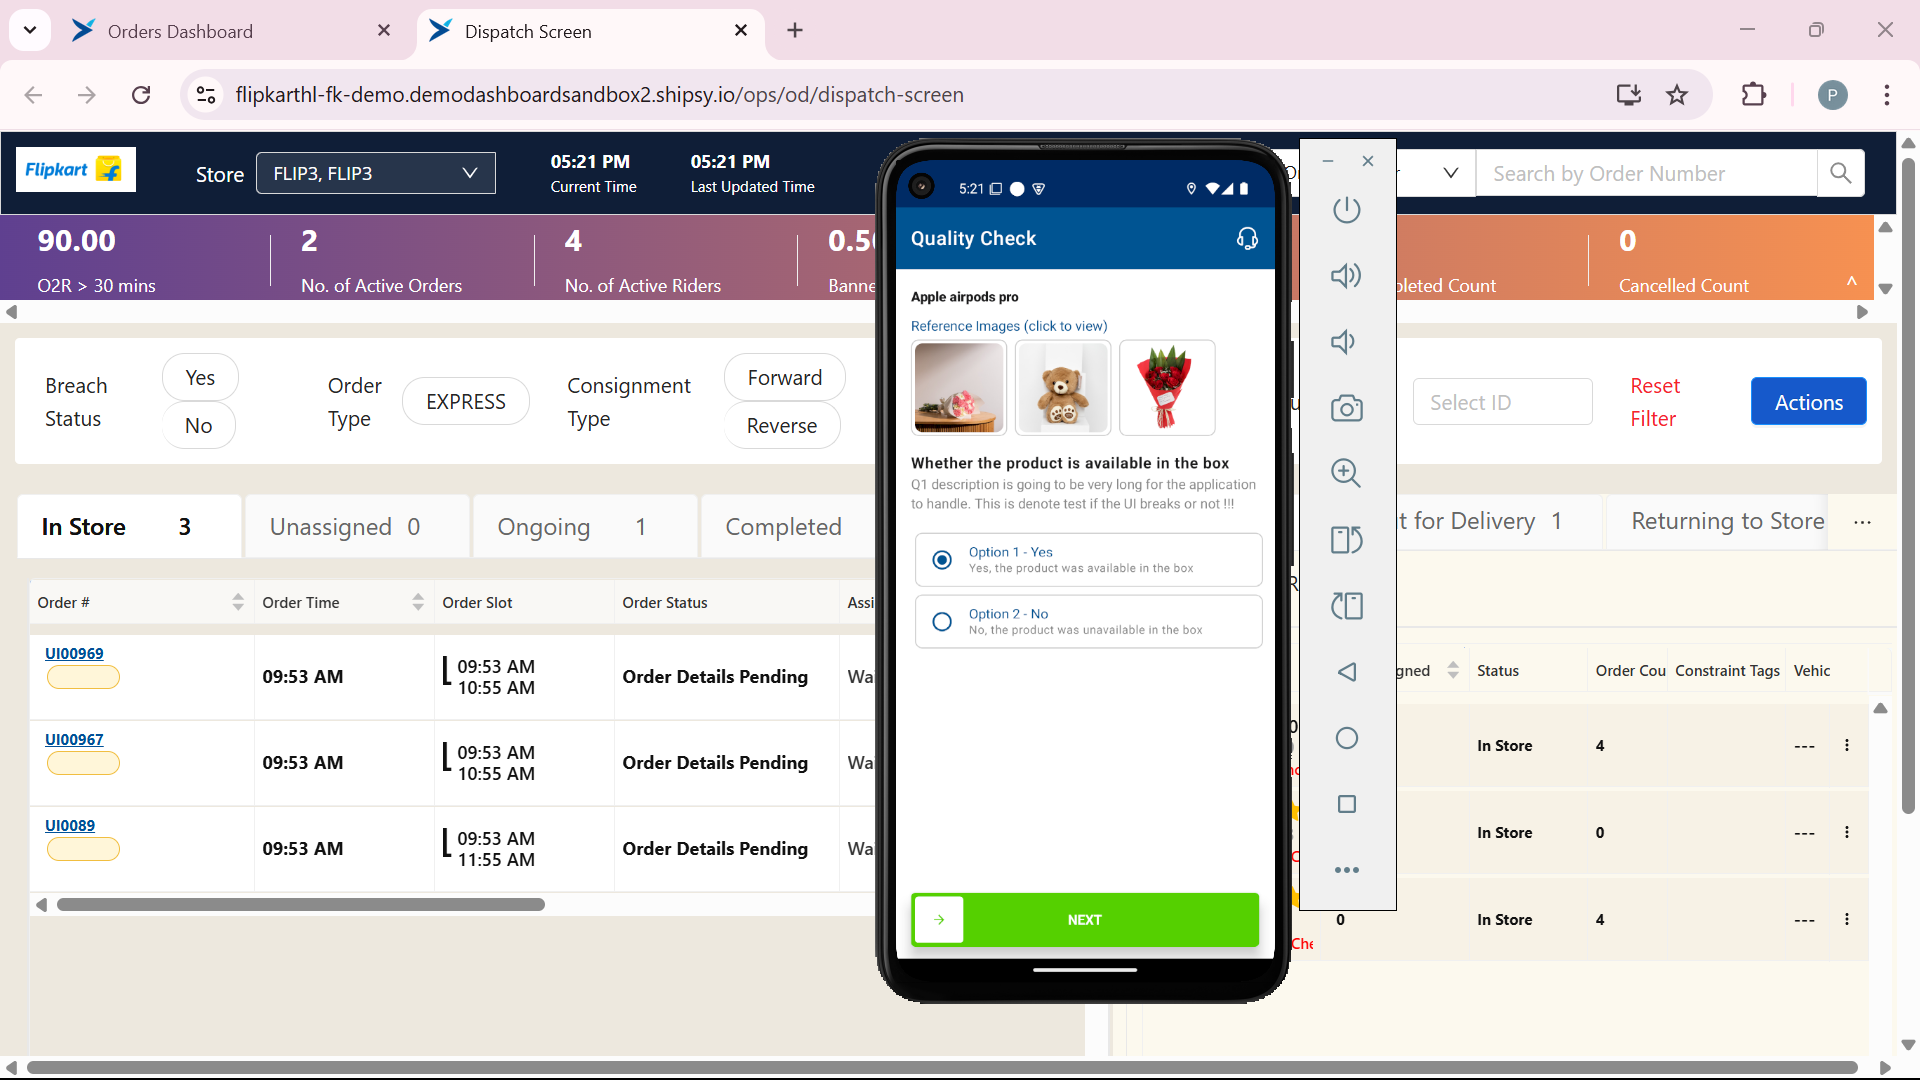
After collecting the amount from the customer. The Quantity Check will take place to check the is the product is good or not. Choose the option according to the product if product is available in the box then choose yes otherwise no.
Step #19: After collecting the amount from the customer. The Quantity Check will take place to check the is the product is good or not. Choose the option according to the product if product is available in the box then choose yes otherwise no.
20
Slide the arrow to right on Next to proceed to next step.
Step #20: Slide the arrow to right on Next to proceed to next step.
21
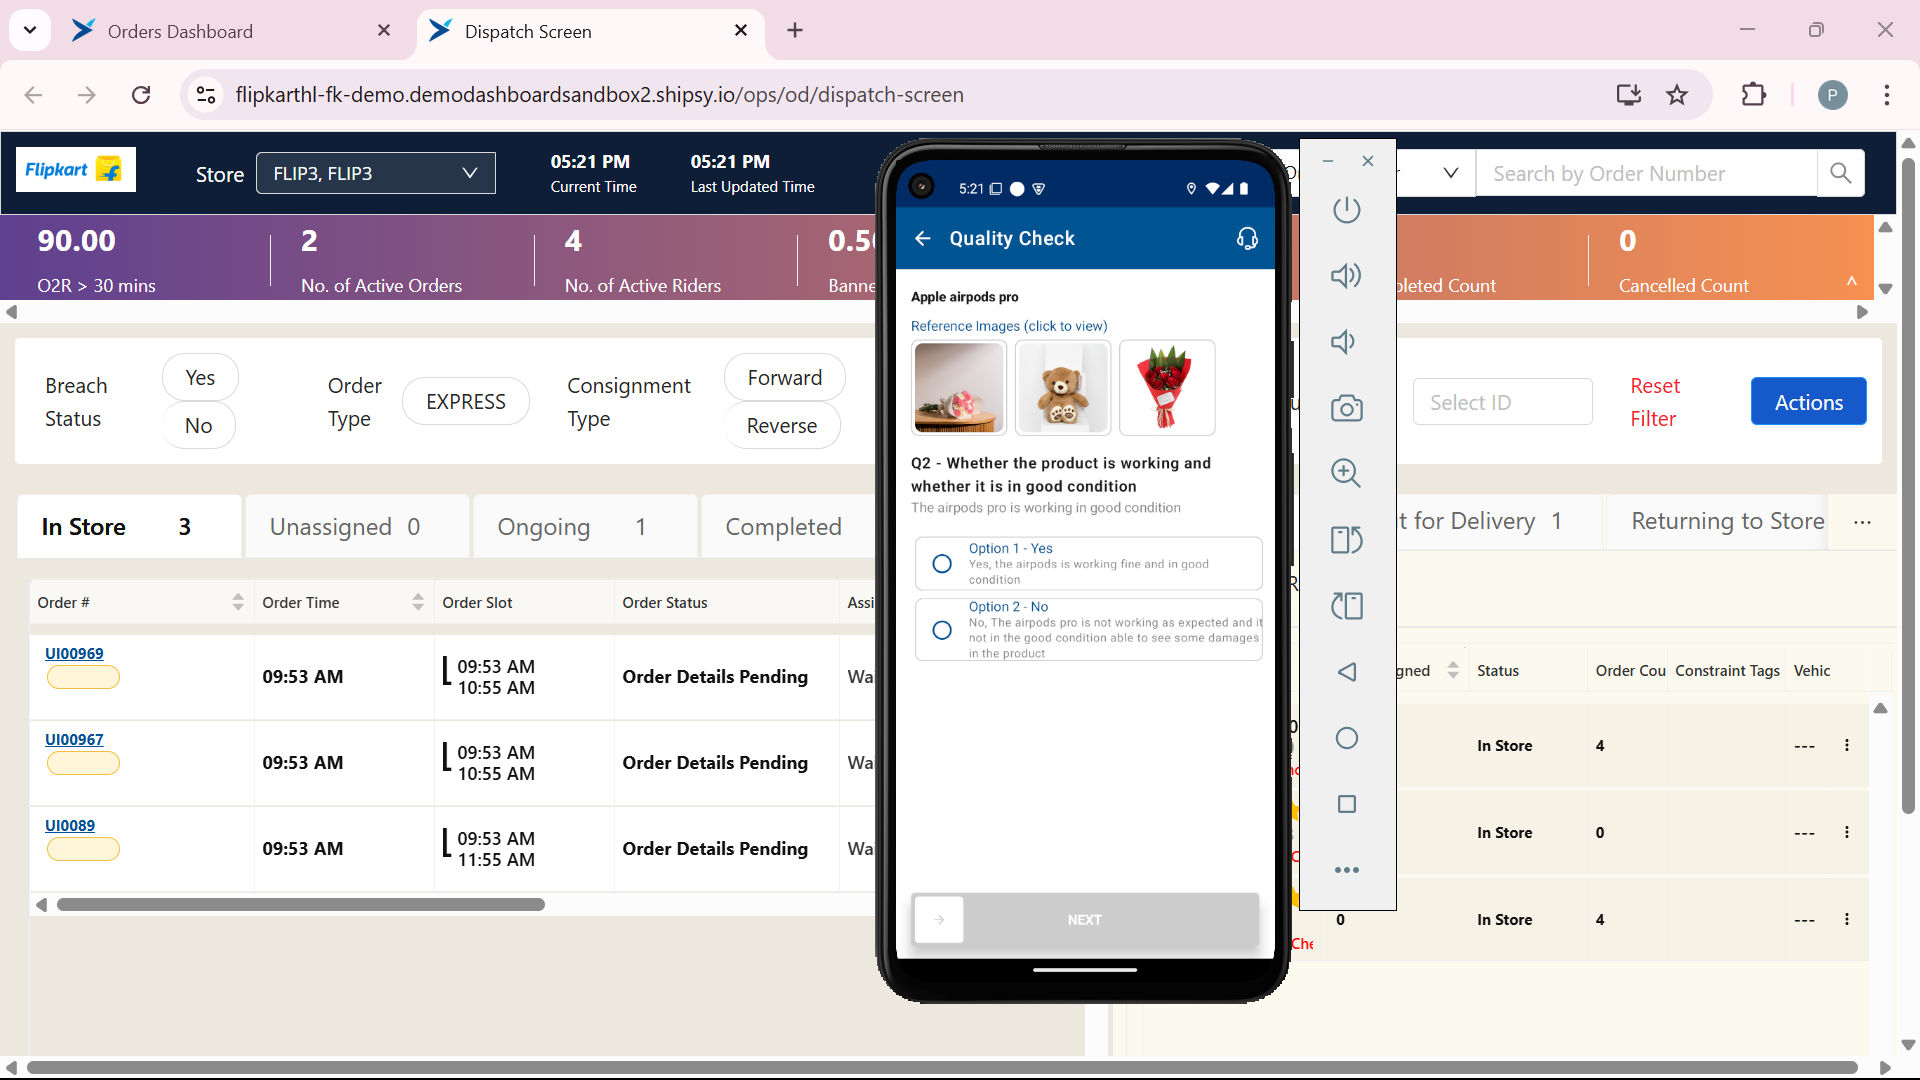
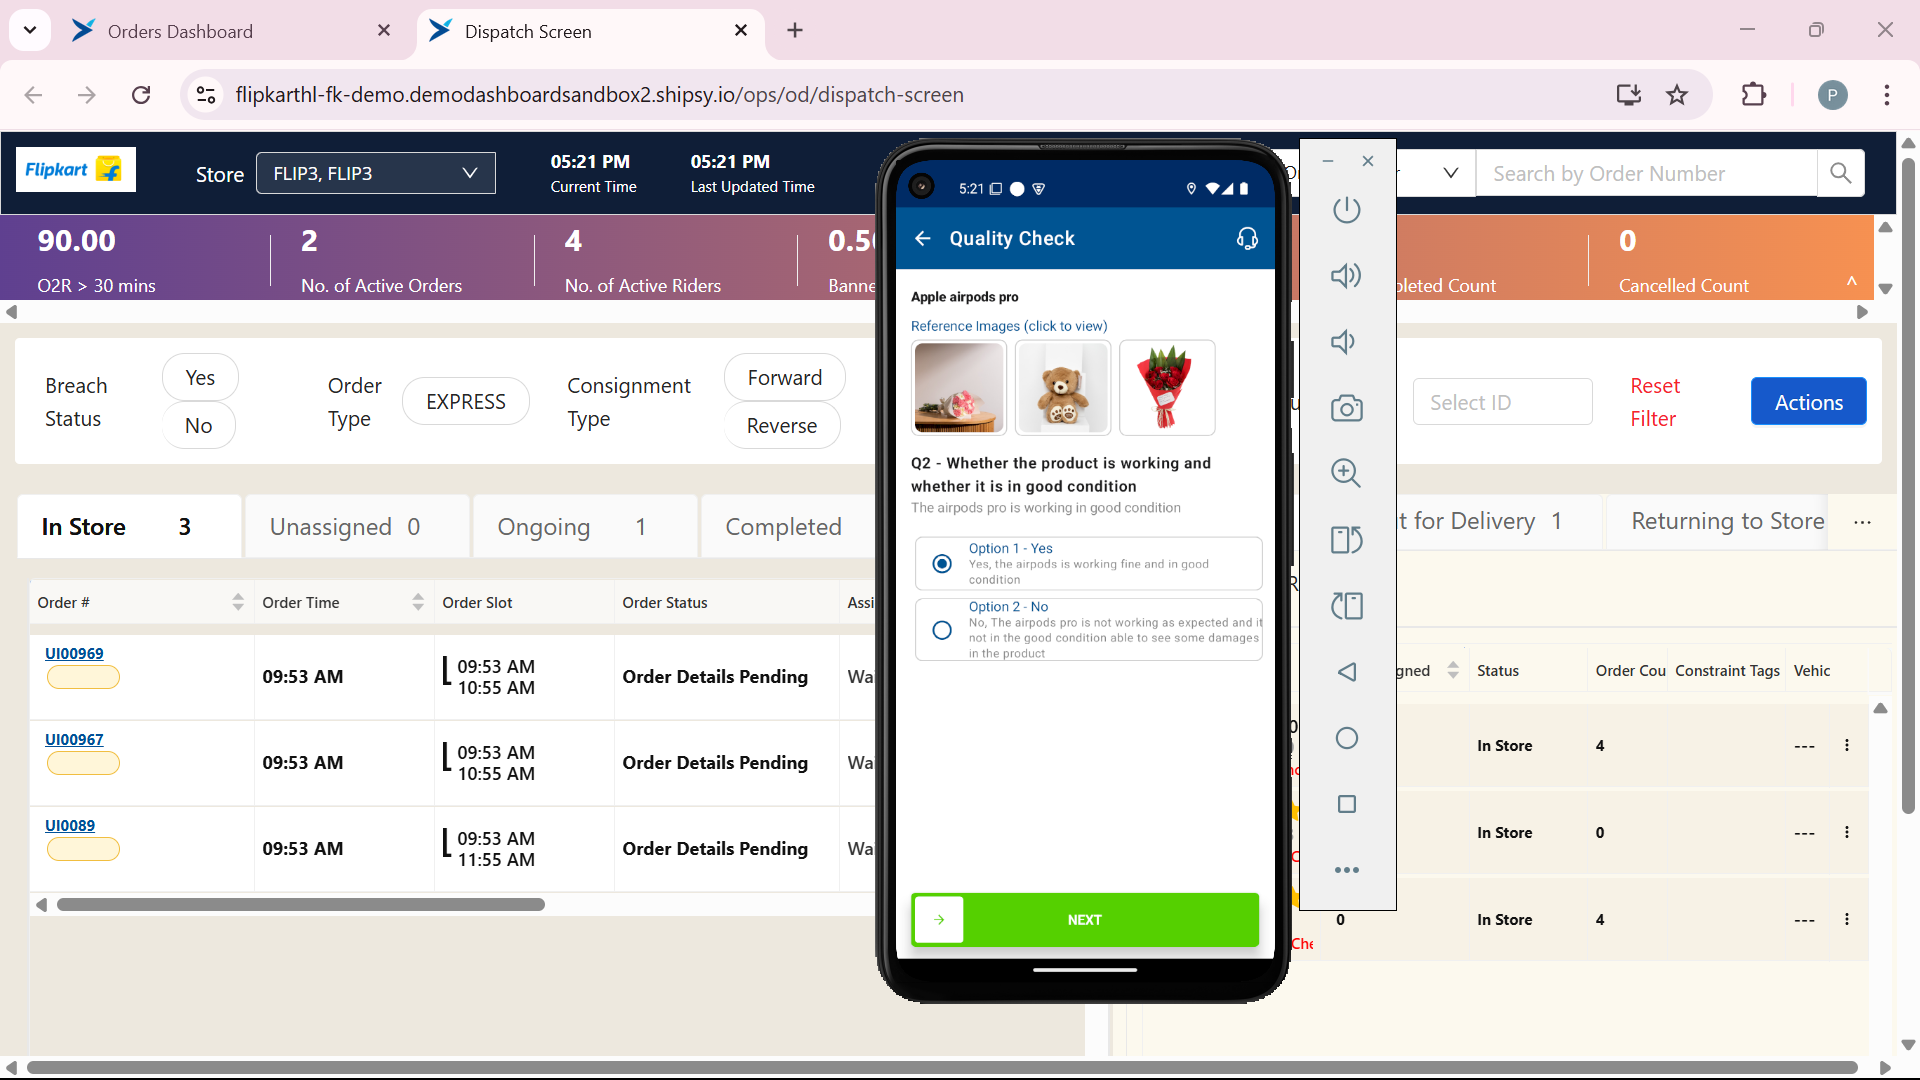
Select the option according to the condition of the product. if the product is working then select option with YES otherwise choose the option with NO.
Step #21: Select the option according to the condition of the product. if the product is working then select option with YES otherwise choose the option with NO.
22
After selecting the option. Slide the arrow to right on Next. to proceed to next step.
Step #22: After selecting the option. Slide the arrow to right on Next. to proceed to next step.
23
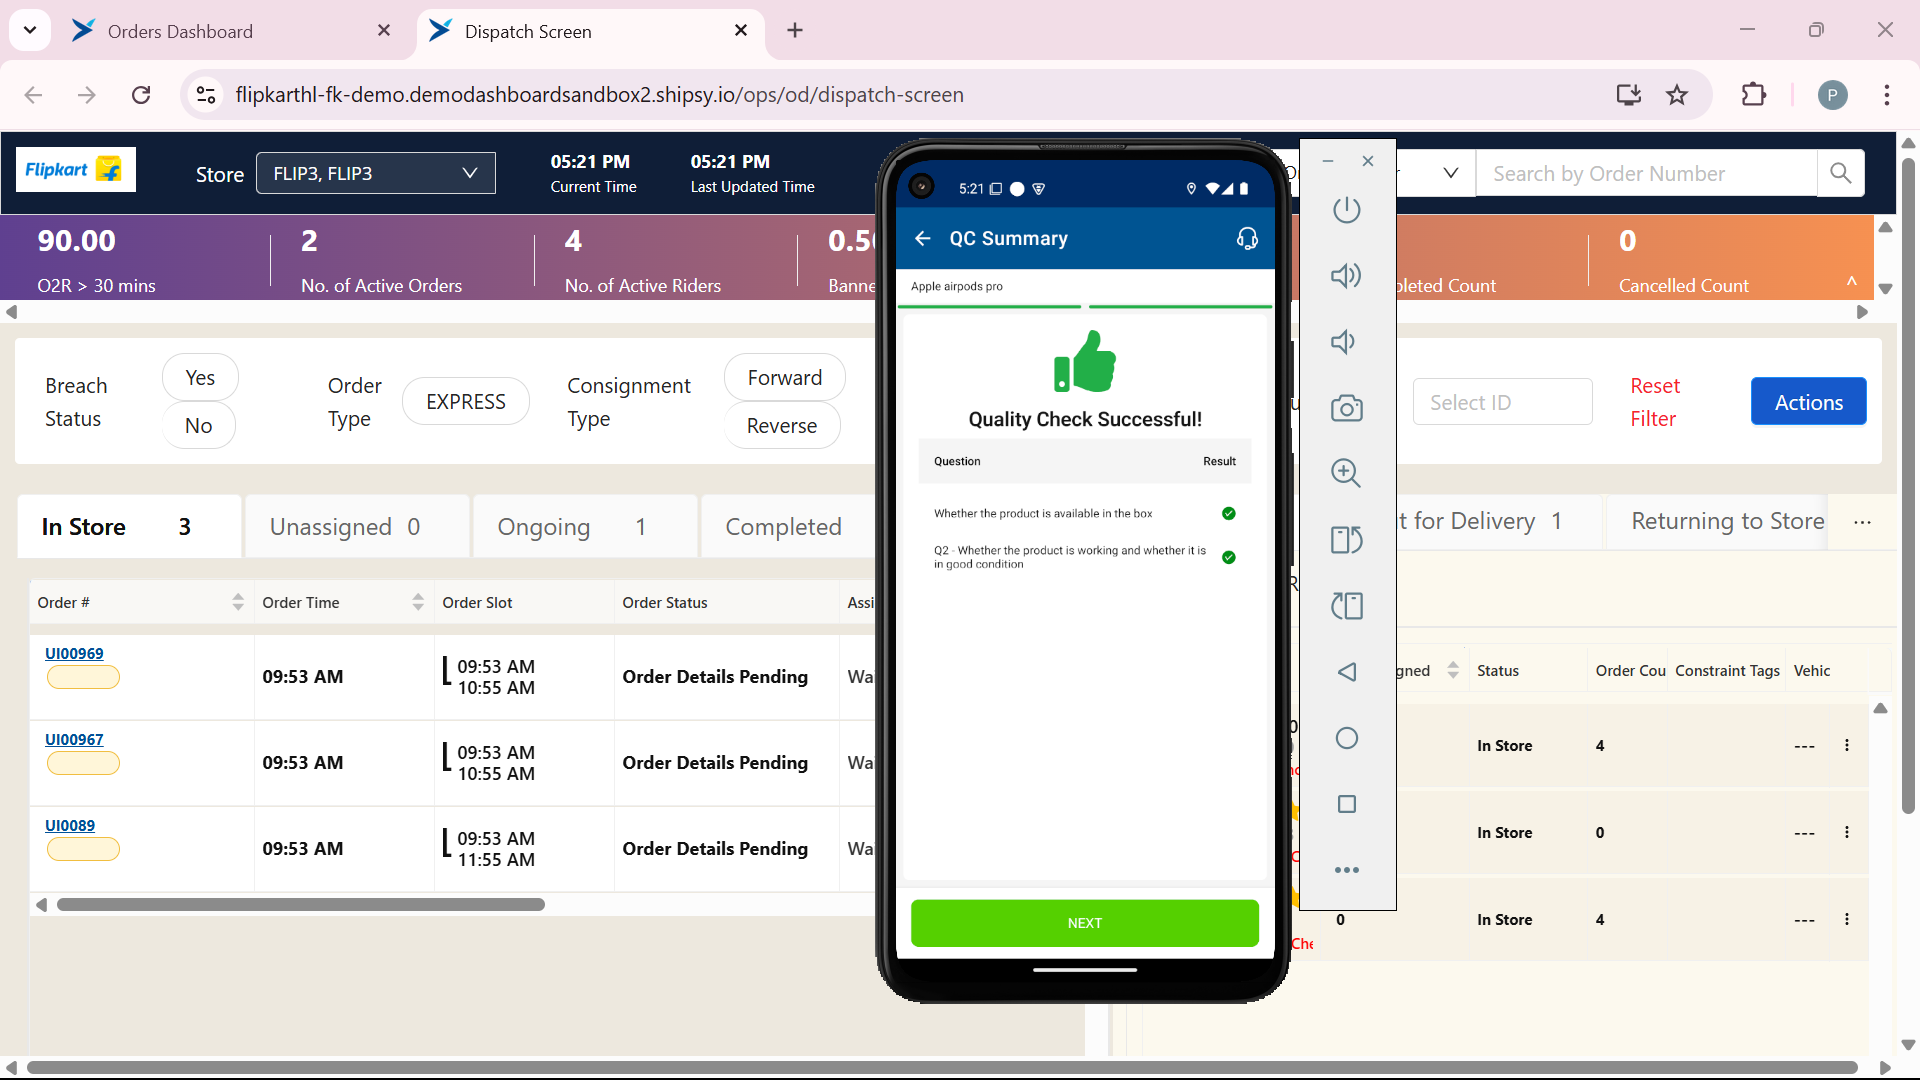
Click on "NEXT". to proceed to next step.
Step #23: Click on "NEXT". to proceed to next step.
24
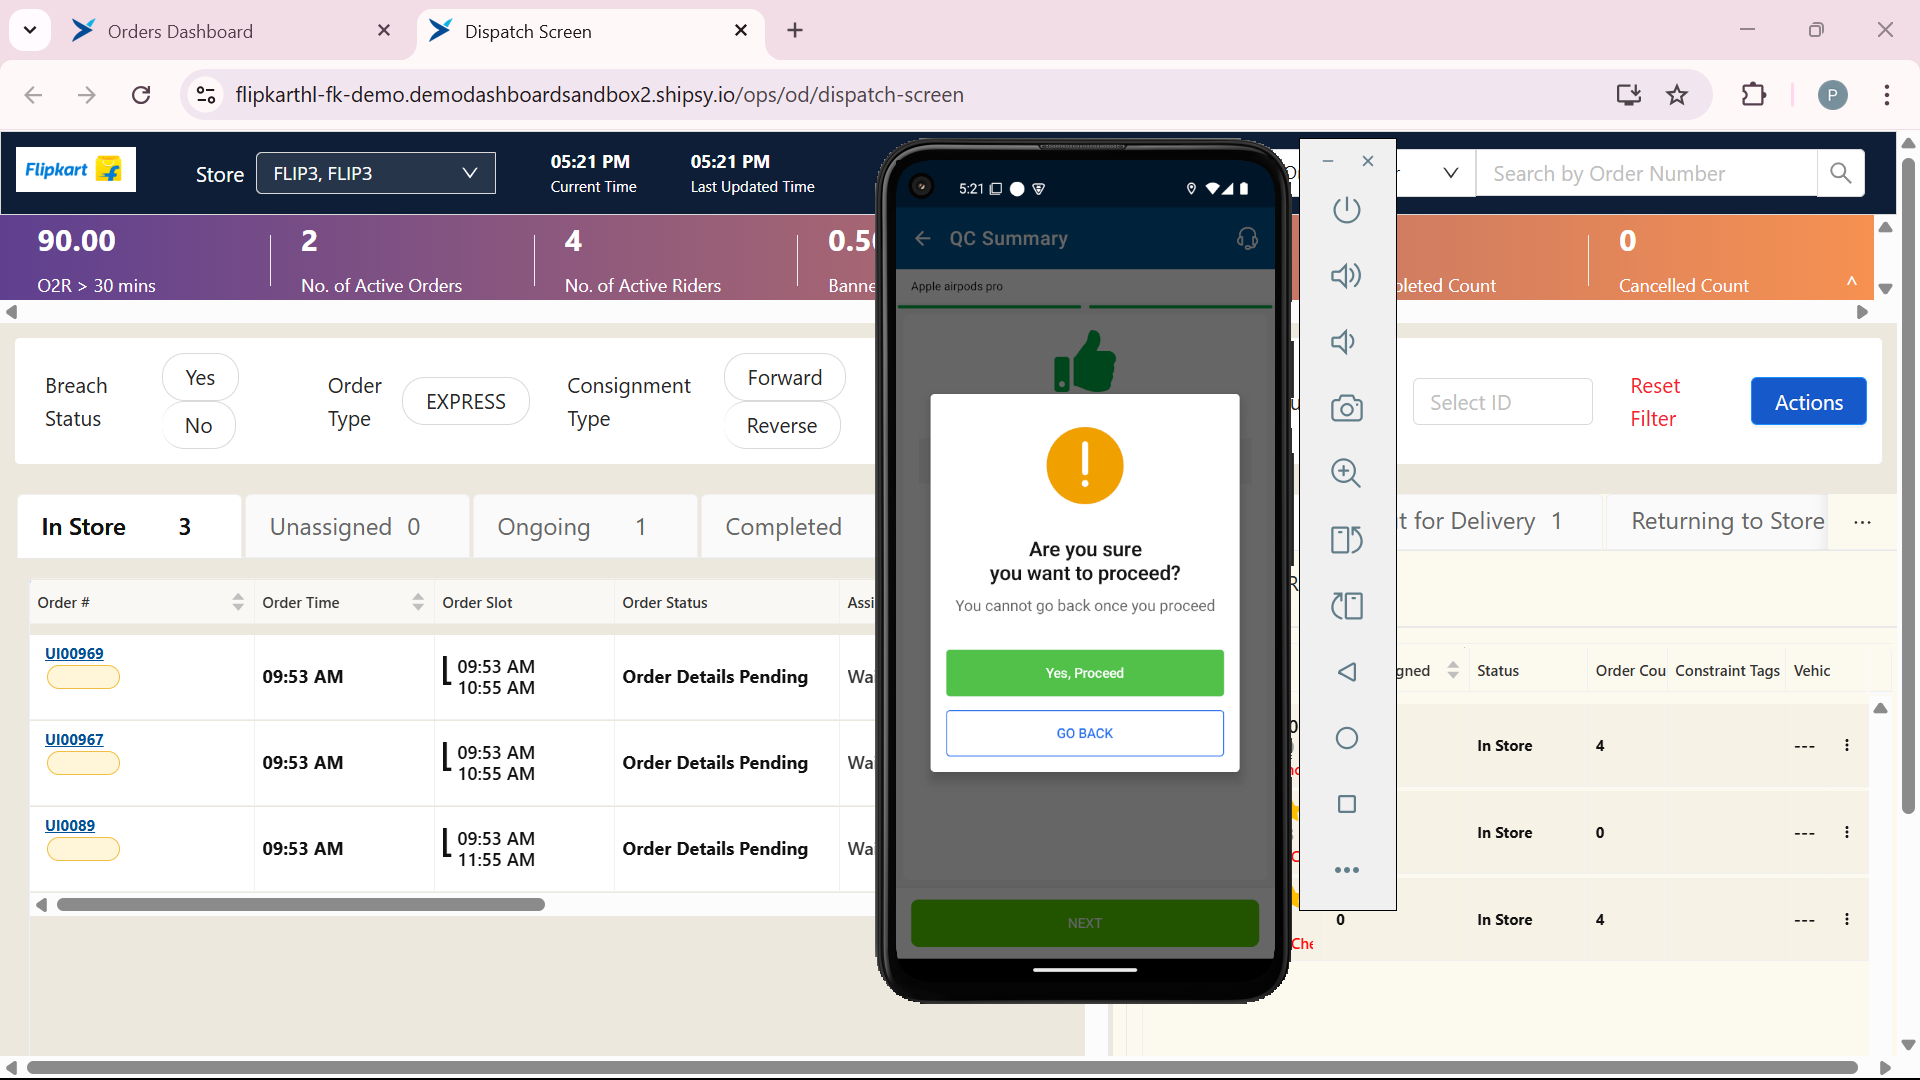
Click on "Yes, Proceed" if you are confident with the given information is correct otherwise choose to GO BACK
Step #24: Click on "Yes, Proceed" if you are confident with the given information is correct otherwise choose to GO BACK
25
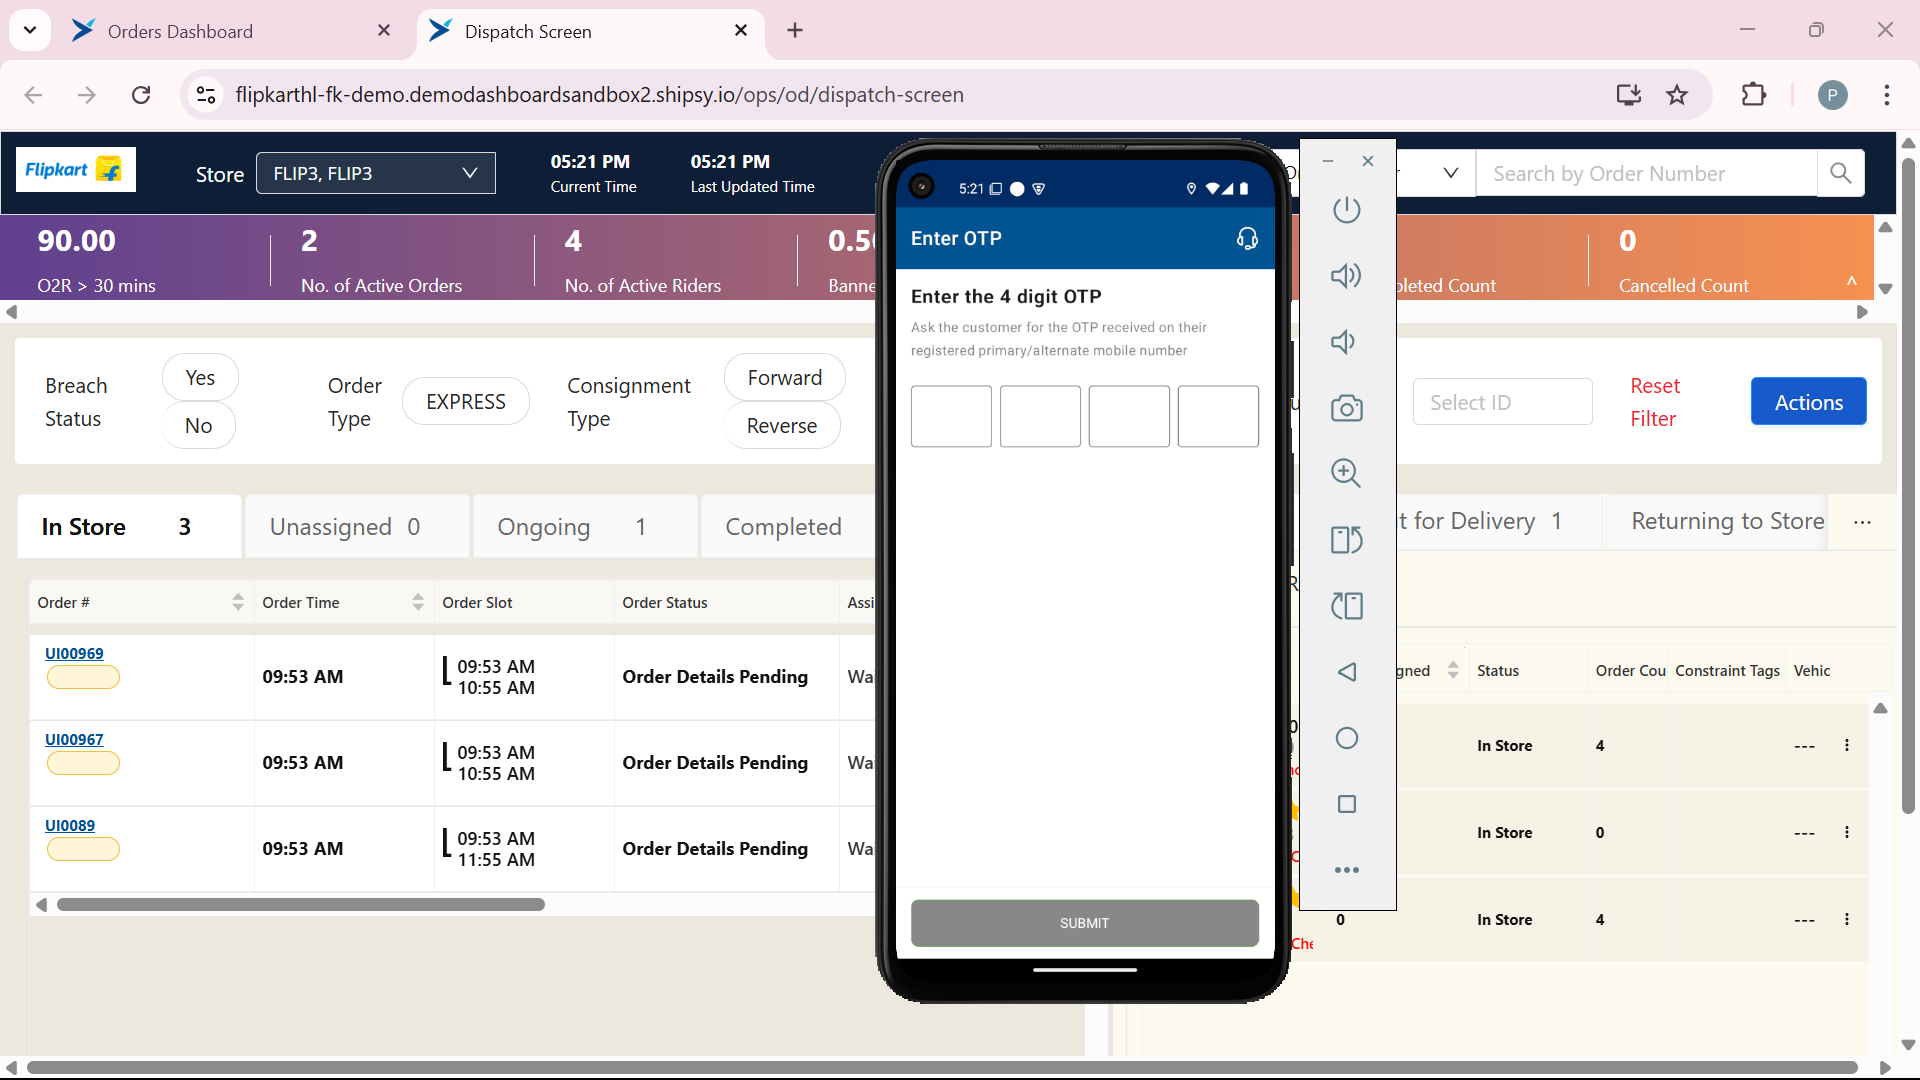
After rider have to collect the OTP from the customer to verify that the product is delivered to the customer.
Step #25: After rider have to collect the OTP from the customer to verify that the product is delivered to the customer.
26
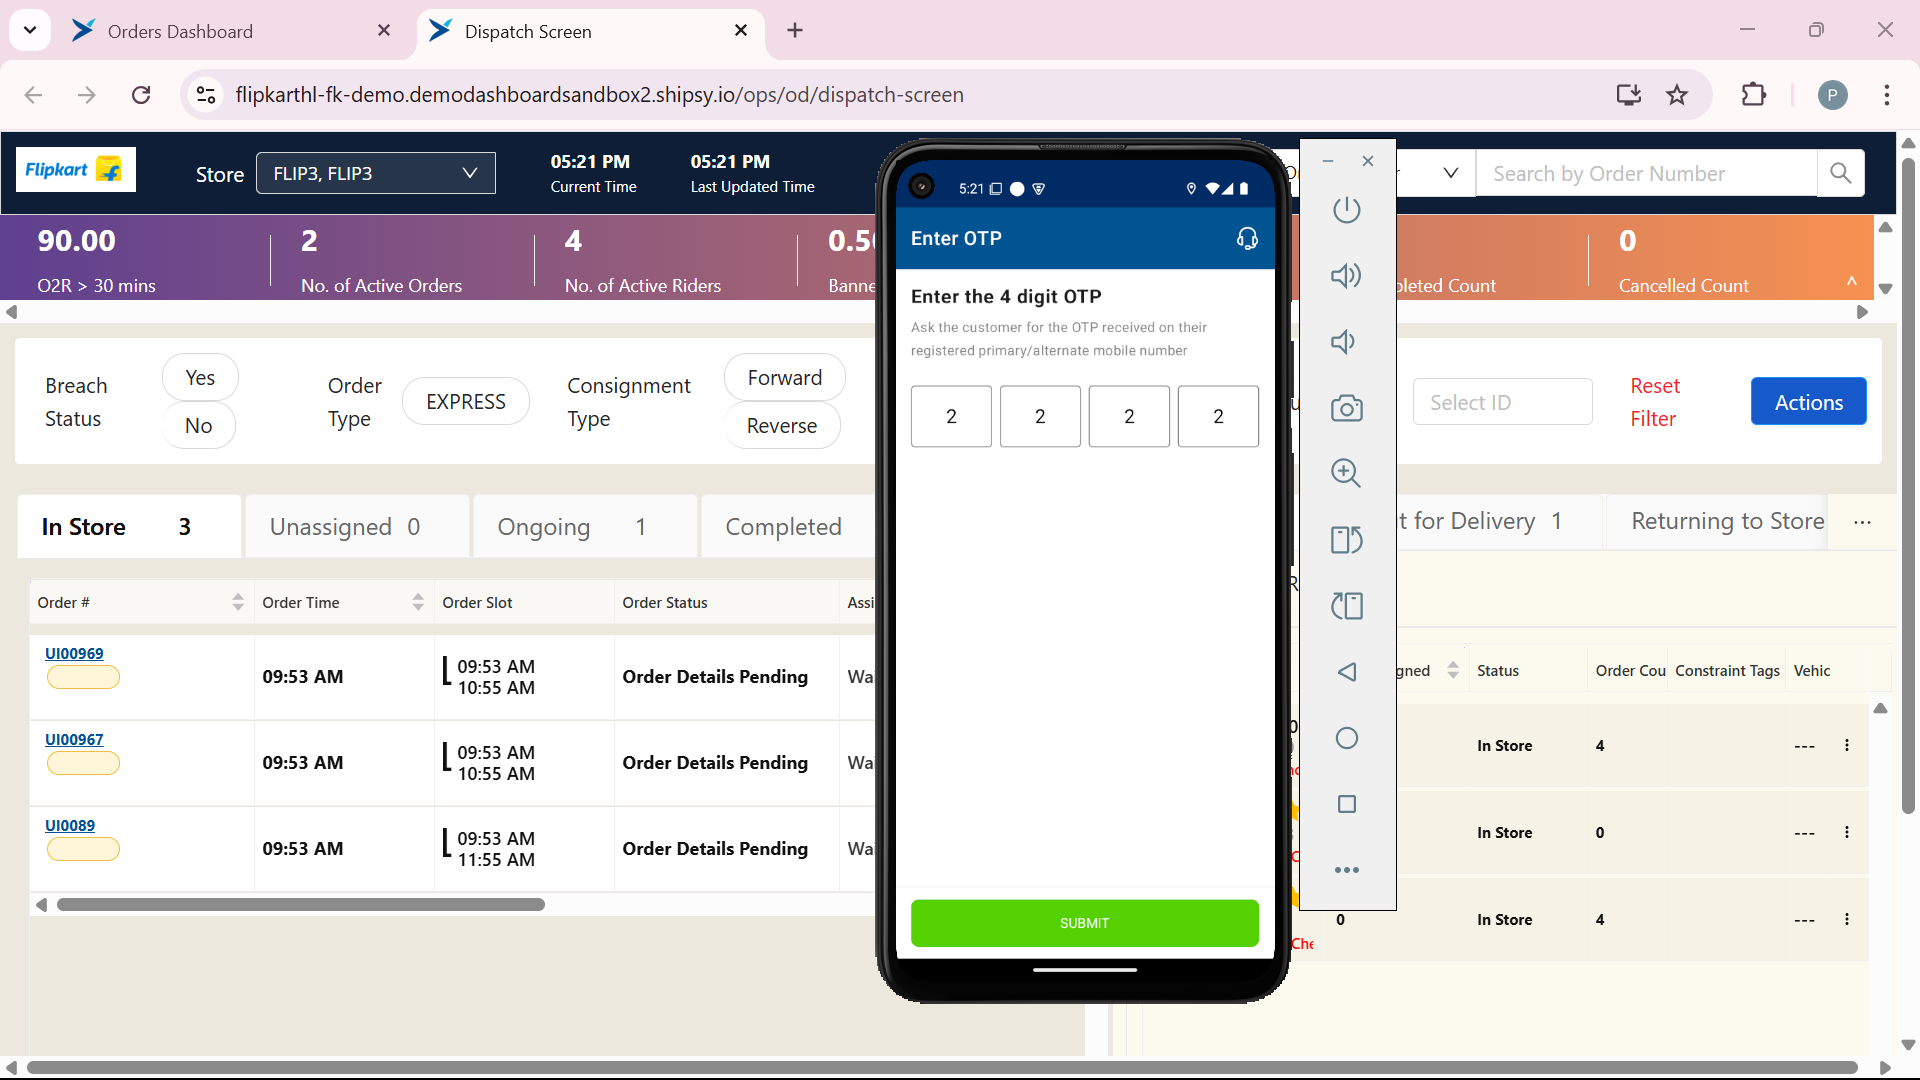
Type the OTP and Click on SUBMIT to submit the OTP.
Step #26: Type the OTP and Click on SUBMIT to submit the OTP.
27
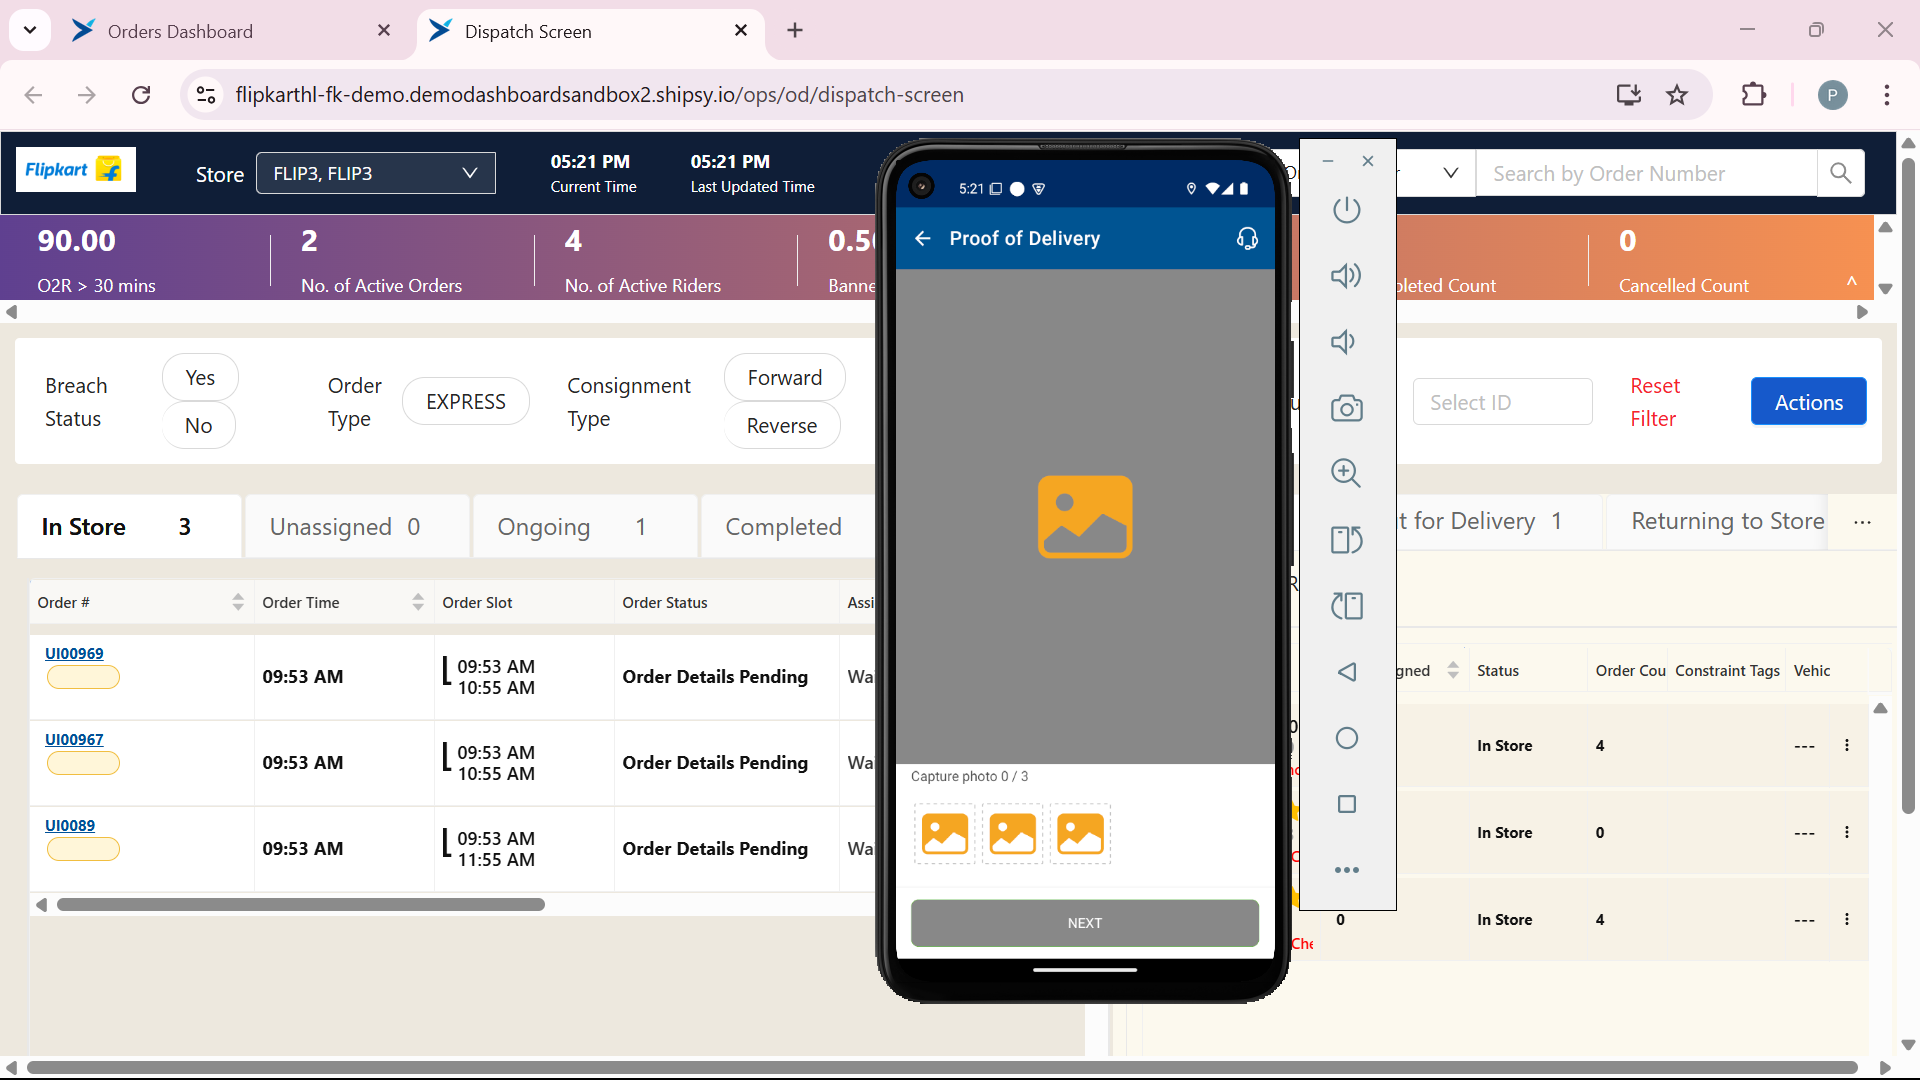
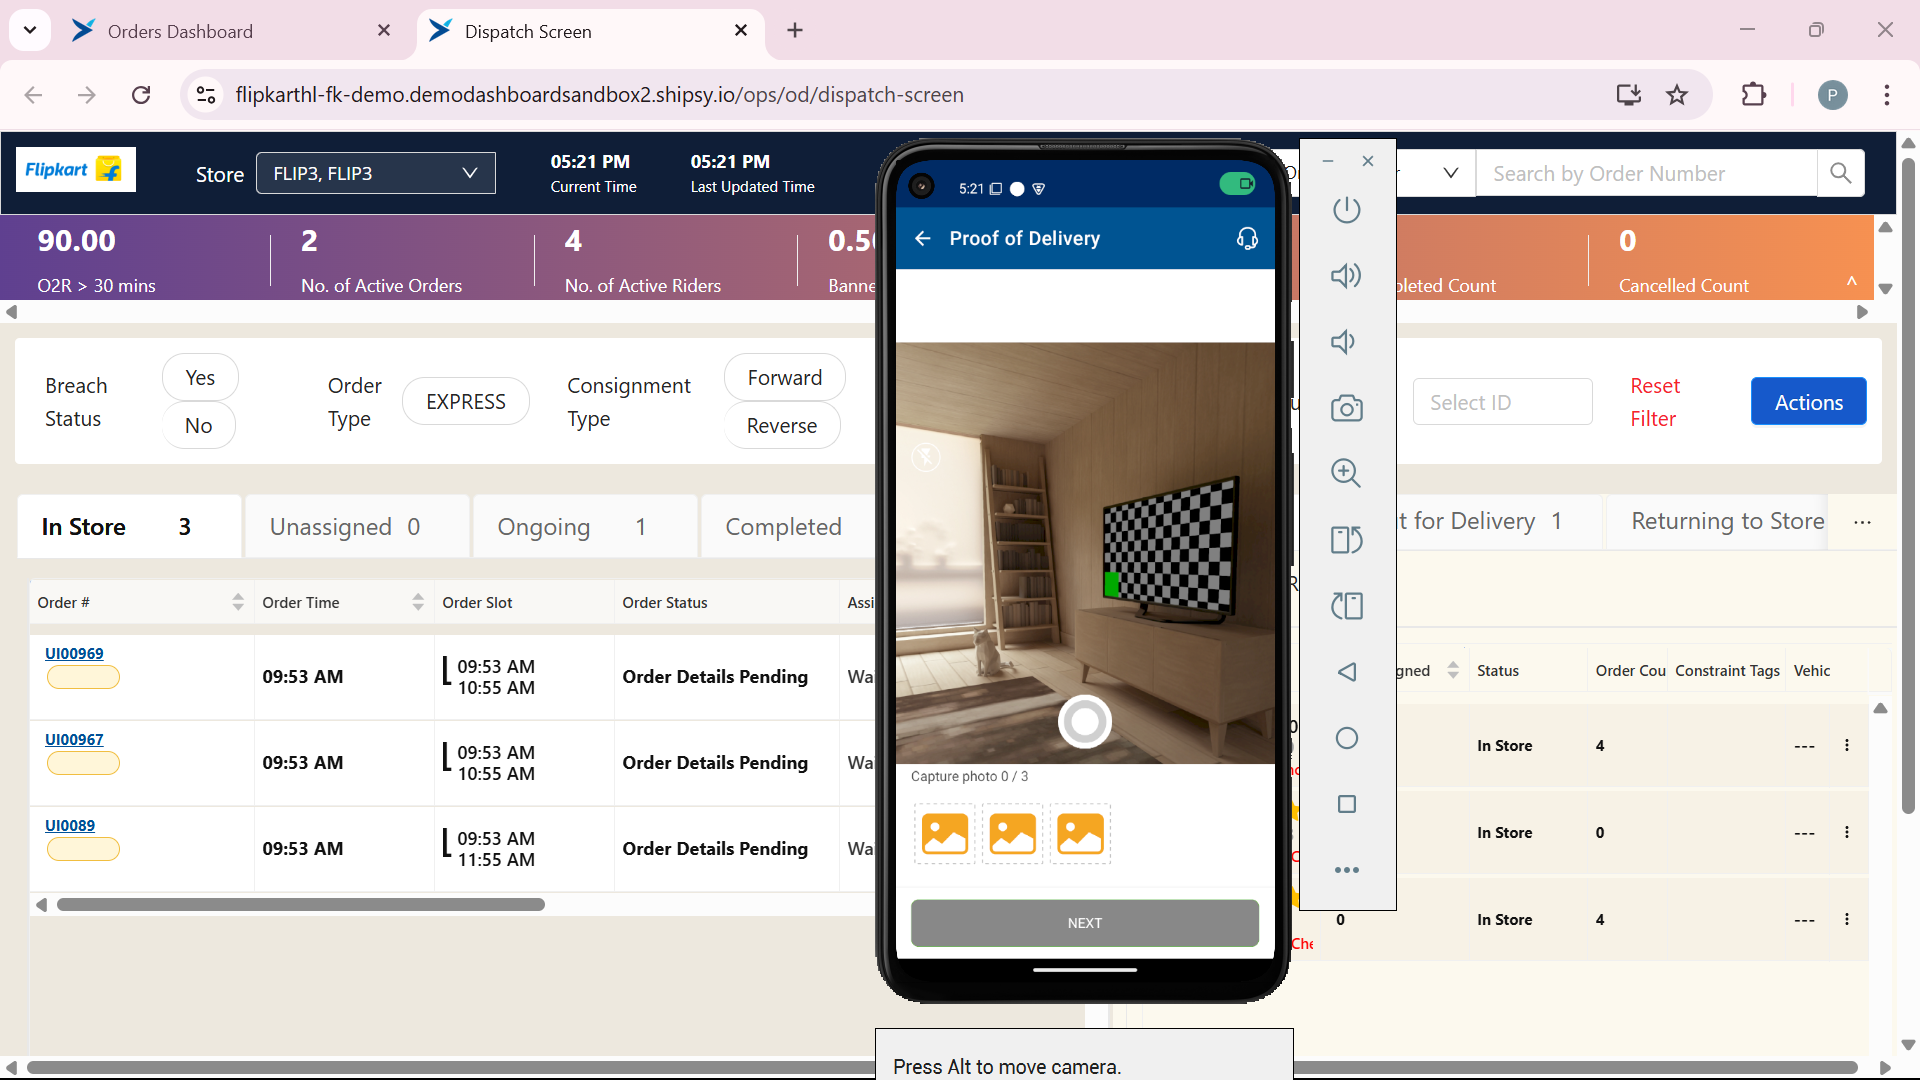
Take the picture of the product.
Step #27: Take the picture of the product.
28
Capture the photo of the product
Step #28: Capture the photo of the product
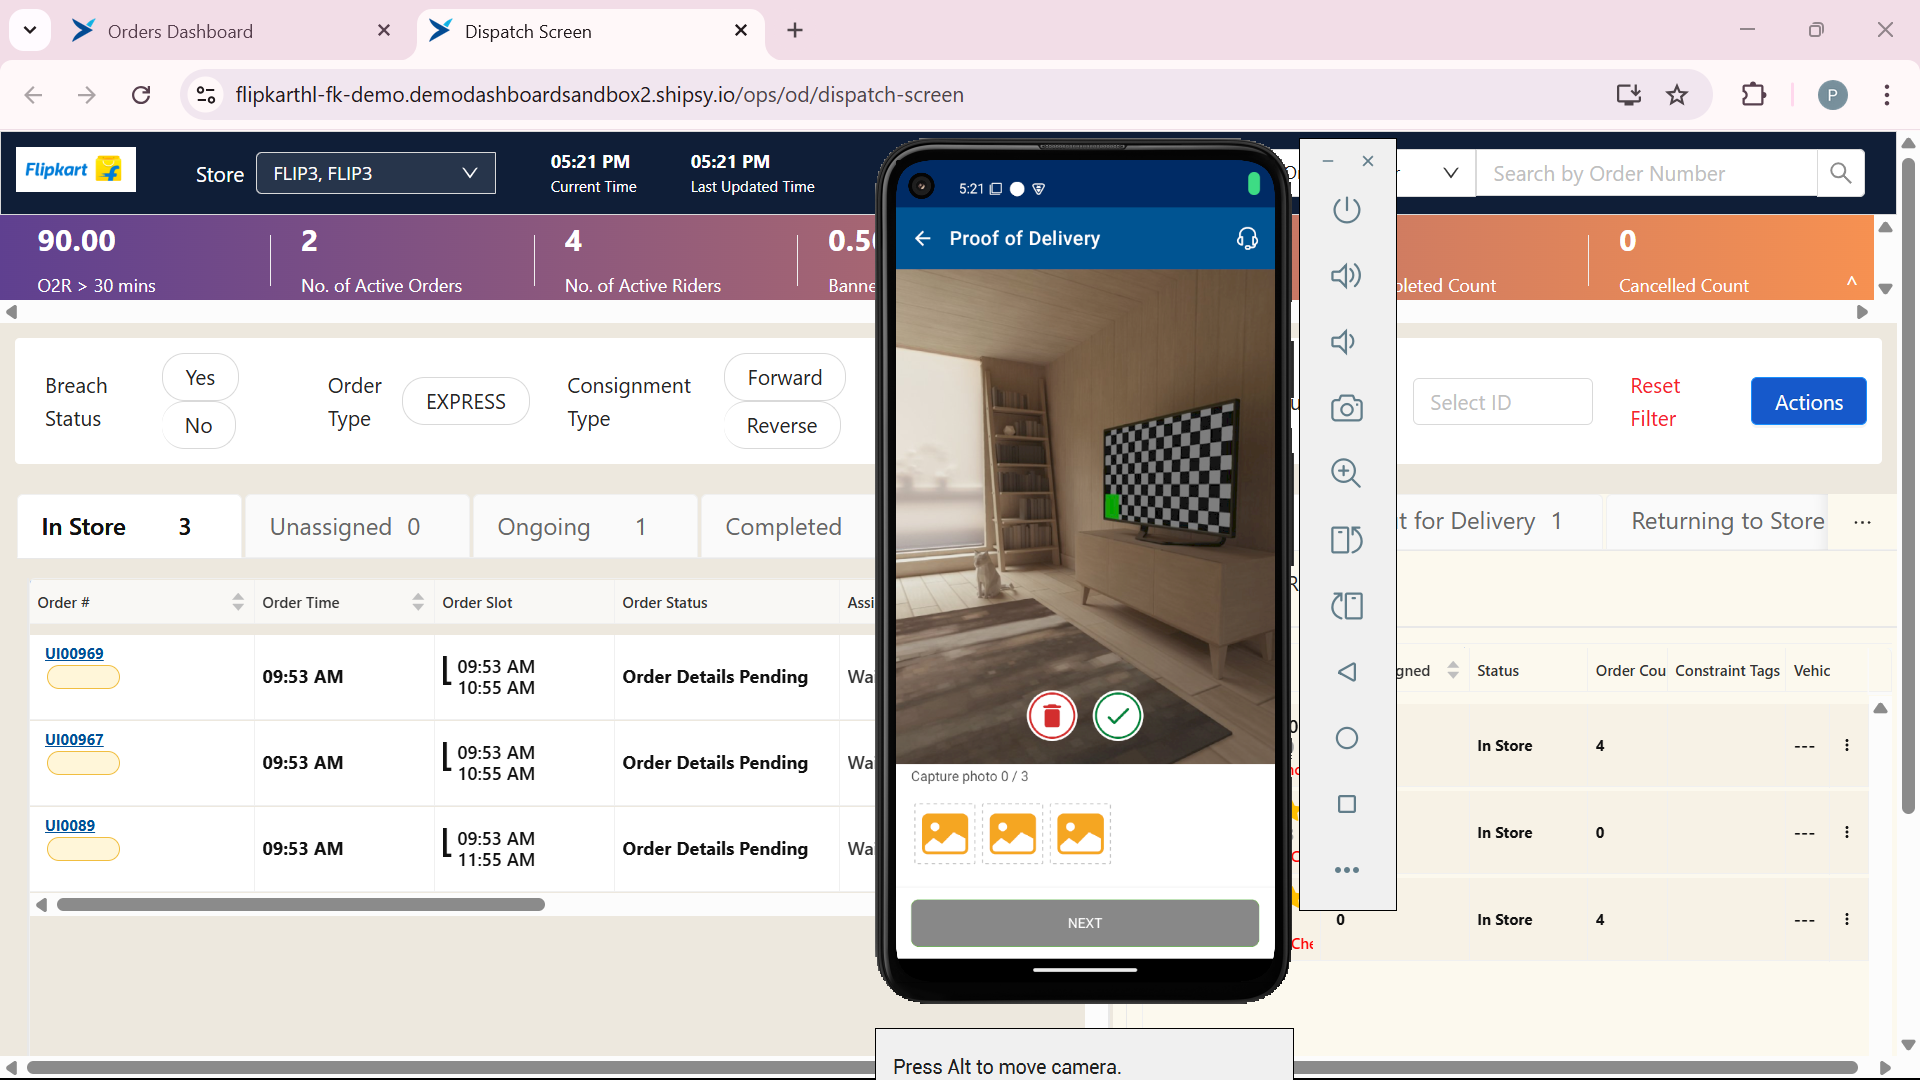
29
Accept the photo after taking the photo of the product.
Step #29: Accept the photo after taking the photo of the product.
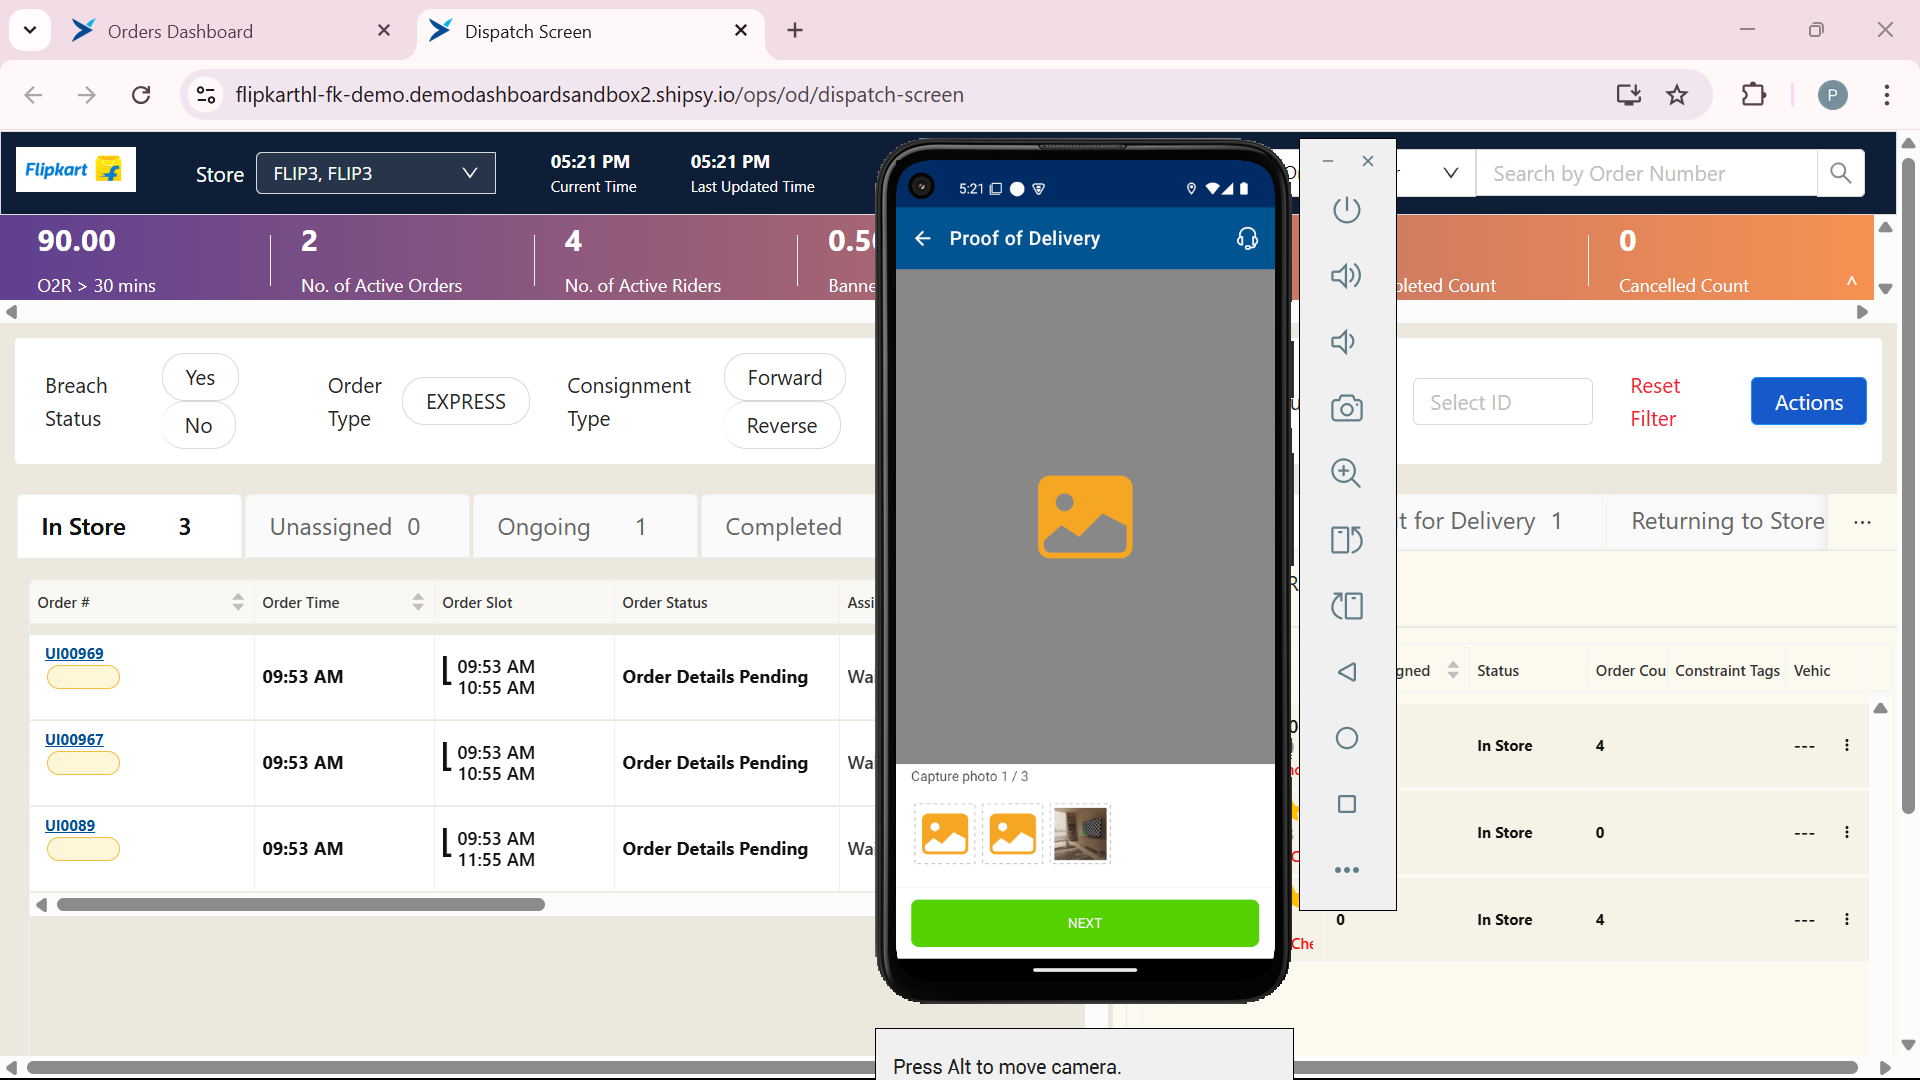
30
After collecting the photos of the product. Click on "NEXT" to proceed further.
Step #30: After collecting the photos of the product. Click on "NEXT" to proceed further.
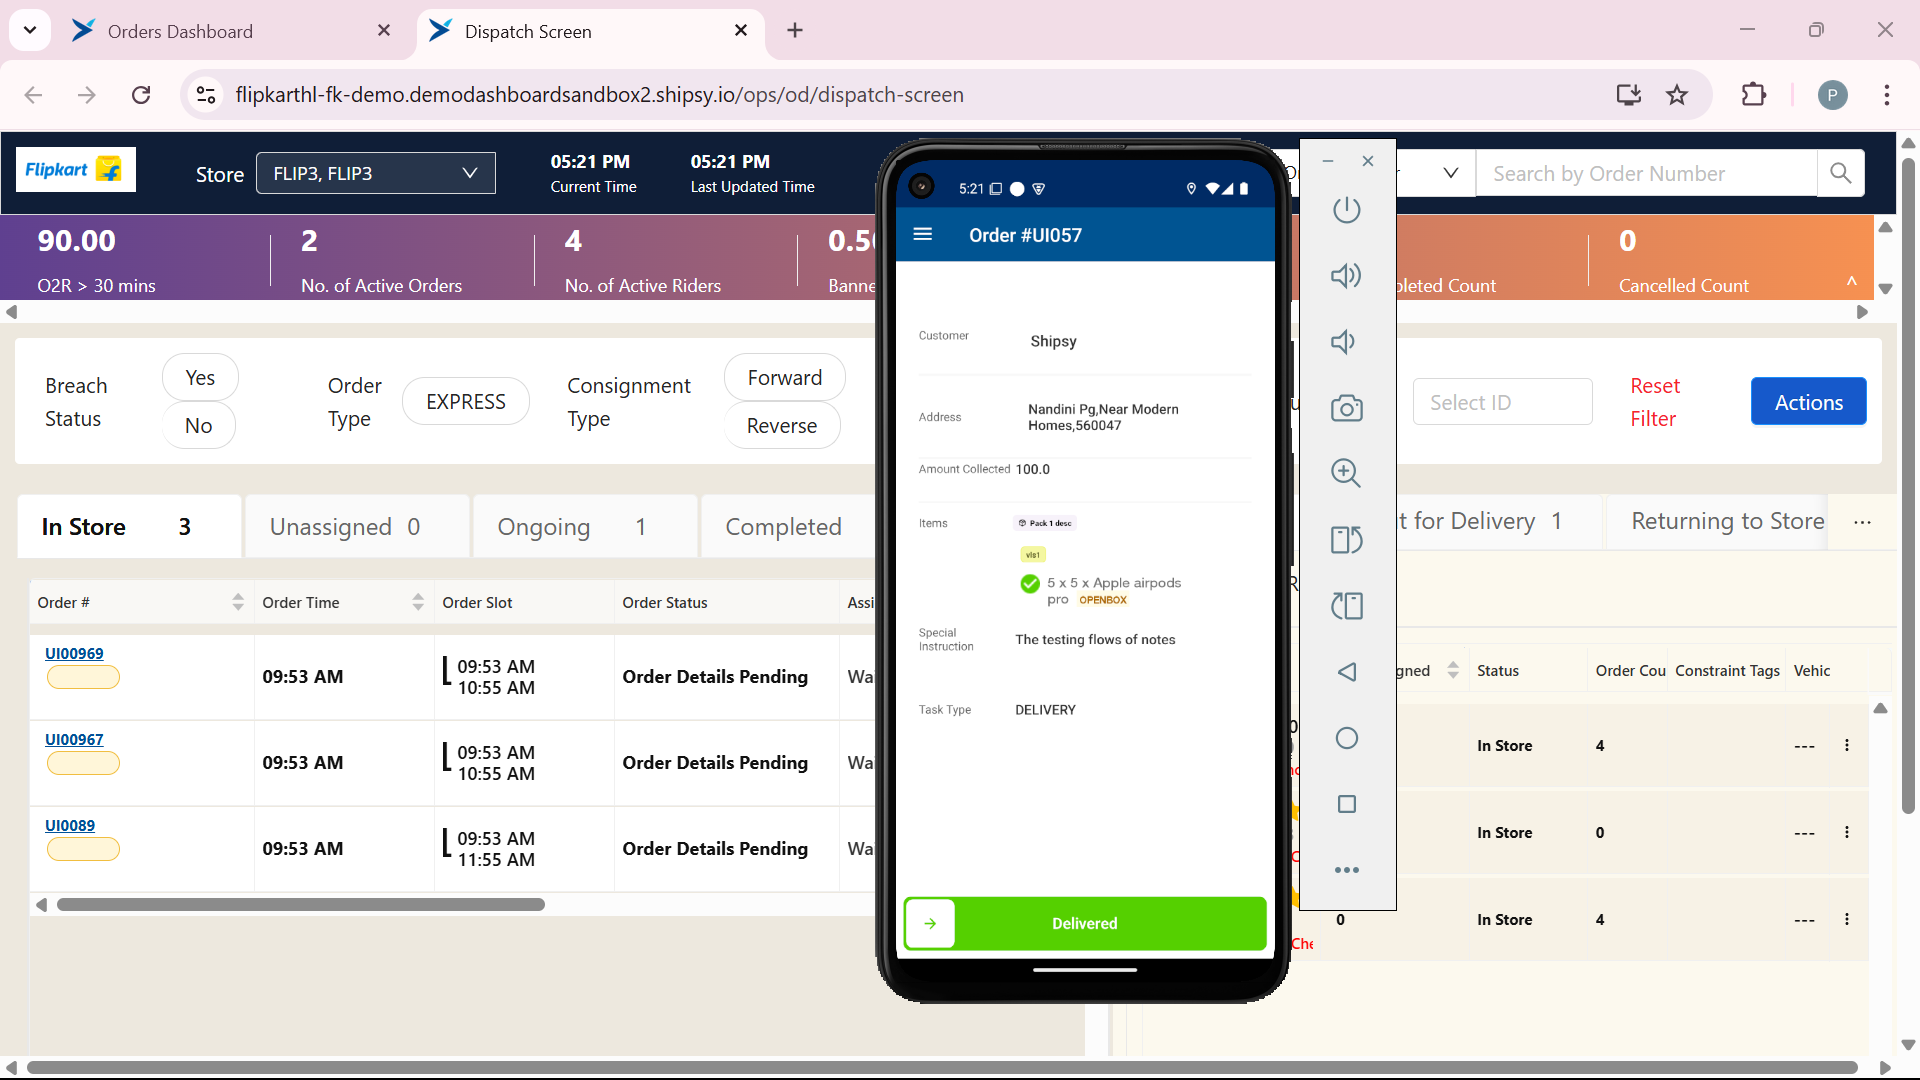
31
Slide the arrow to right on delivered. to updated the status from Reached Gate to Delivered
Step #31: Slide the arrow to right on delivered. to updated the status from Reached Gate to Delivered
32
After Delivered the product to the customer. Rider gets the money to the delivery.
Step #32: After Delivered the product to the customer. Rider gets the money to the delivery.
33
Slide the arrow to right on BACK TO STORE. after completing the delivery. Then normal orders page will appears on the mobile screen.
Step #33: Slide the arrow to right on BACK TO STORE. after completing the delivery. Then normal orders page will appears on the mobile screen.

How Open Box Delivery (OBD) Works