How to Create and Manage Advanced Shifts in Connecteam
Creating and Managing Shifts in Connecteam: A Complete Administrative Guide This guide provides a step-by-step walkthrough for creating, editing, and publishing Advanced shifts in Connecteam using the Provider Schedule and your administrative permissions. Whether you're scheduling a one-time visit or managing a recurring series, you'll learn how to: ➤ Select and apply shift templates ➤ Assign referrals to visits ➤ Adjust shift start and end times ➤ Attach required documentation, such as intake forms By the end of this guide, you'll be equipped to manage shifts efficiently and confidently within the Connecteam platform.
Before we begin, make sure you’ve accepted the email invitation to activate your Admin permissions - this is required to create, edit, or publish schedules.
We’ll walk through the process of opening up two browser windows for ease of use, learning through this procedure. Creating a shift using the Provider Schedule, starting with how to access it and selecting the right template. You’ll also learn how to manage repeating schedules, assign visit times, and attach necessary documentation.
Let’s get started.
To begin, open the Job Scheduling tab and access the Provider Schedule.
➤ Use a desktop computer for the best experience
➤ Ensure you're in Admin view, not User view (procedure here to see the differences)
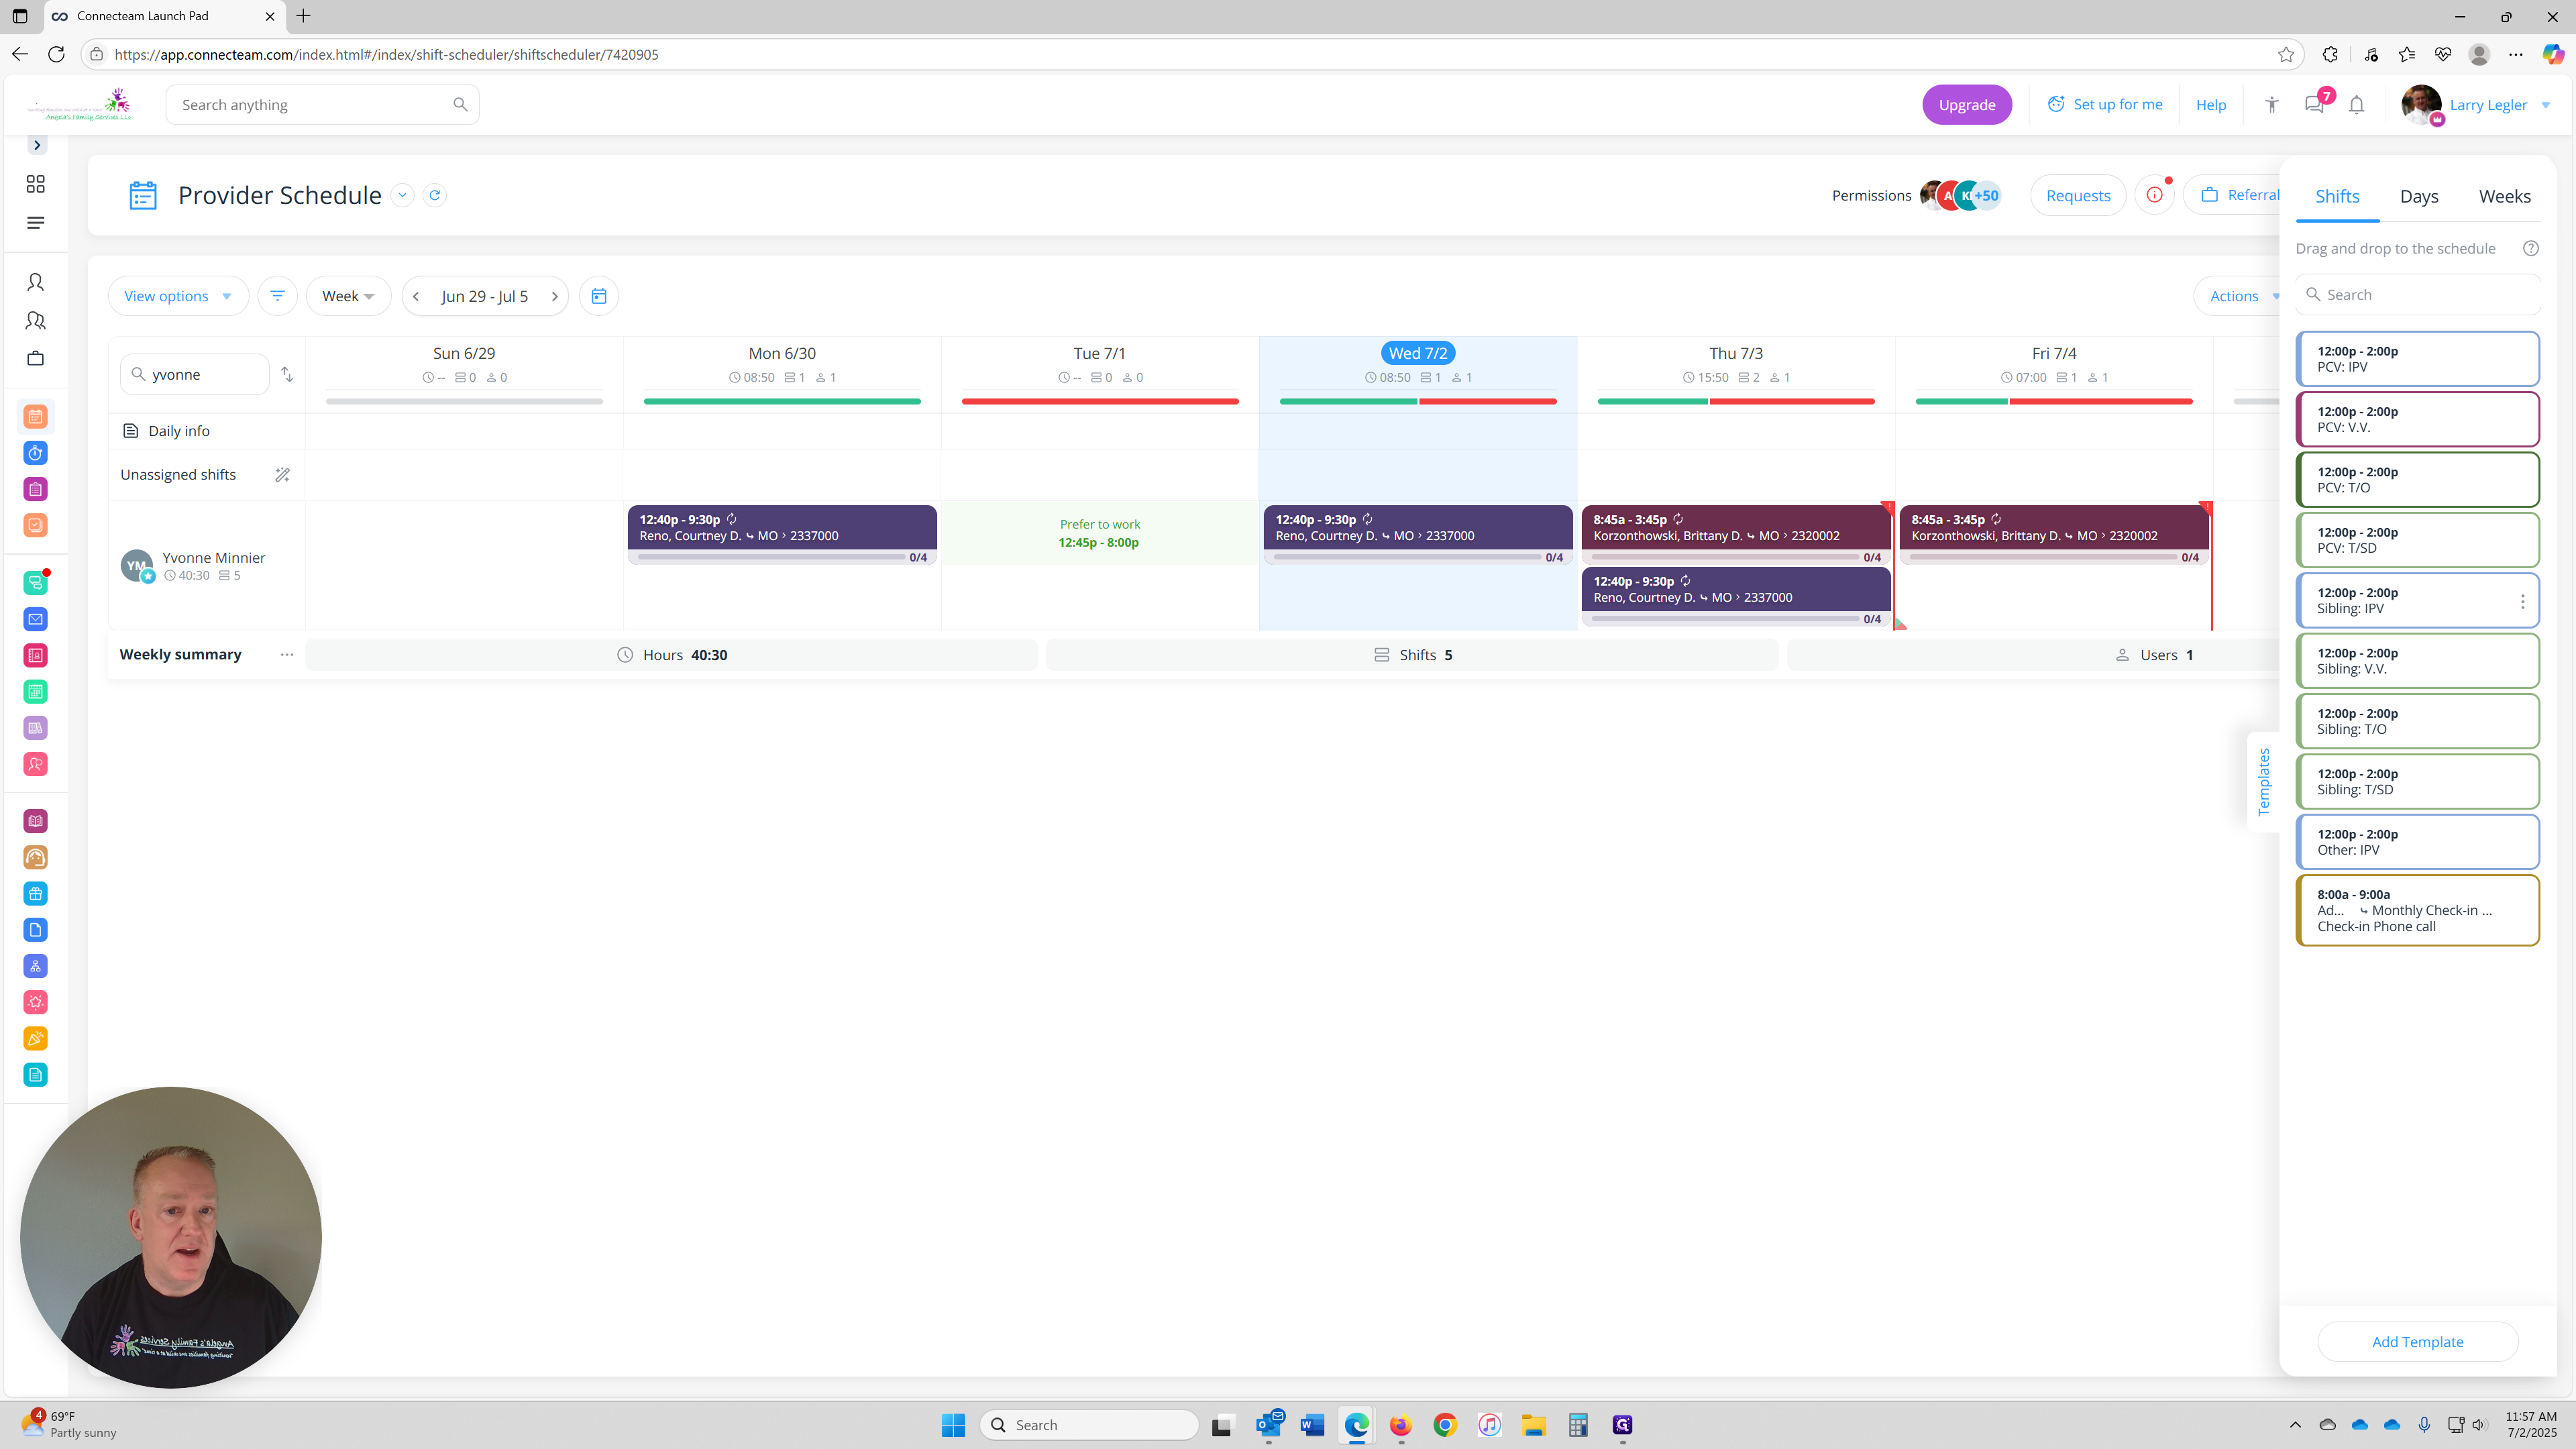
Depending on your selected view, templates appear in different ways:
➤ Weekly View: Templates are visible on the right-hand side of the screen
➤ Daily or Monthly View: Click on the day of your choice, then select the ". . ." menu and choose Add from templates > to view available template options
Available templates include for Parent Child Visits (PCV), Sibling (SIB) and Other
➤ In-Person Visits
➤ Virtual Visits (V.V.)
➤ Transport Overnight (T/O)
➤ Transport Same Day (T/SD)
Each template includes built-in shift tasks such as:
➤ Parent Screening
➤ Caregiver Screening
➤ Report Completed
➤ Signatures Acquired
These tasks help you stay organized and ensure all required steps are completed for each shift. You can use these as check-off items to support your own workflow.
Before you begin, it is highly recommended to open two browser windows:
Window 1: Use this to follow the guide and view screenshots or instructions.
Window 2: Use this to log into Connecteam and apply what you're learning in real time.
This setup allows you to follow the guide and complete tasks simultaneously, without needing to switch back and forth between tabs or within Connecteam itself.
If you only use one browser window, you’ll need to constantly click back and forth between this Connecteam course guide (where the directions are being shown here) and the Provider Schedule (where you’ll be adding your work preference shifts).
This can make the guide difficult to follow and slow down your workflow. To avoid this, you can right-click the course link above and choose “Open in new window” so the guide stays open separately while you work.
You can also log into multiple Connecteam windows at the same time and view different sections within the platform. Just go to connecteam.com and sign in separately in each window. One window can show the procedure, and the other can be used to update your Provider Schedule and adding shifts to your schedule.

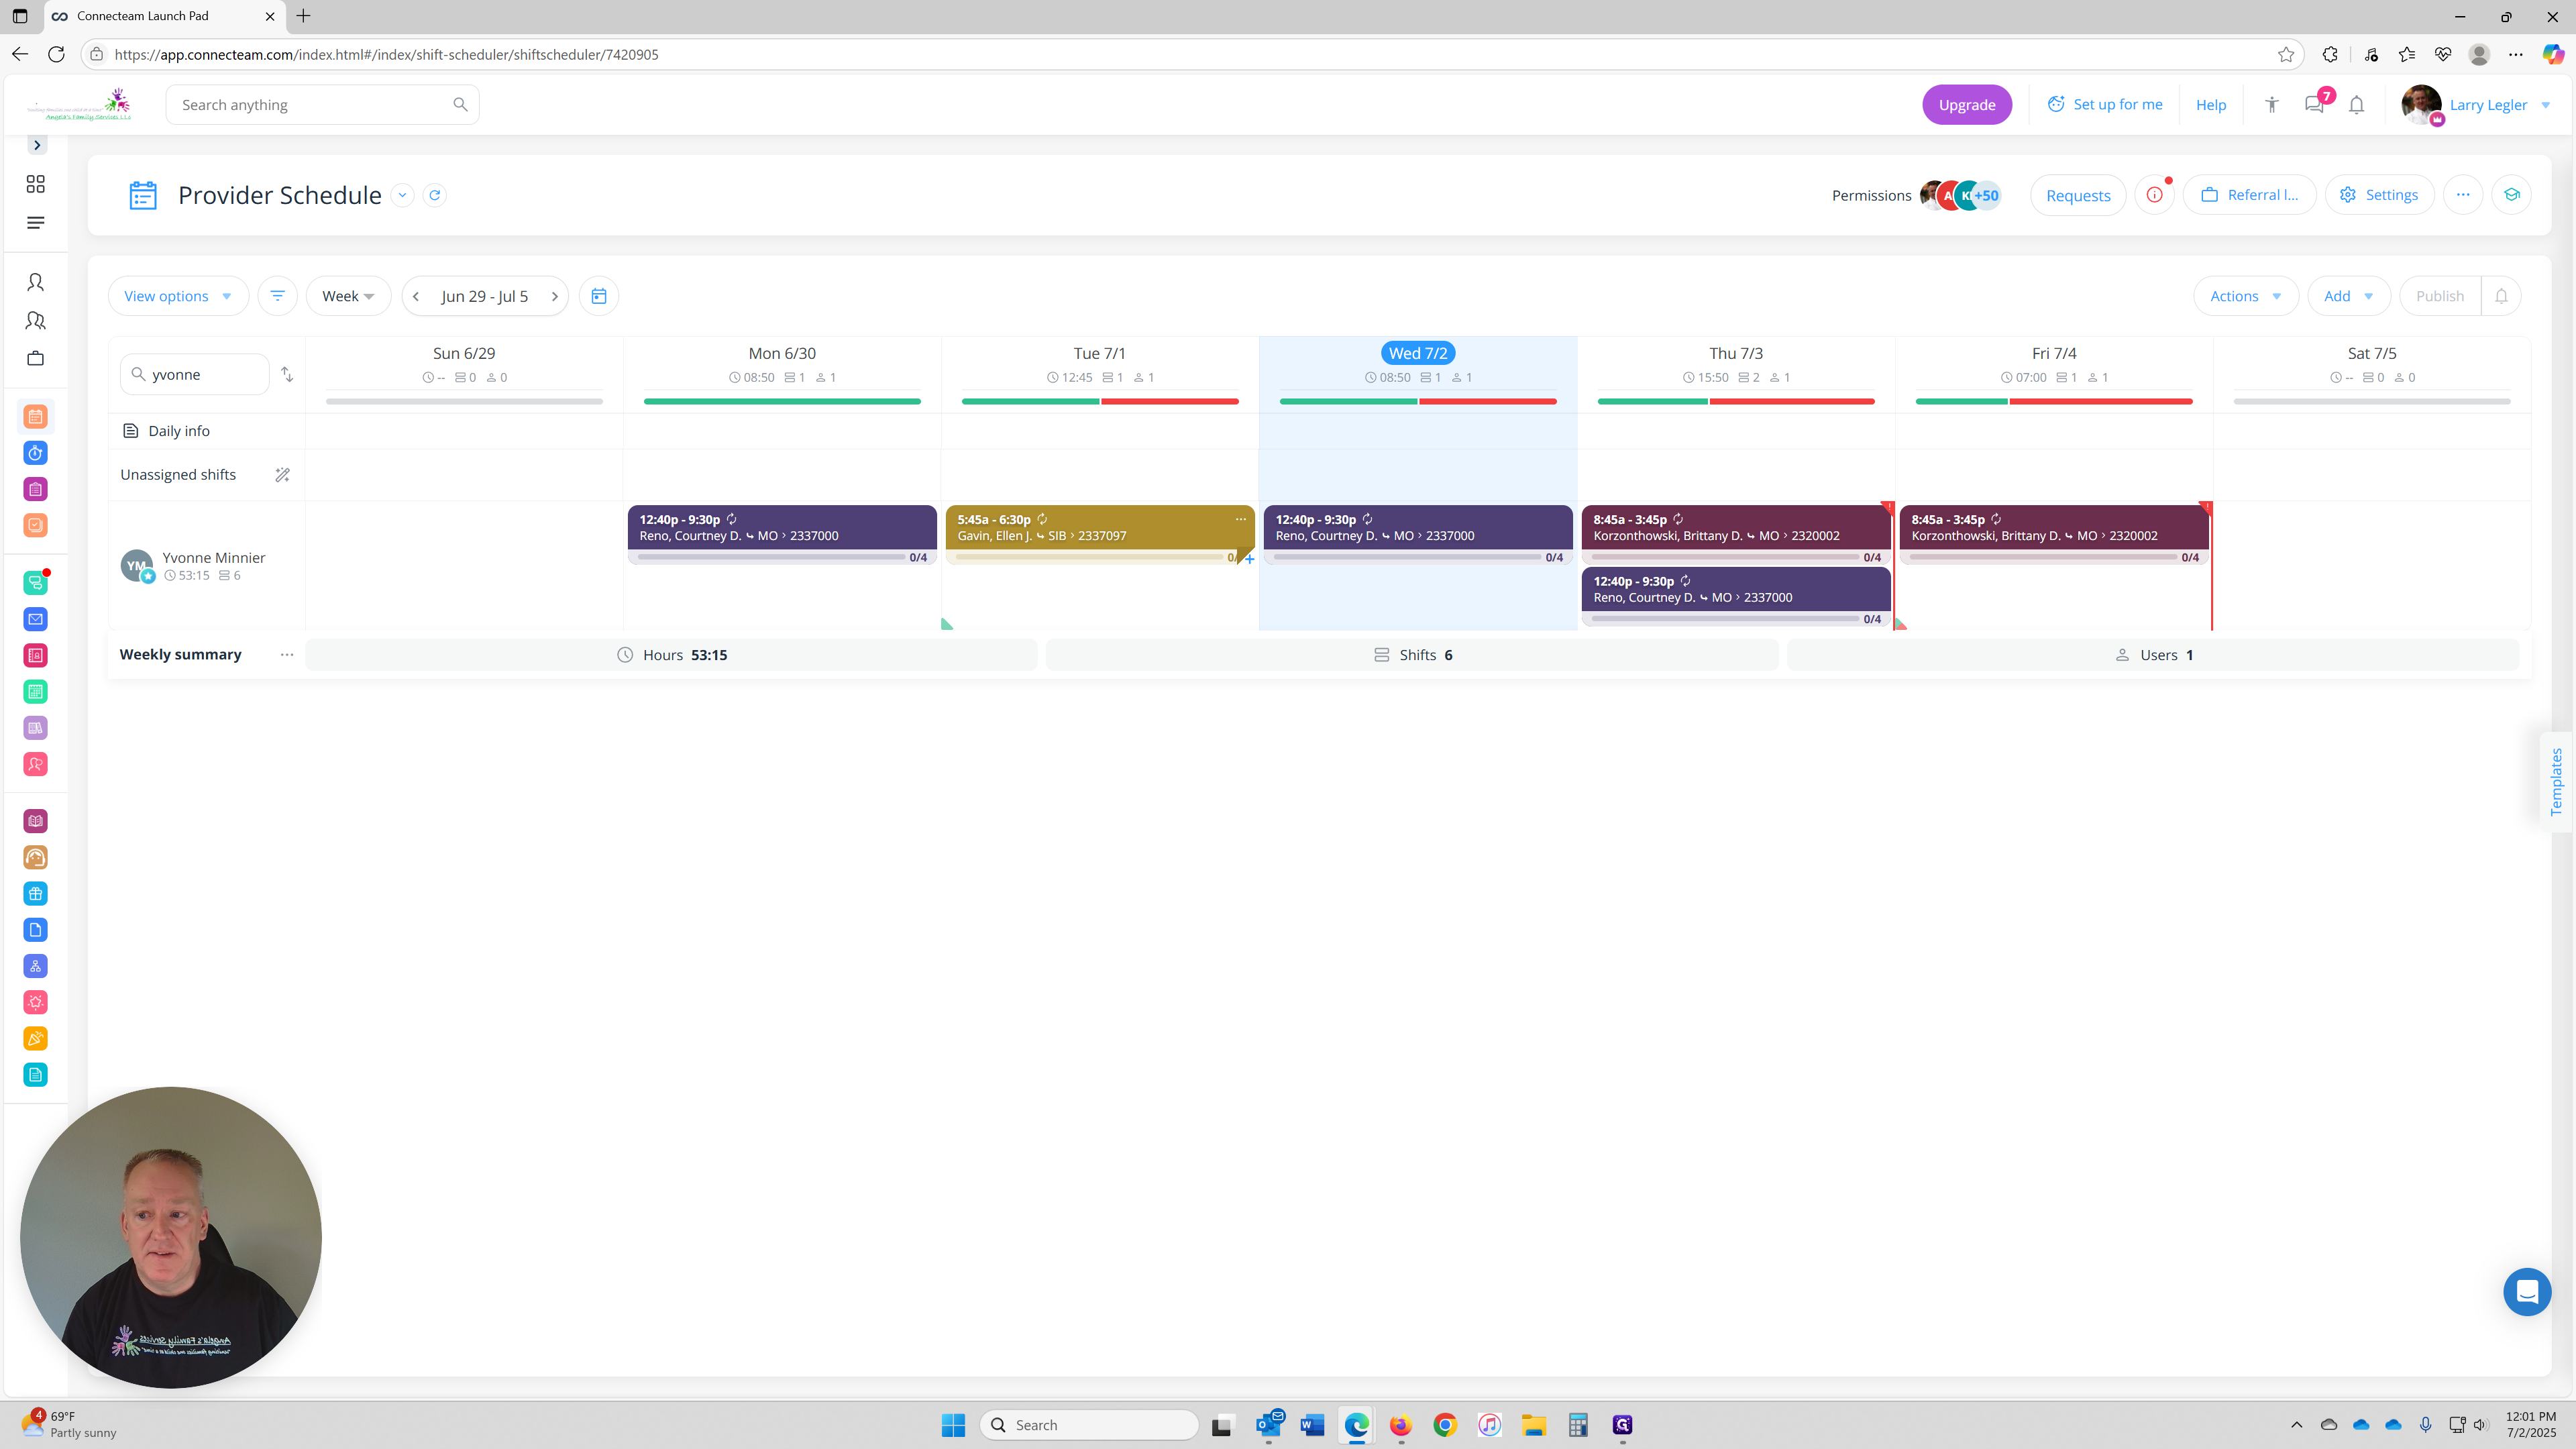
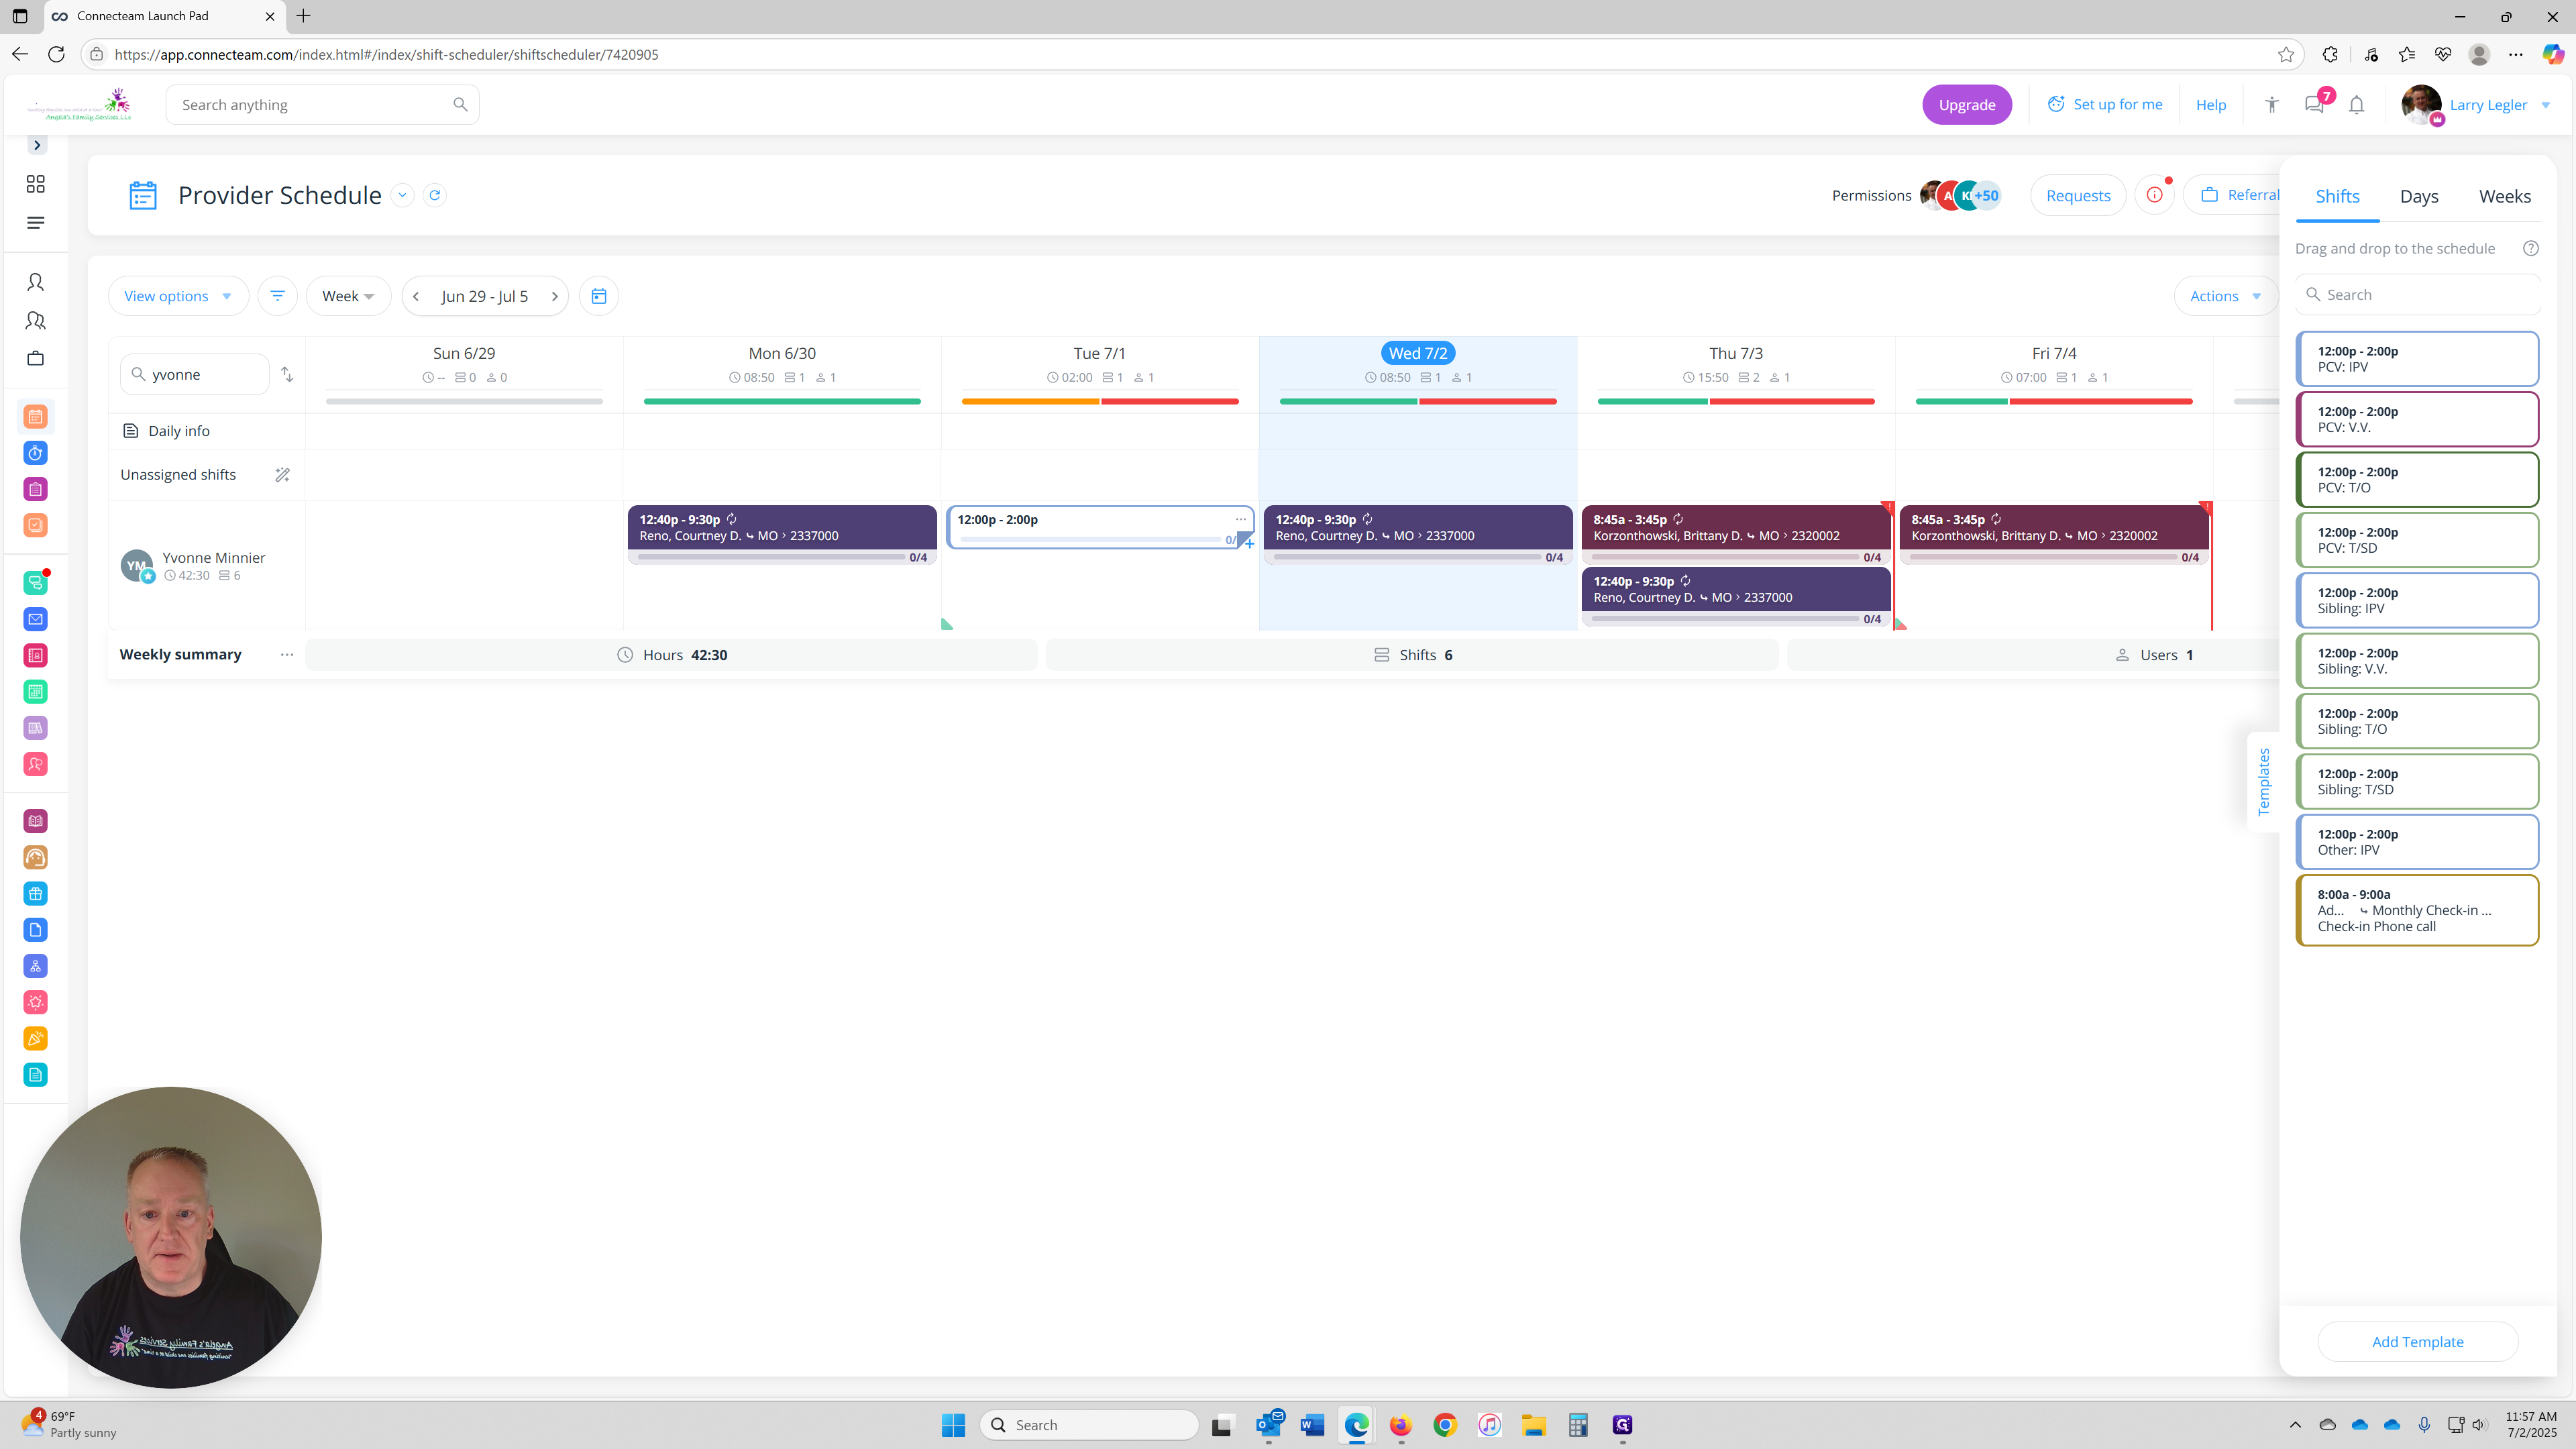
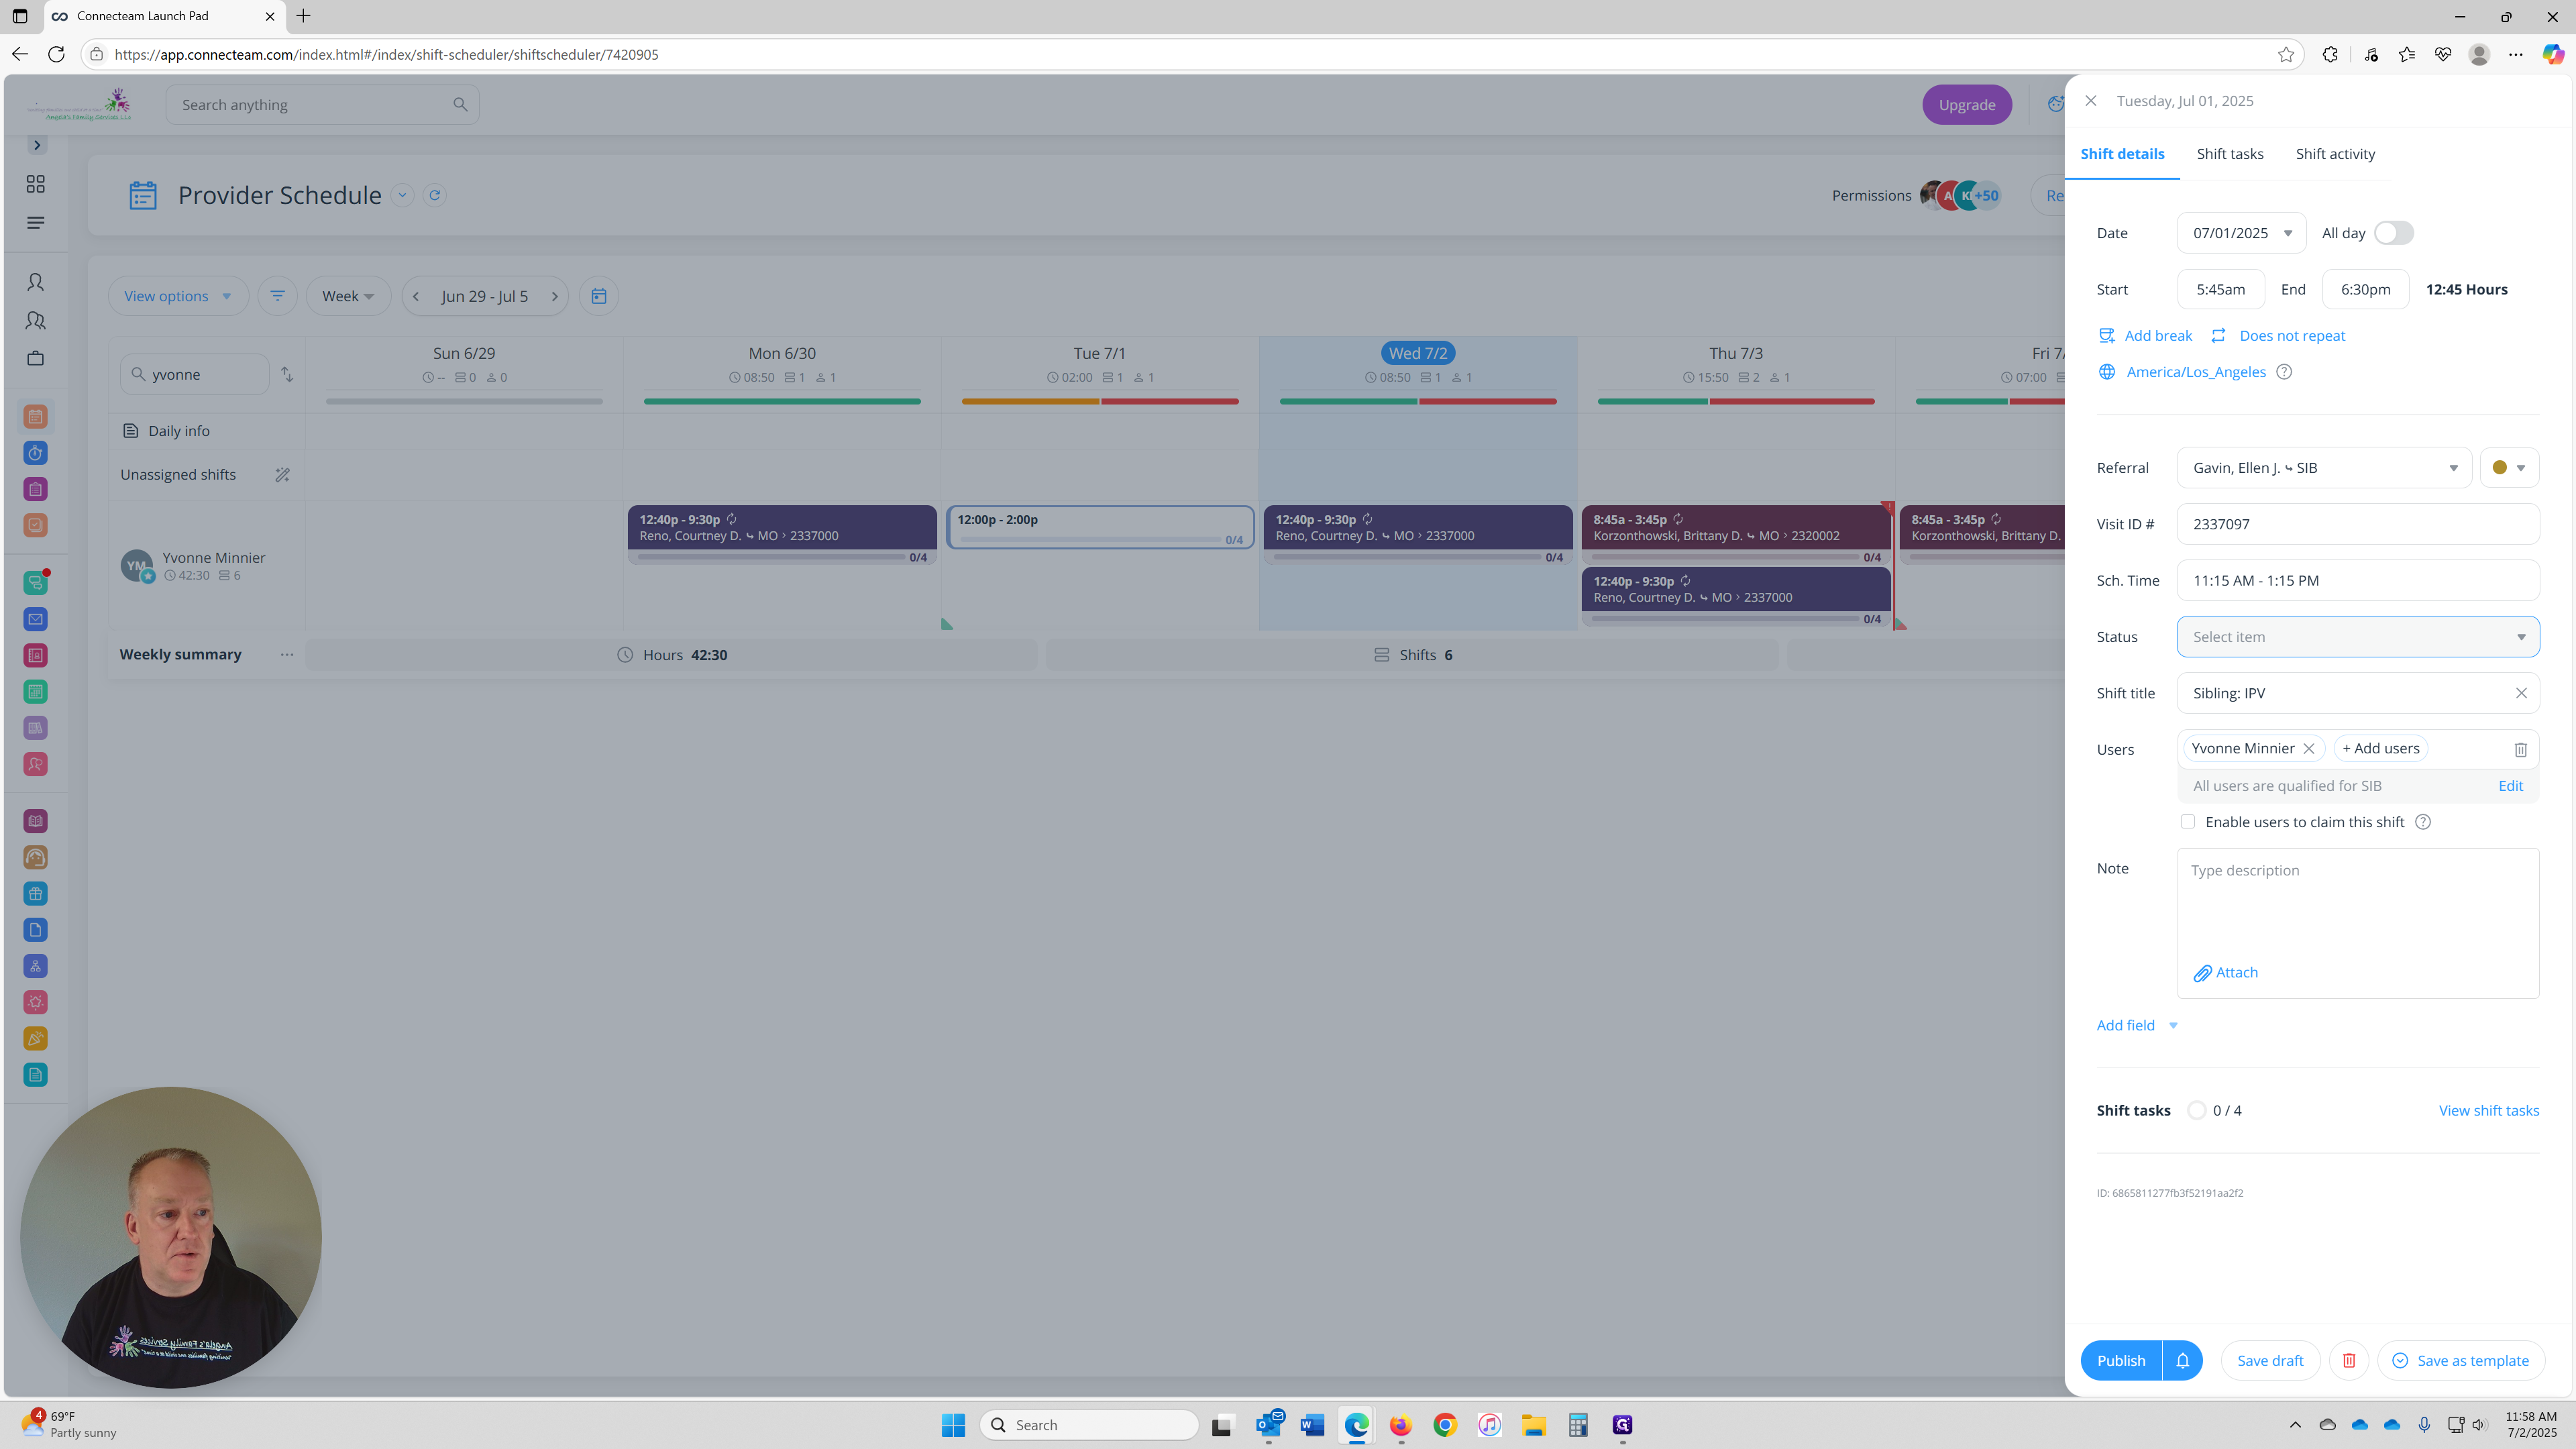
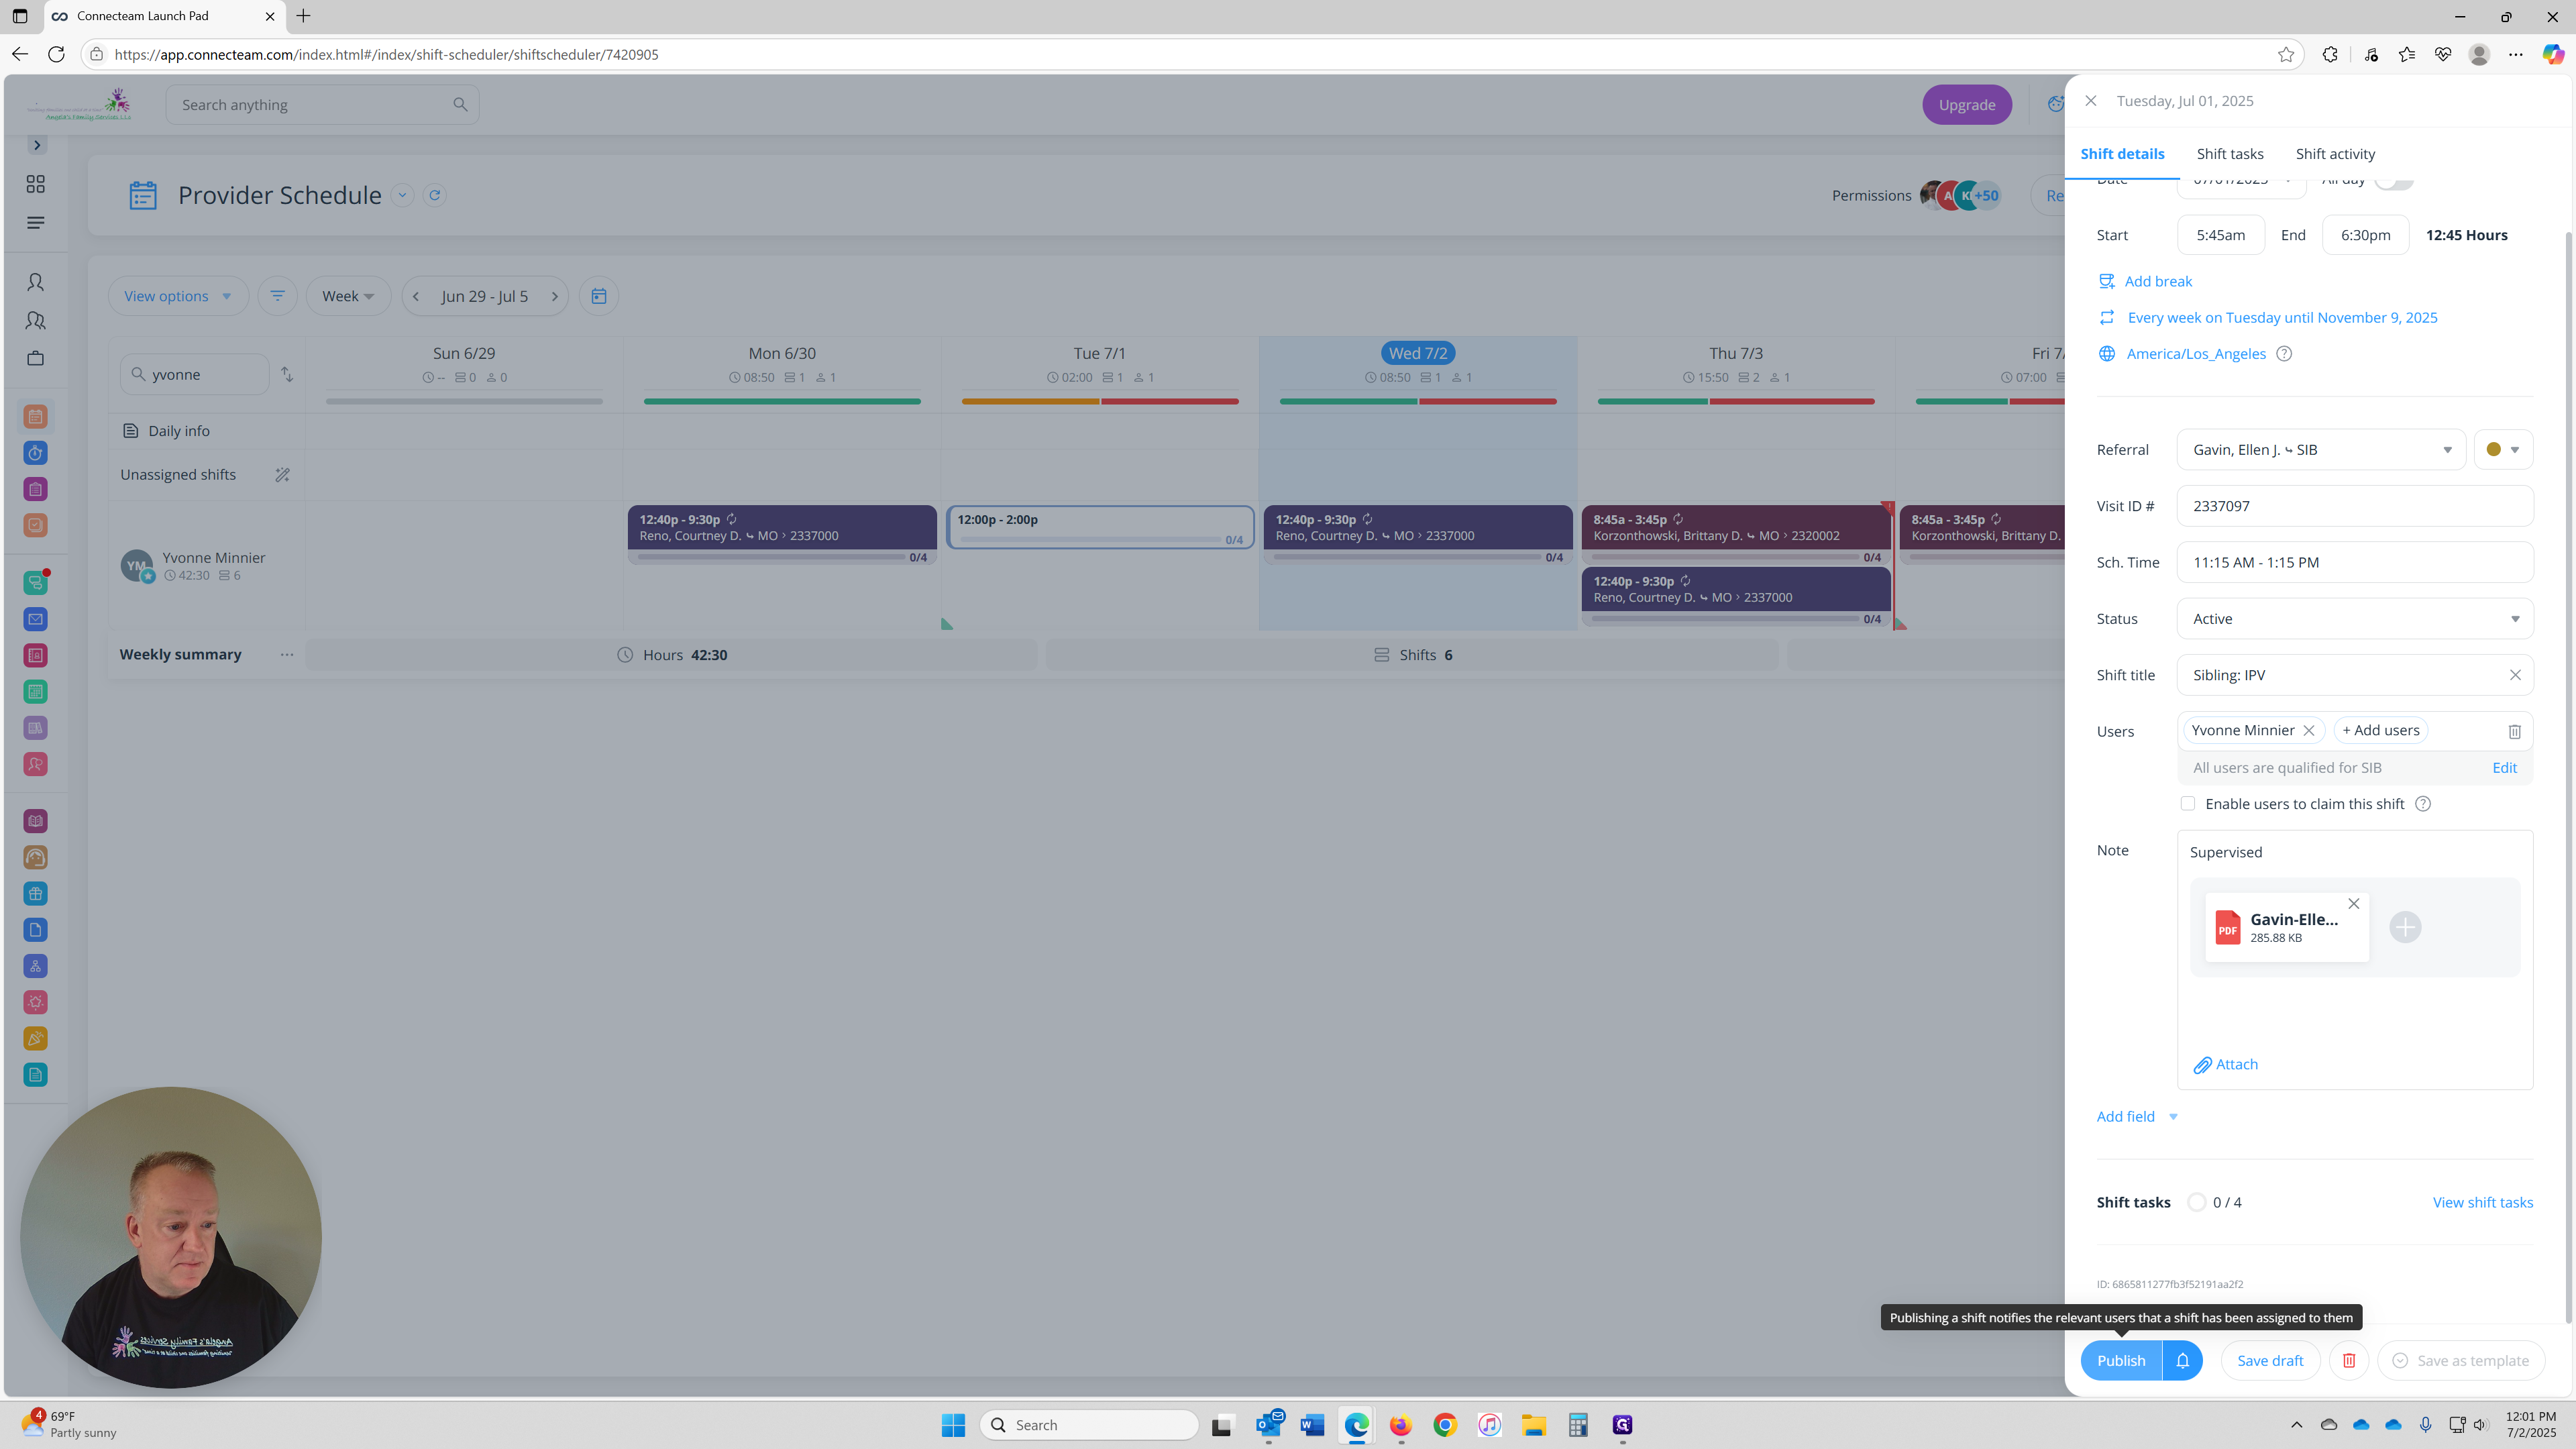
There are several options, we will be choosing Sibling: IPV for this case. We will take that and drag it to the first day that the visit will start.
The shift will automatically appear on the day where you dropped the template.
The Templates panel will remain open on the right-hand side. To view the shift details, click the new shift on the calendar.
In this example, we dropped the shift on Tuesday, 7/1, and it shows as 12:00p – 2:00p.
Clicking the shift will open the Shift Details panel on the right-hand side, where you can view and edit all the information that makes up this referral shift.
Once the shift opens in the right-hand panel, you’ll see the pre-filled details from the template.
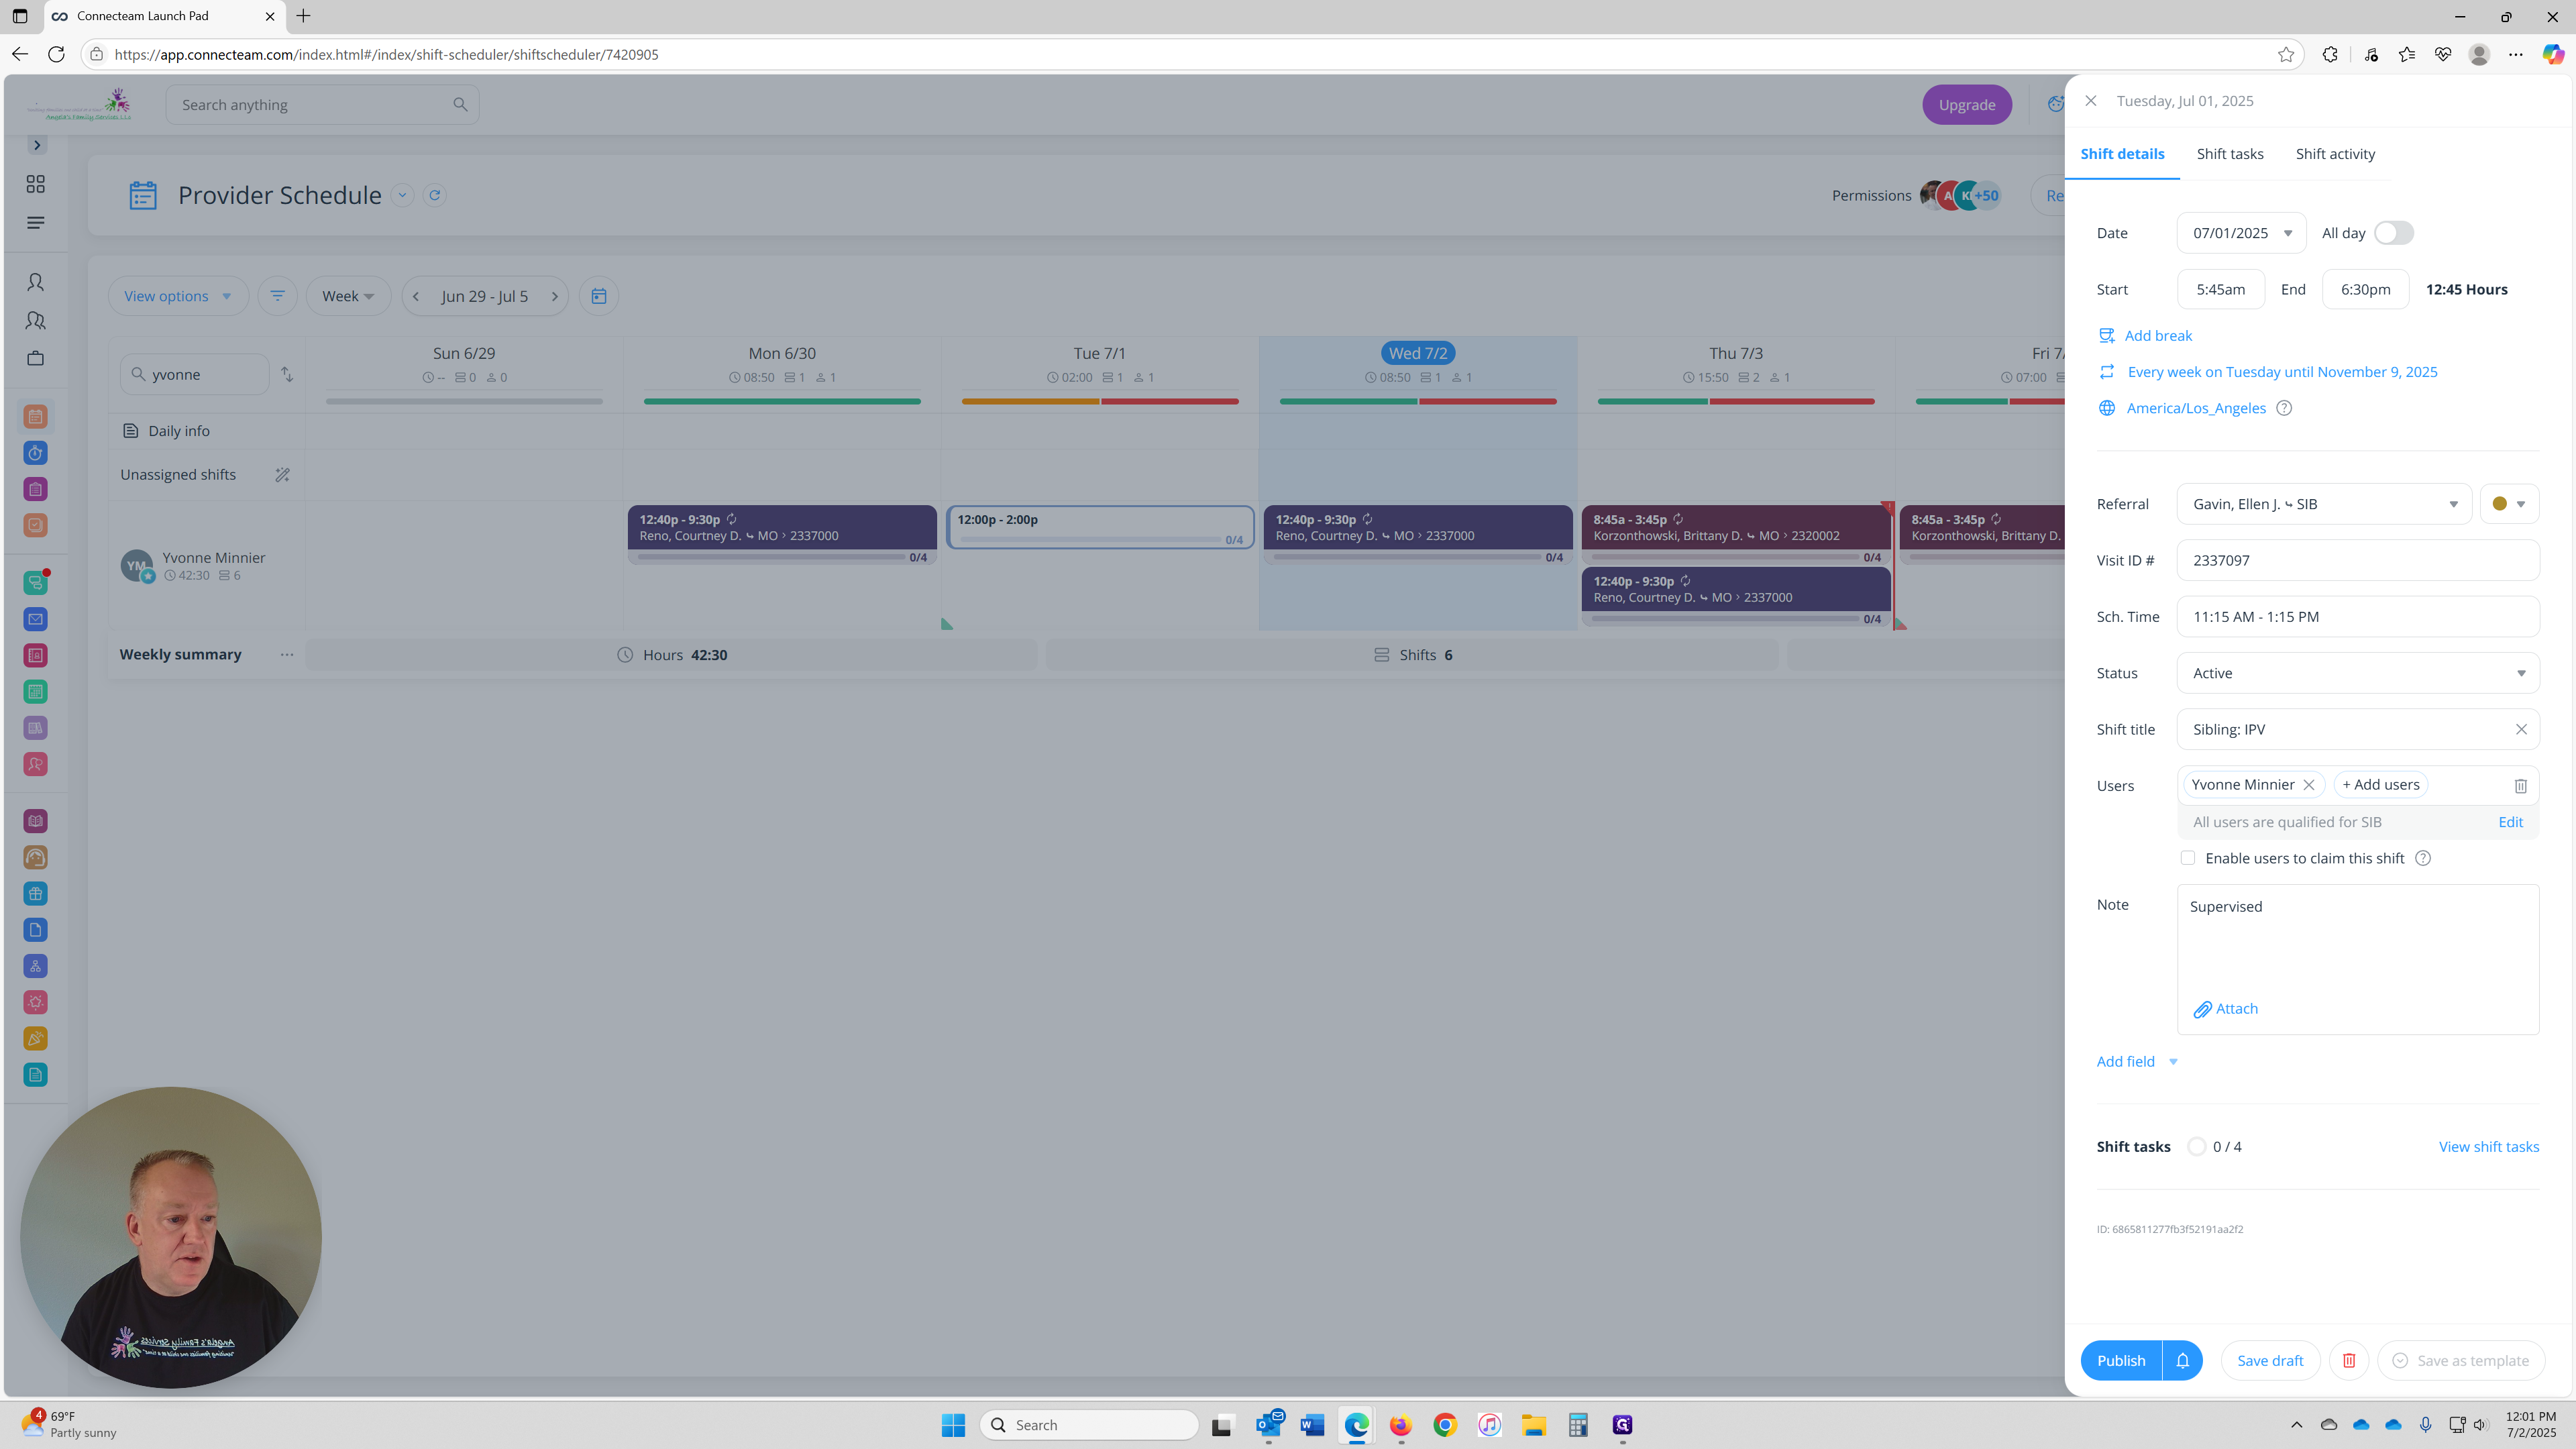
To adjust the shift time, click into the Start Time and End Time fields and enter the correct hours for this referral case.
🕒 In this example, the shift was originally set to 12:00 pm – 2:00 pm, You can update it to reflect the actual travel time, starting from when you leave home to when you return. For Virtual Visits (V.V.) or any appointment without travel, enter the same times in this field as shown in your "Sch. Visit Times" section below, since no travel time applies.
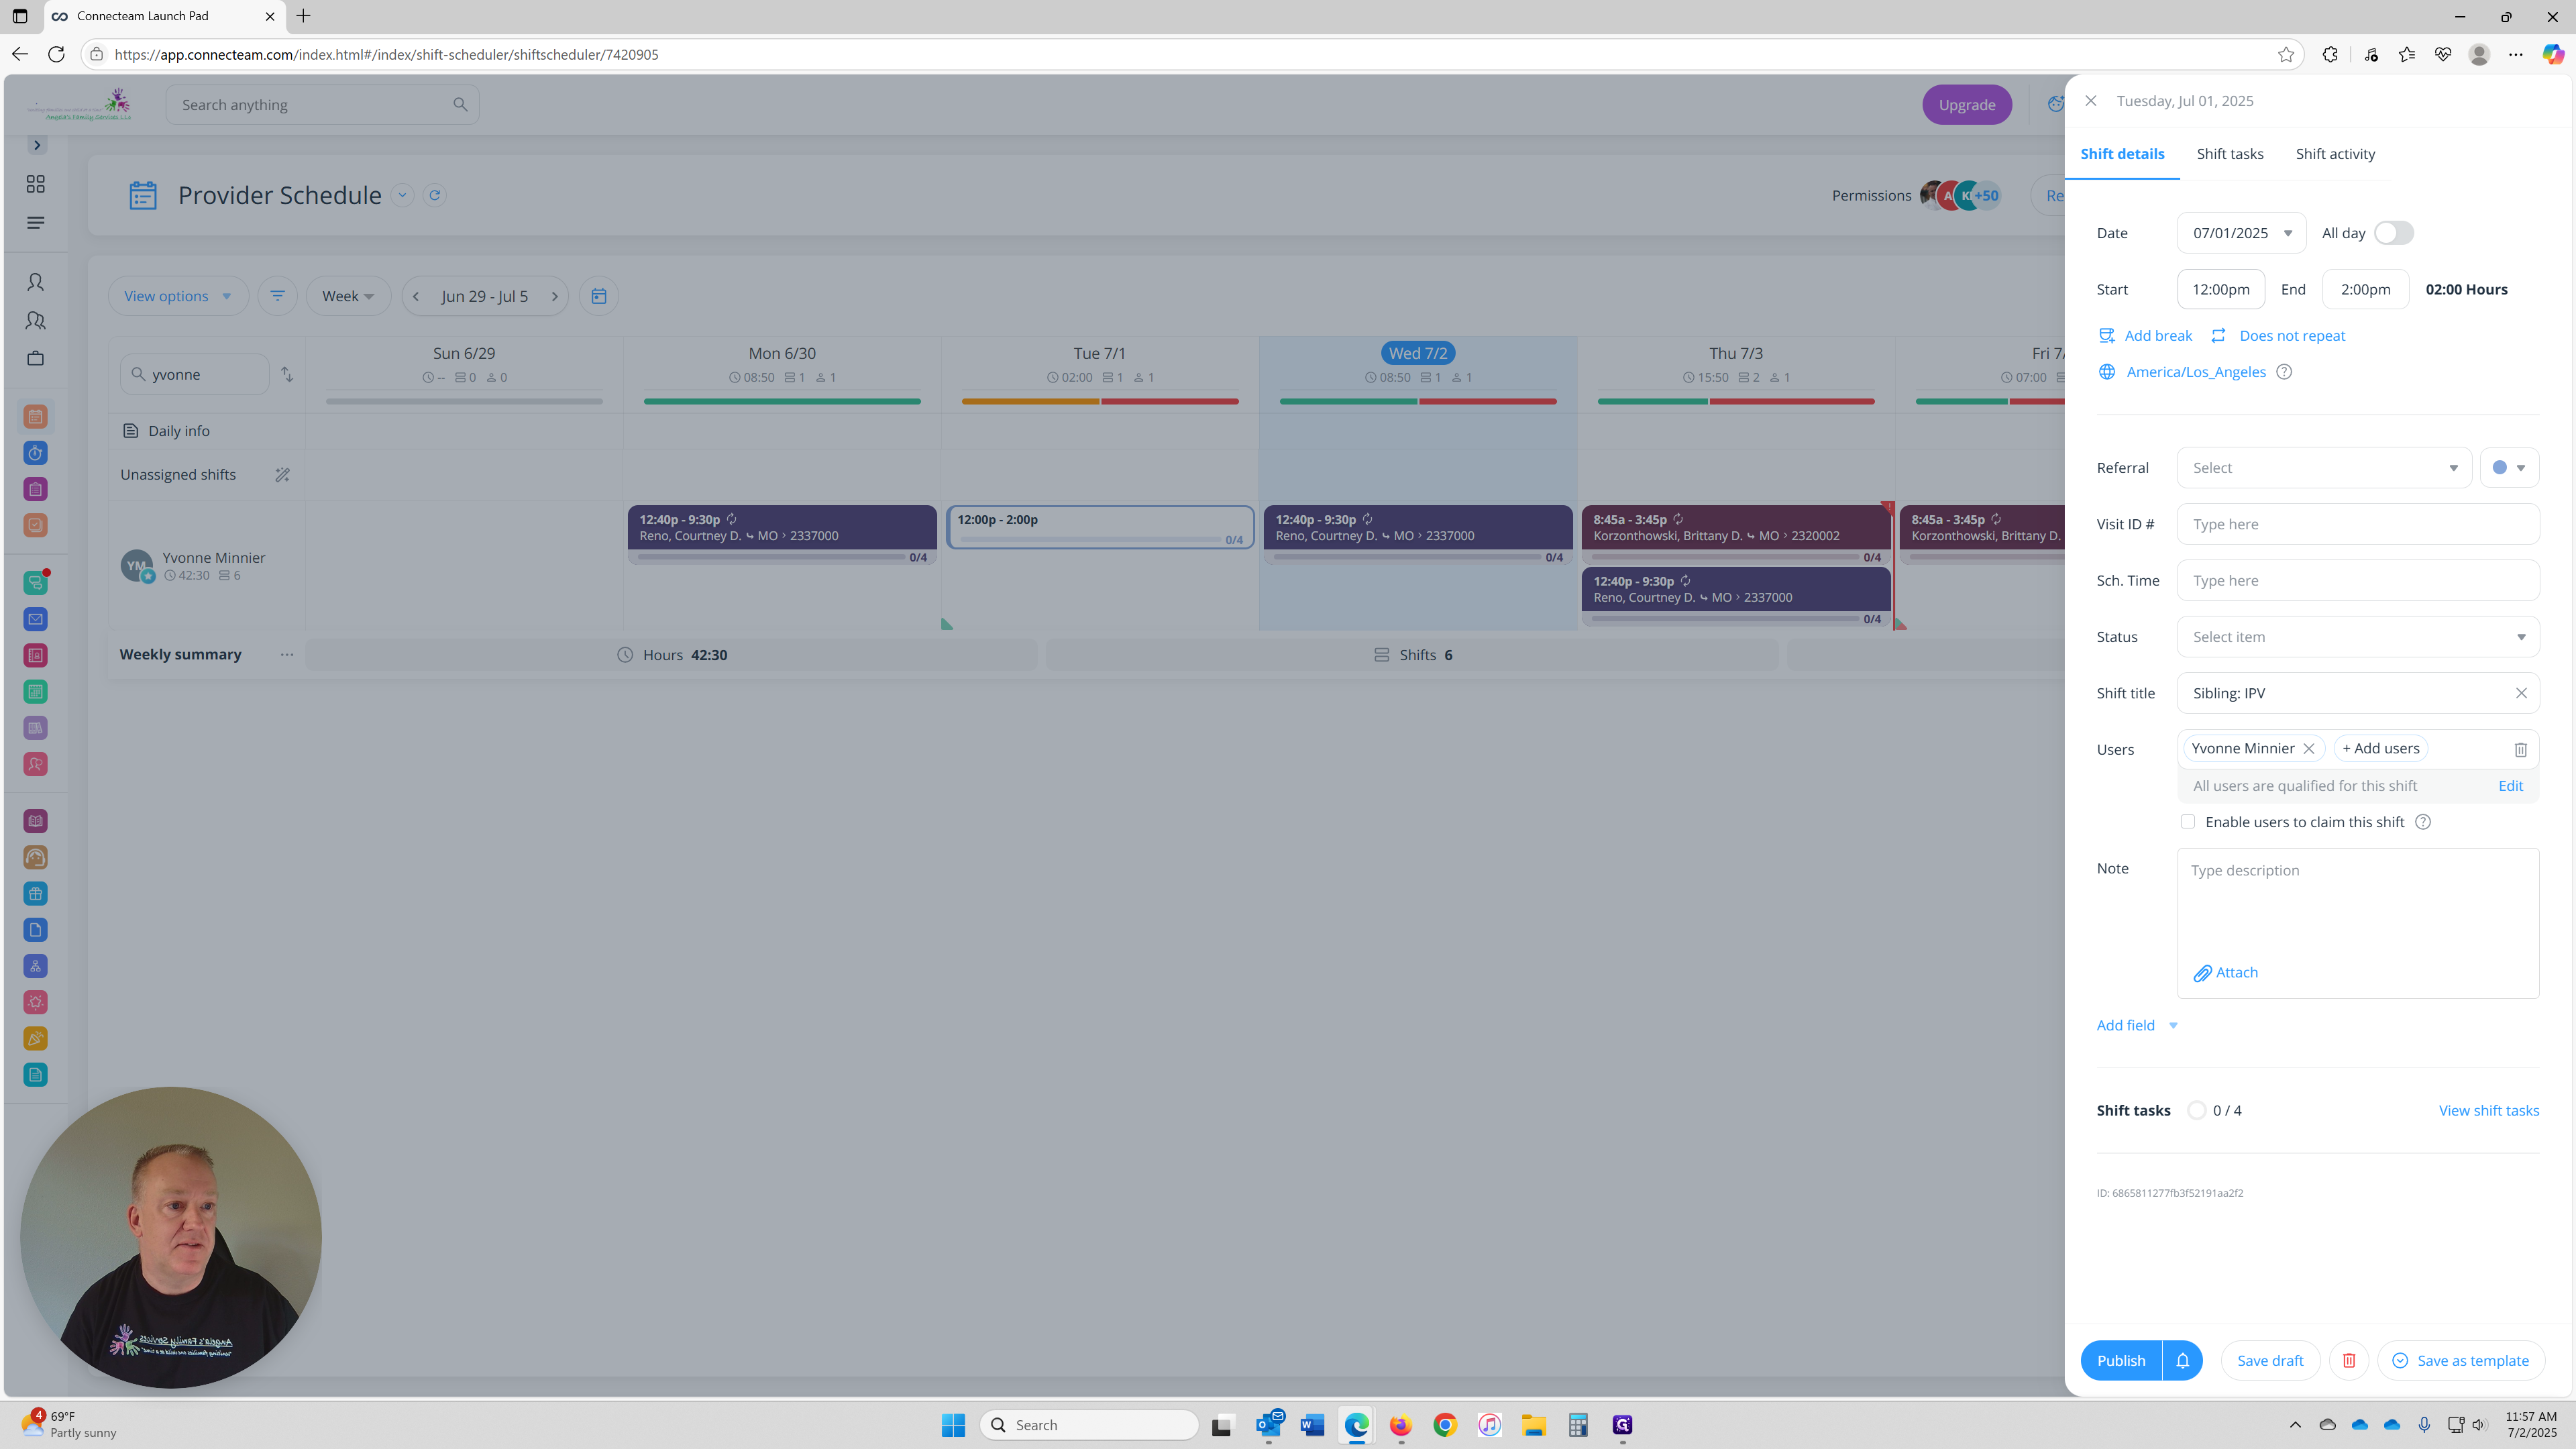

Next, select the relationship type for the referral case. This helps categorize the shift appropriately and is a required selection.
Click the drop-down and choose either:
MO for Mother
SIB for Sibling


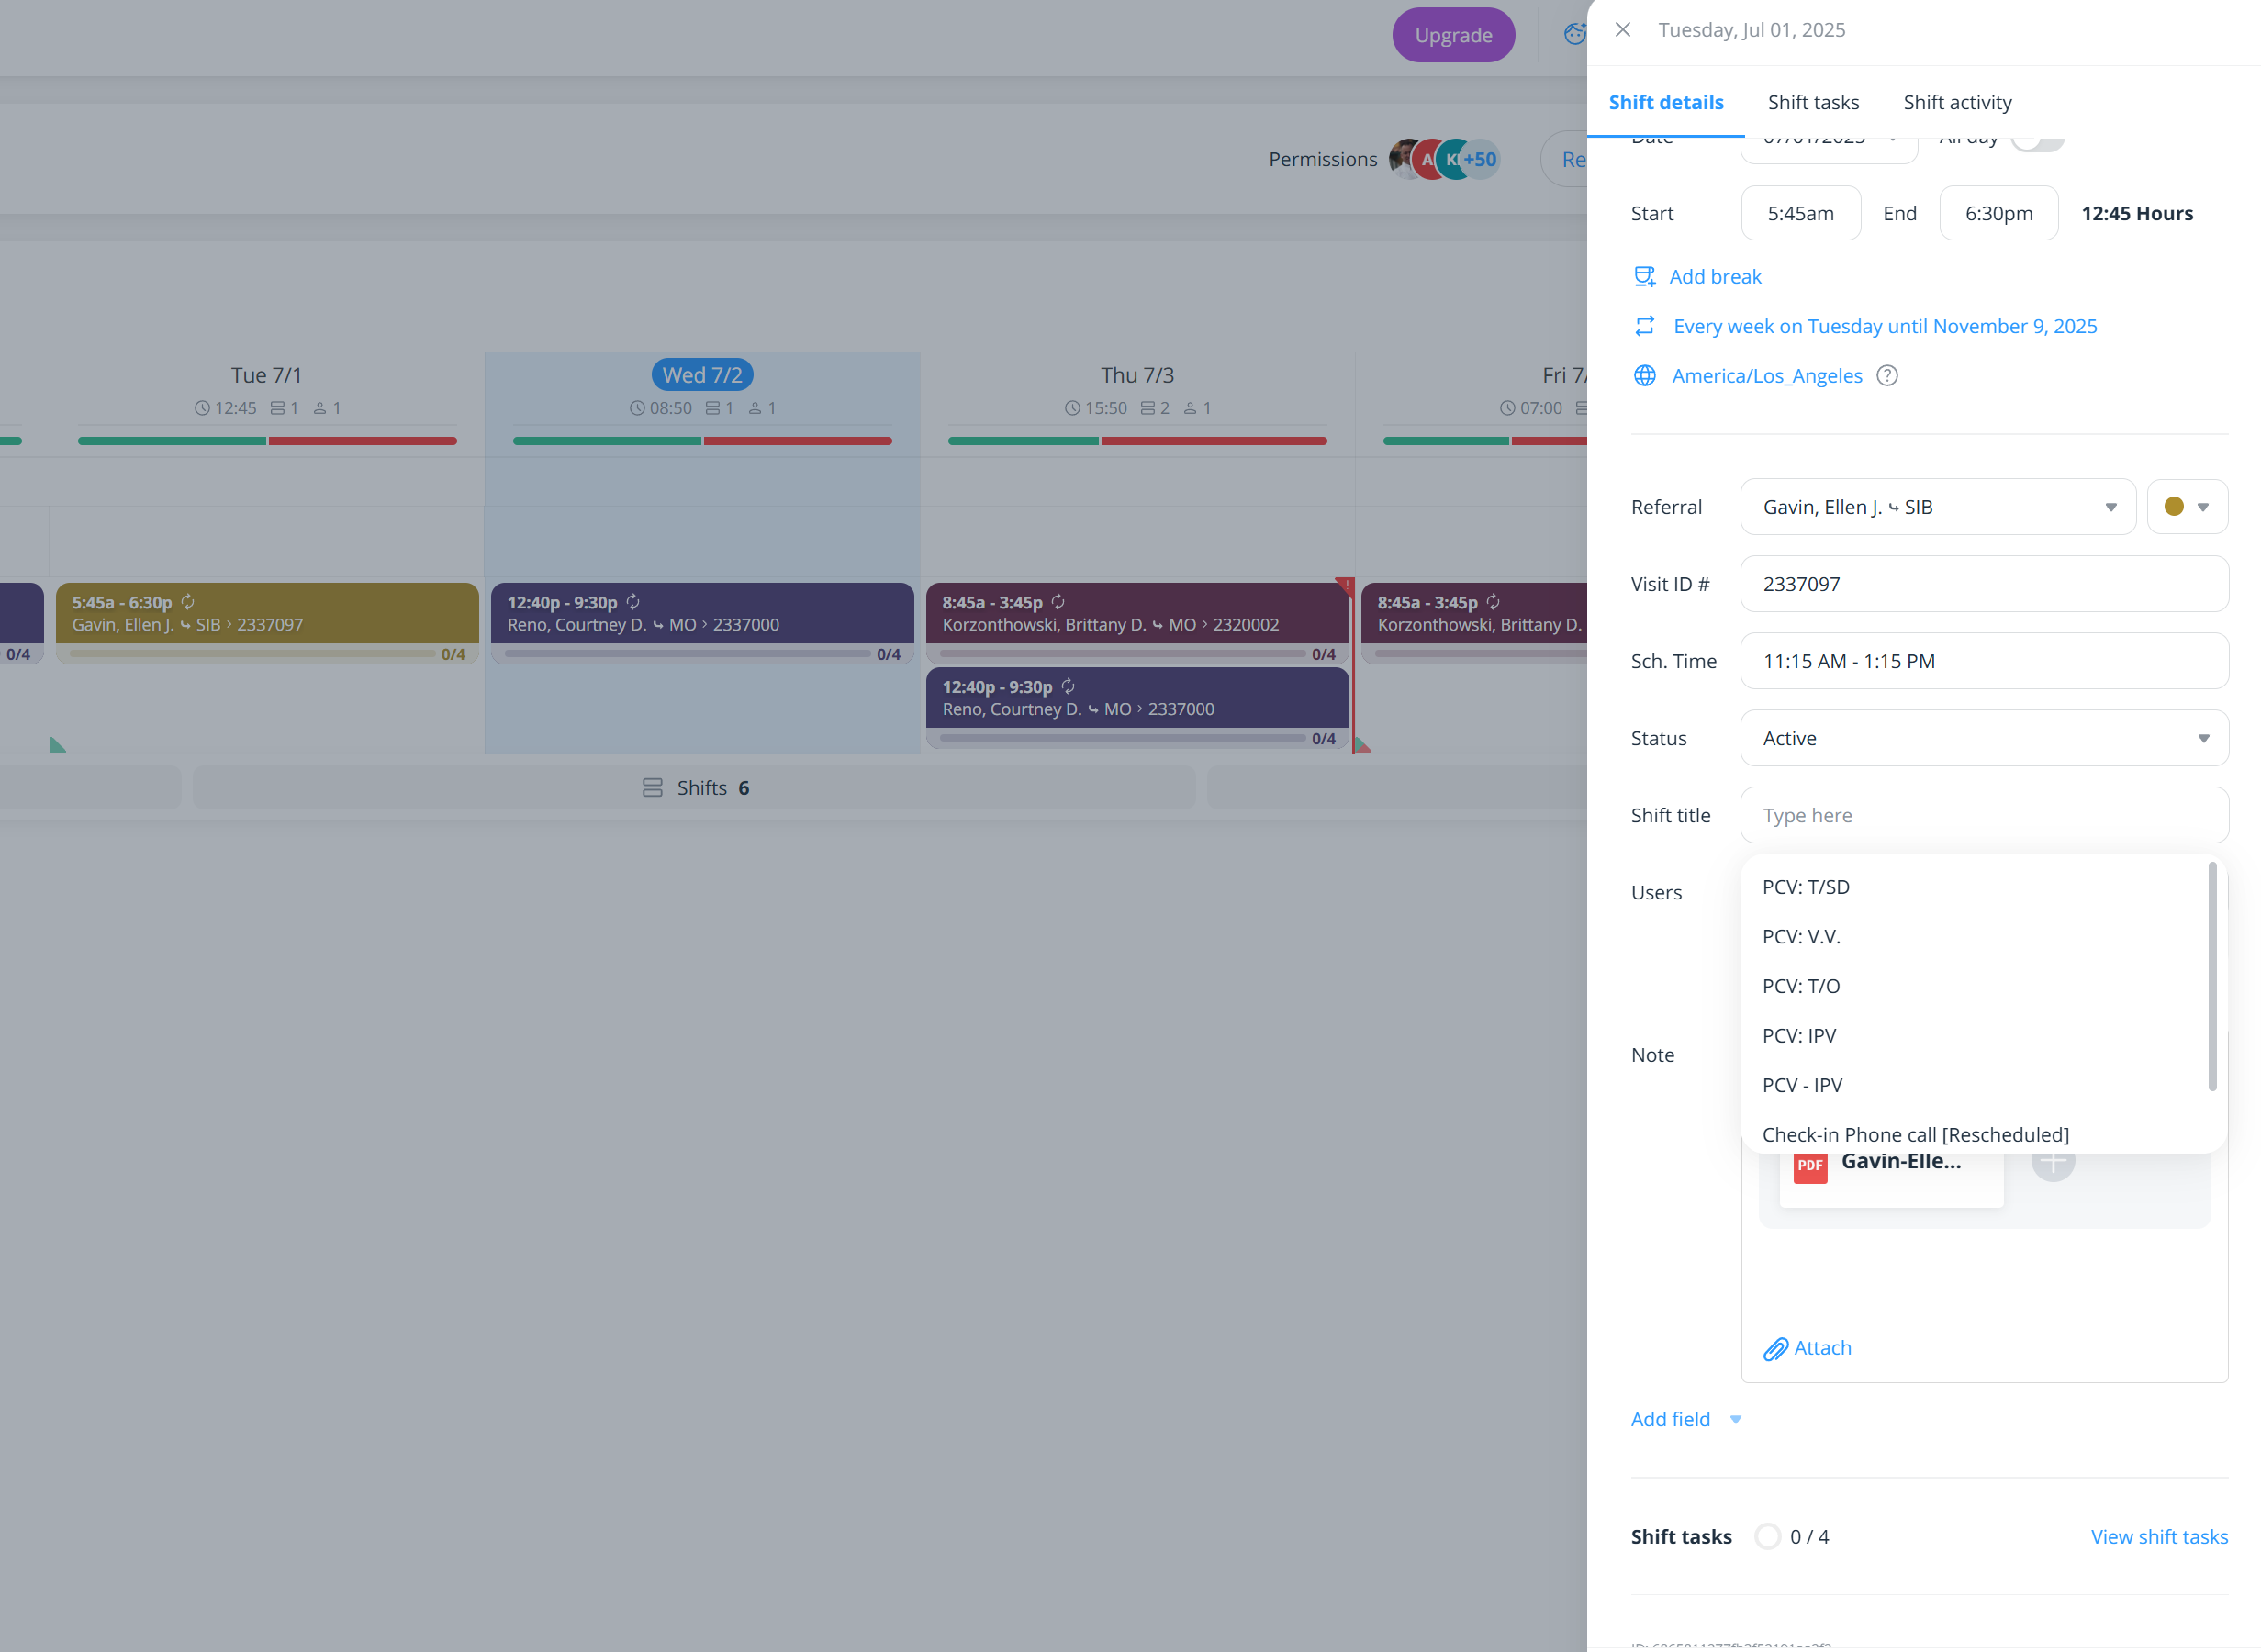
The Status field is a flexible tool that allows you to track the current state and progress of each shift. While “Scheduled” is used for shifts that are current, you can update this field later (or at any time you find it has changed) to reflect how the shift concludes.
Here are some common uses:
Completed – when the shift has ended successfully
Scheduled - used when all shift details are entered, the Intake is attached, and the visit is fully scheduled
Resolved – when the shift is closed, or after updating the referral and changing Visit ID #
Cancelled > 24 hours – for shifts canceled for that reason, usually billing designations
No Show – if the referral did not attend
And more...
✅ You can begin using this field now to track your shifts throughout your calendar. Update it as needed to reflect the shift’s outcome or status.
ℹ️ More detailed training on advanced uses of the Status field will be provided later.
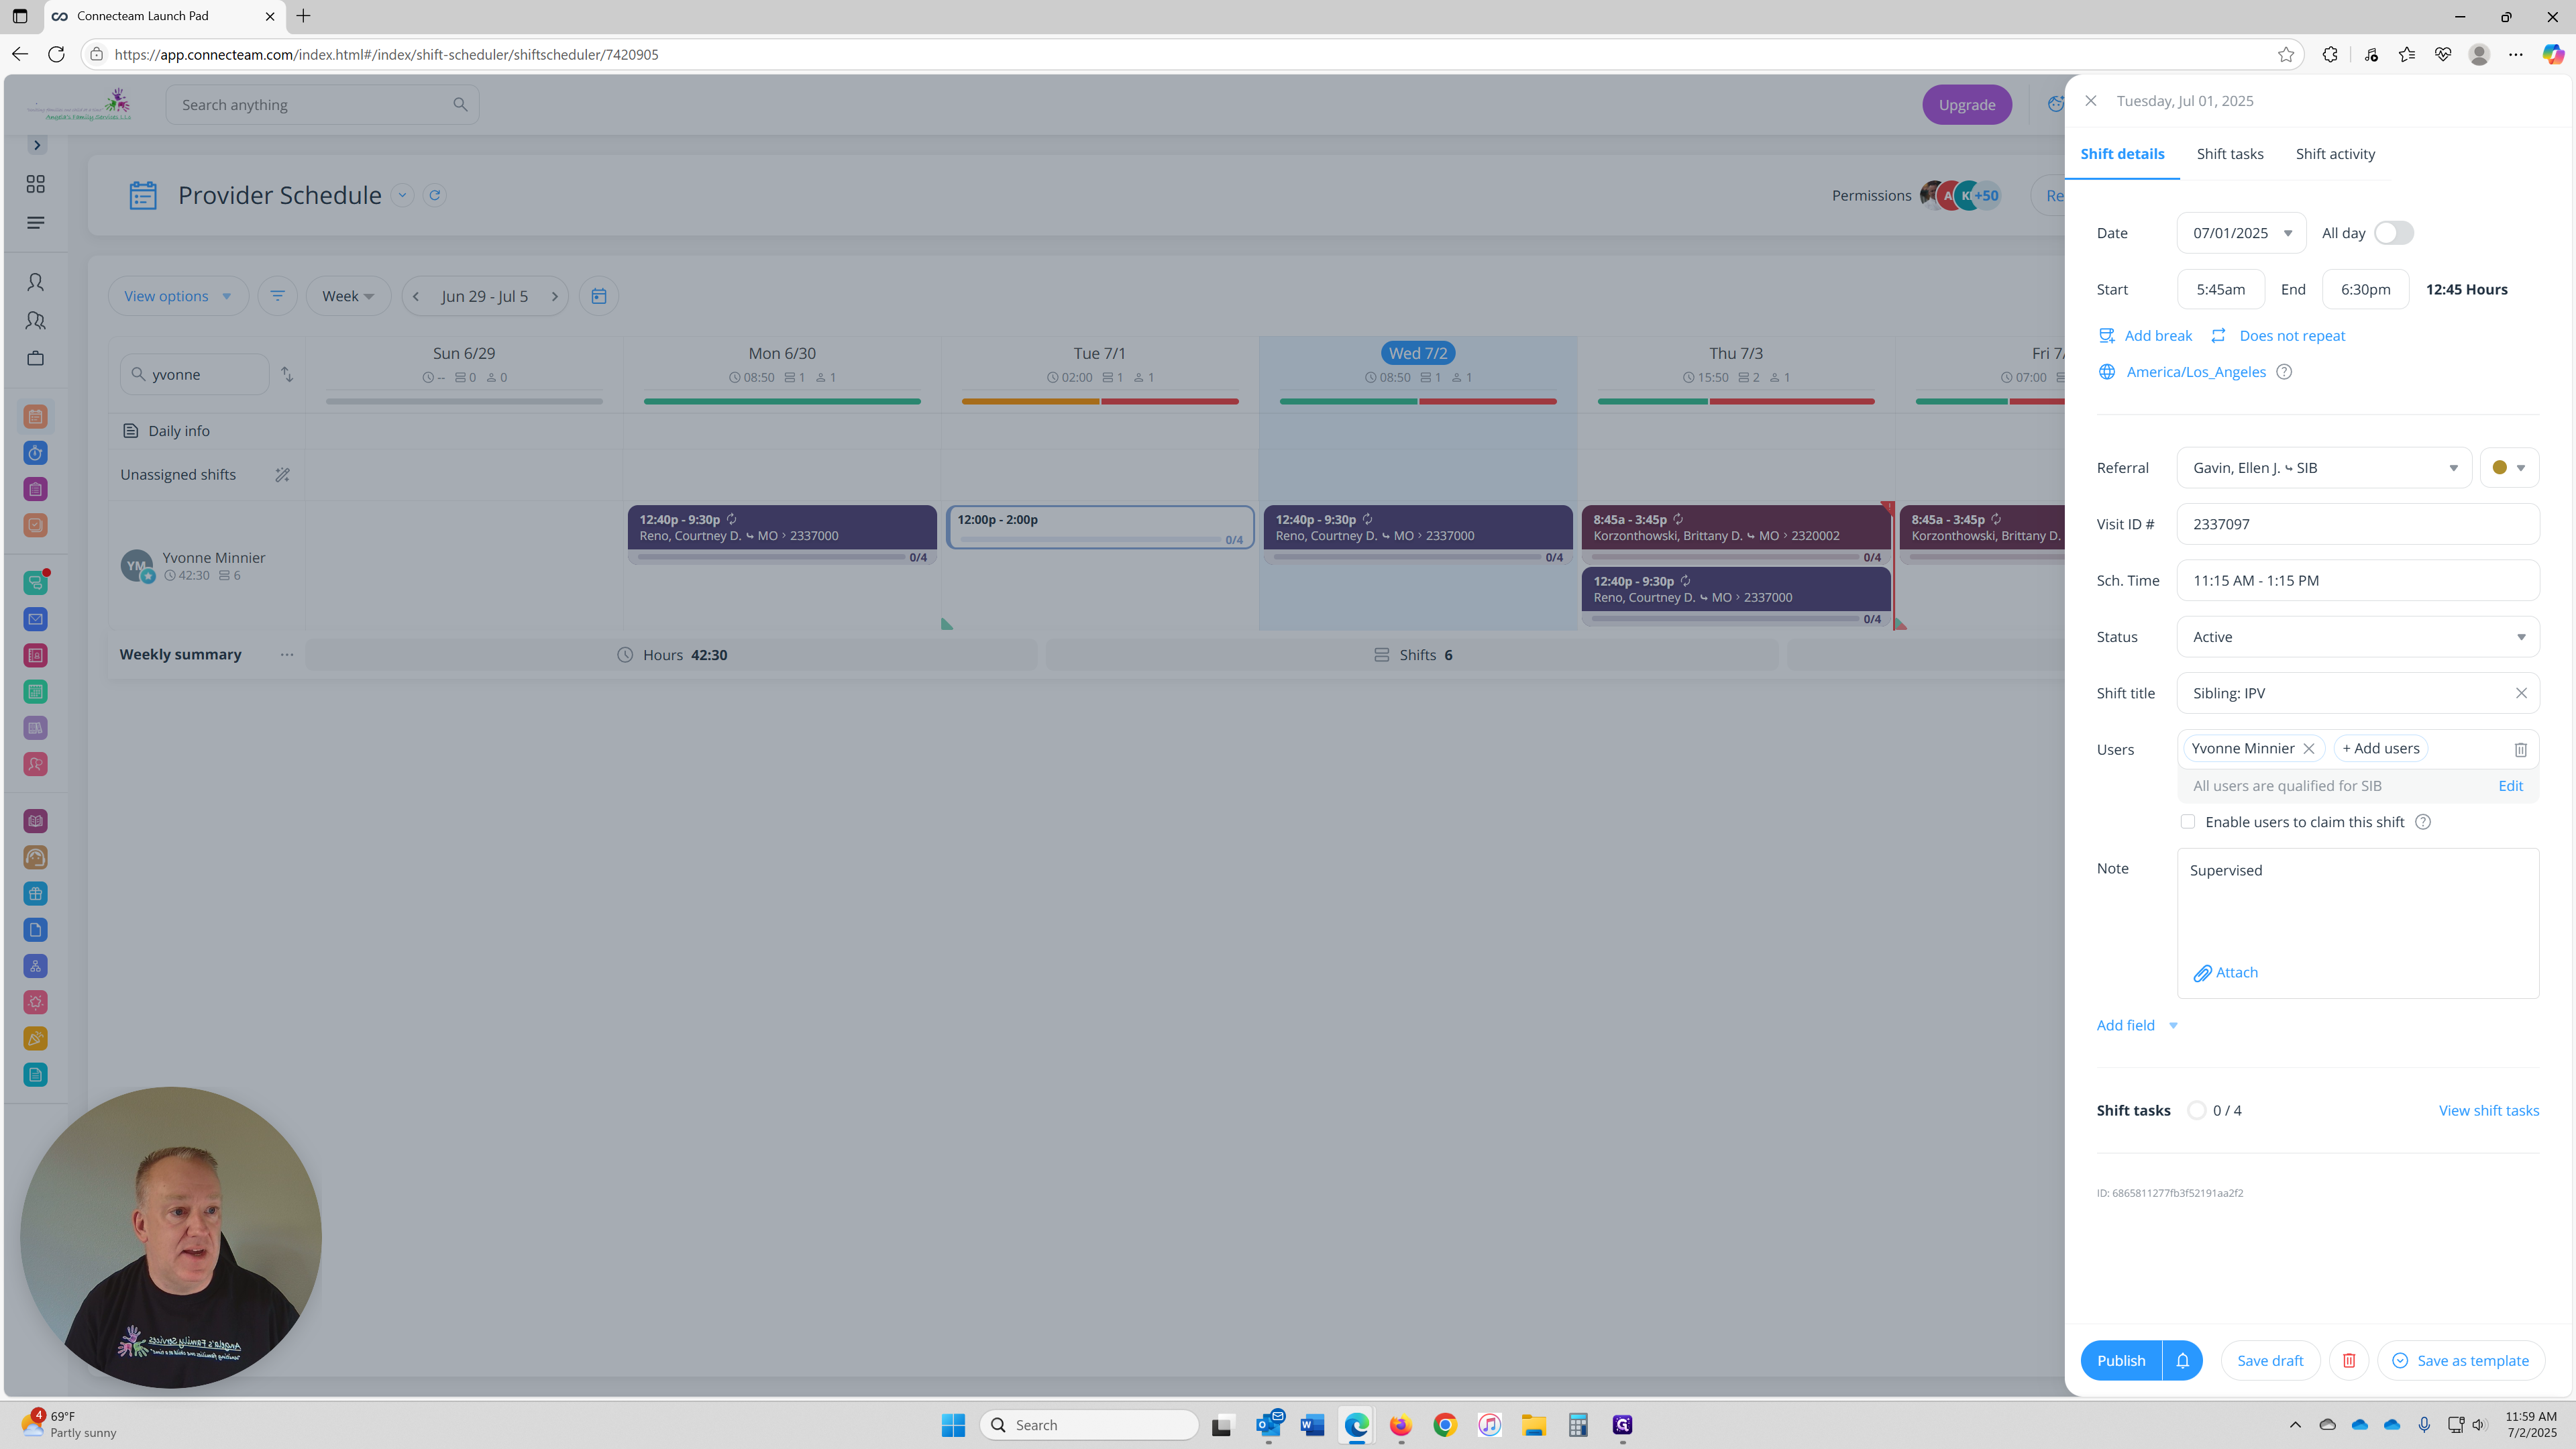
If you created the shift using a template from the Week View, your name will be automatically filled in under the User field — as shown in this example.
If your name is not listed, it likely means:
You didn’t use a template to create the shift, or
You started the shift from a different method (e.g., manually from the calendar)
⚠️ Important:
Do not manually select your name if it’s missing. This can lead to errors and mis-attribution of shifts.
✅ Always use the template method to ensure your name and other key details — including Shift Title/Tasks— are applied correctly.

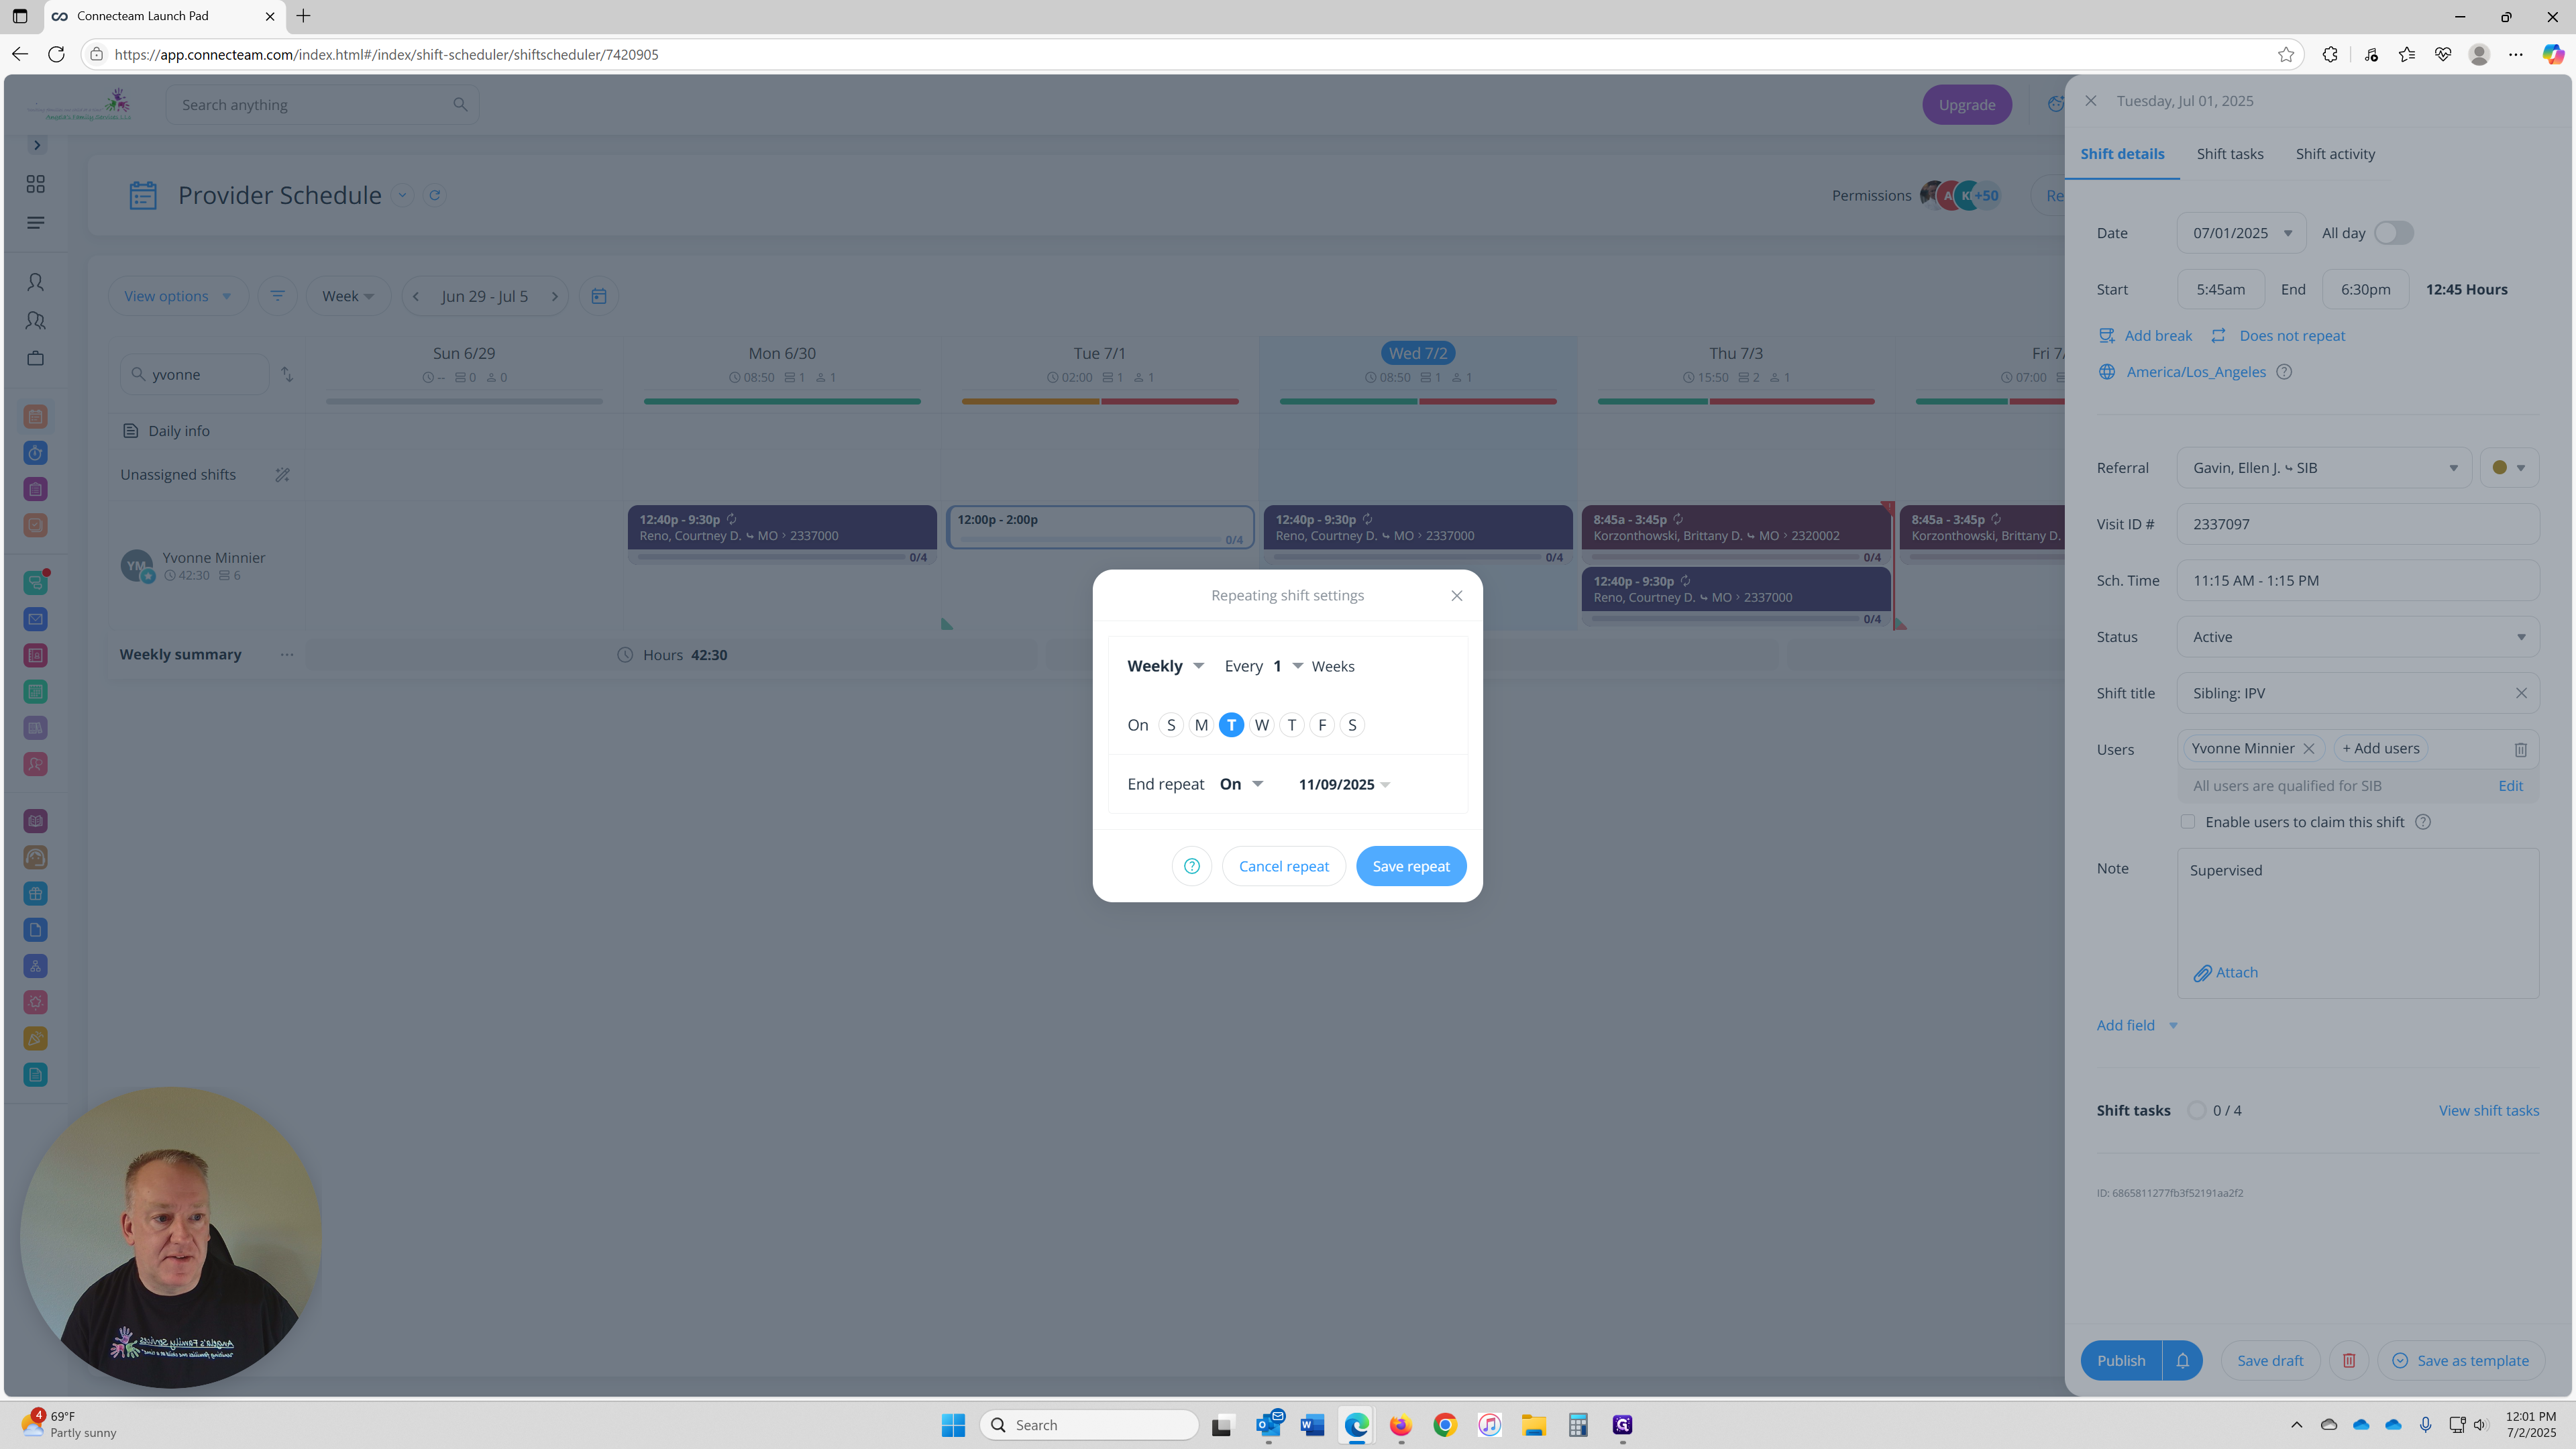
Repeating Schedules
You may have noticed the repeating schedule options (e.g., Daily, Weekly, Monthly) appear near the top of the screen earlier in the process.
We’re addressing them now — in Step 13 — to avoid starting the procedure with a more complex feature.
These options allow you to set how often the shift repeats, which is useful for recurring visits.
⚠️ Be careful when selecting a repeat type. For example, choosing “Daily” instead of “Weekly” can limit how far ahead you’re able to schedule — as shown in the training video issue that took me a bit to figure out myself.

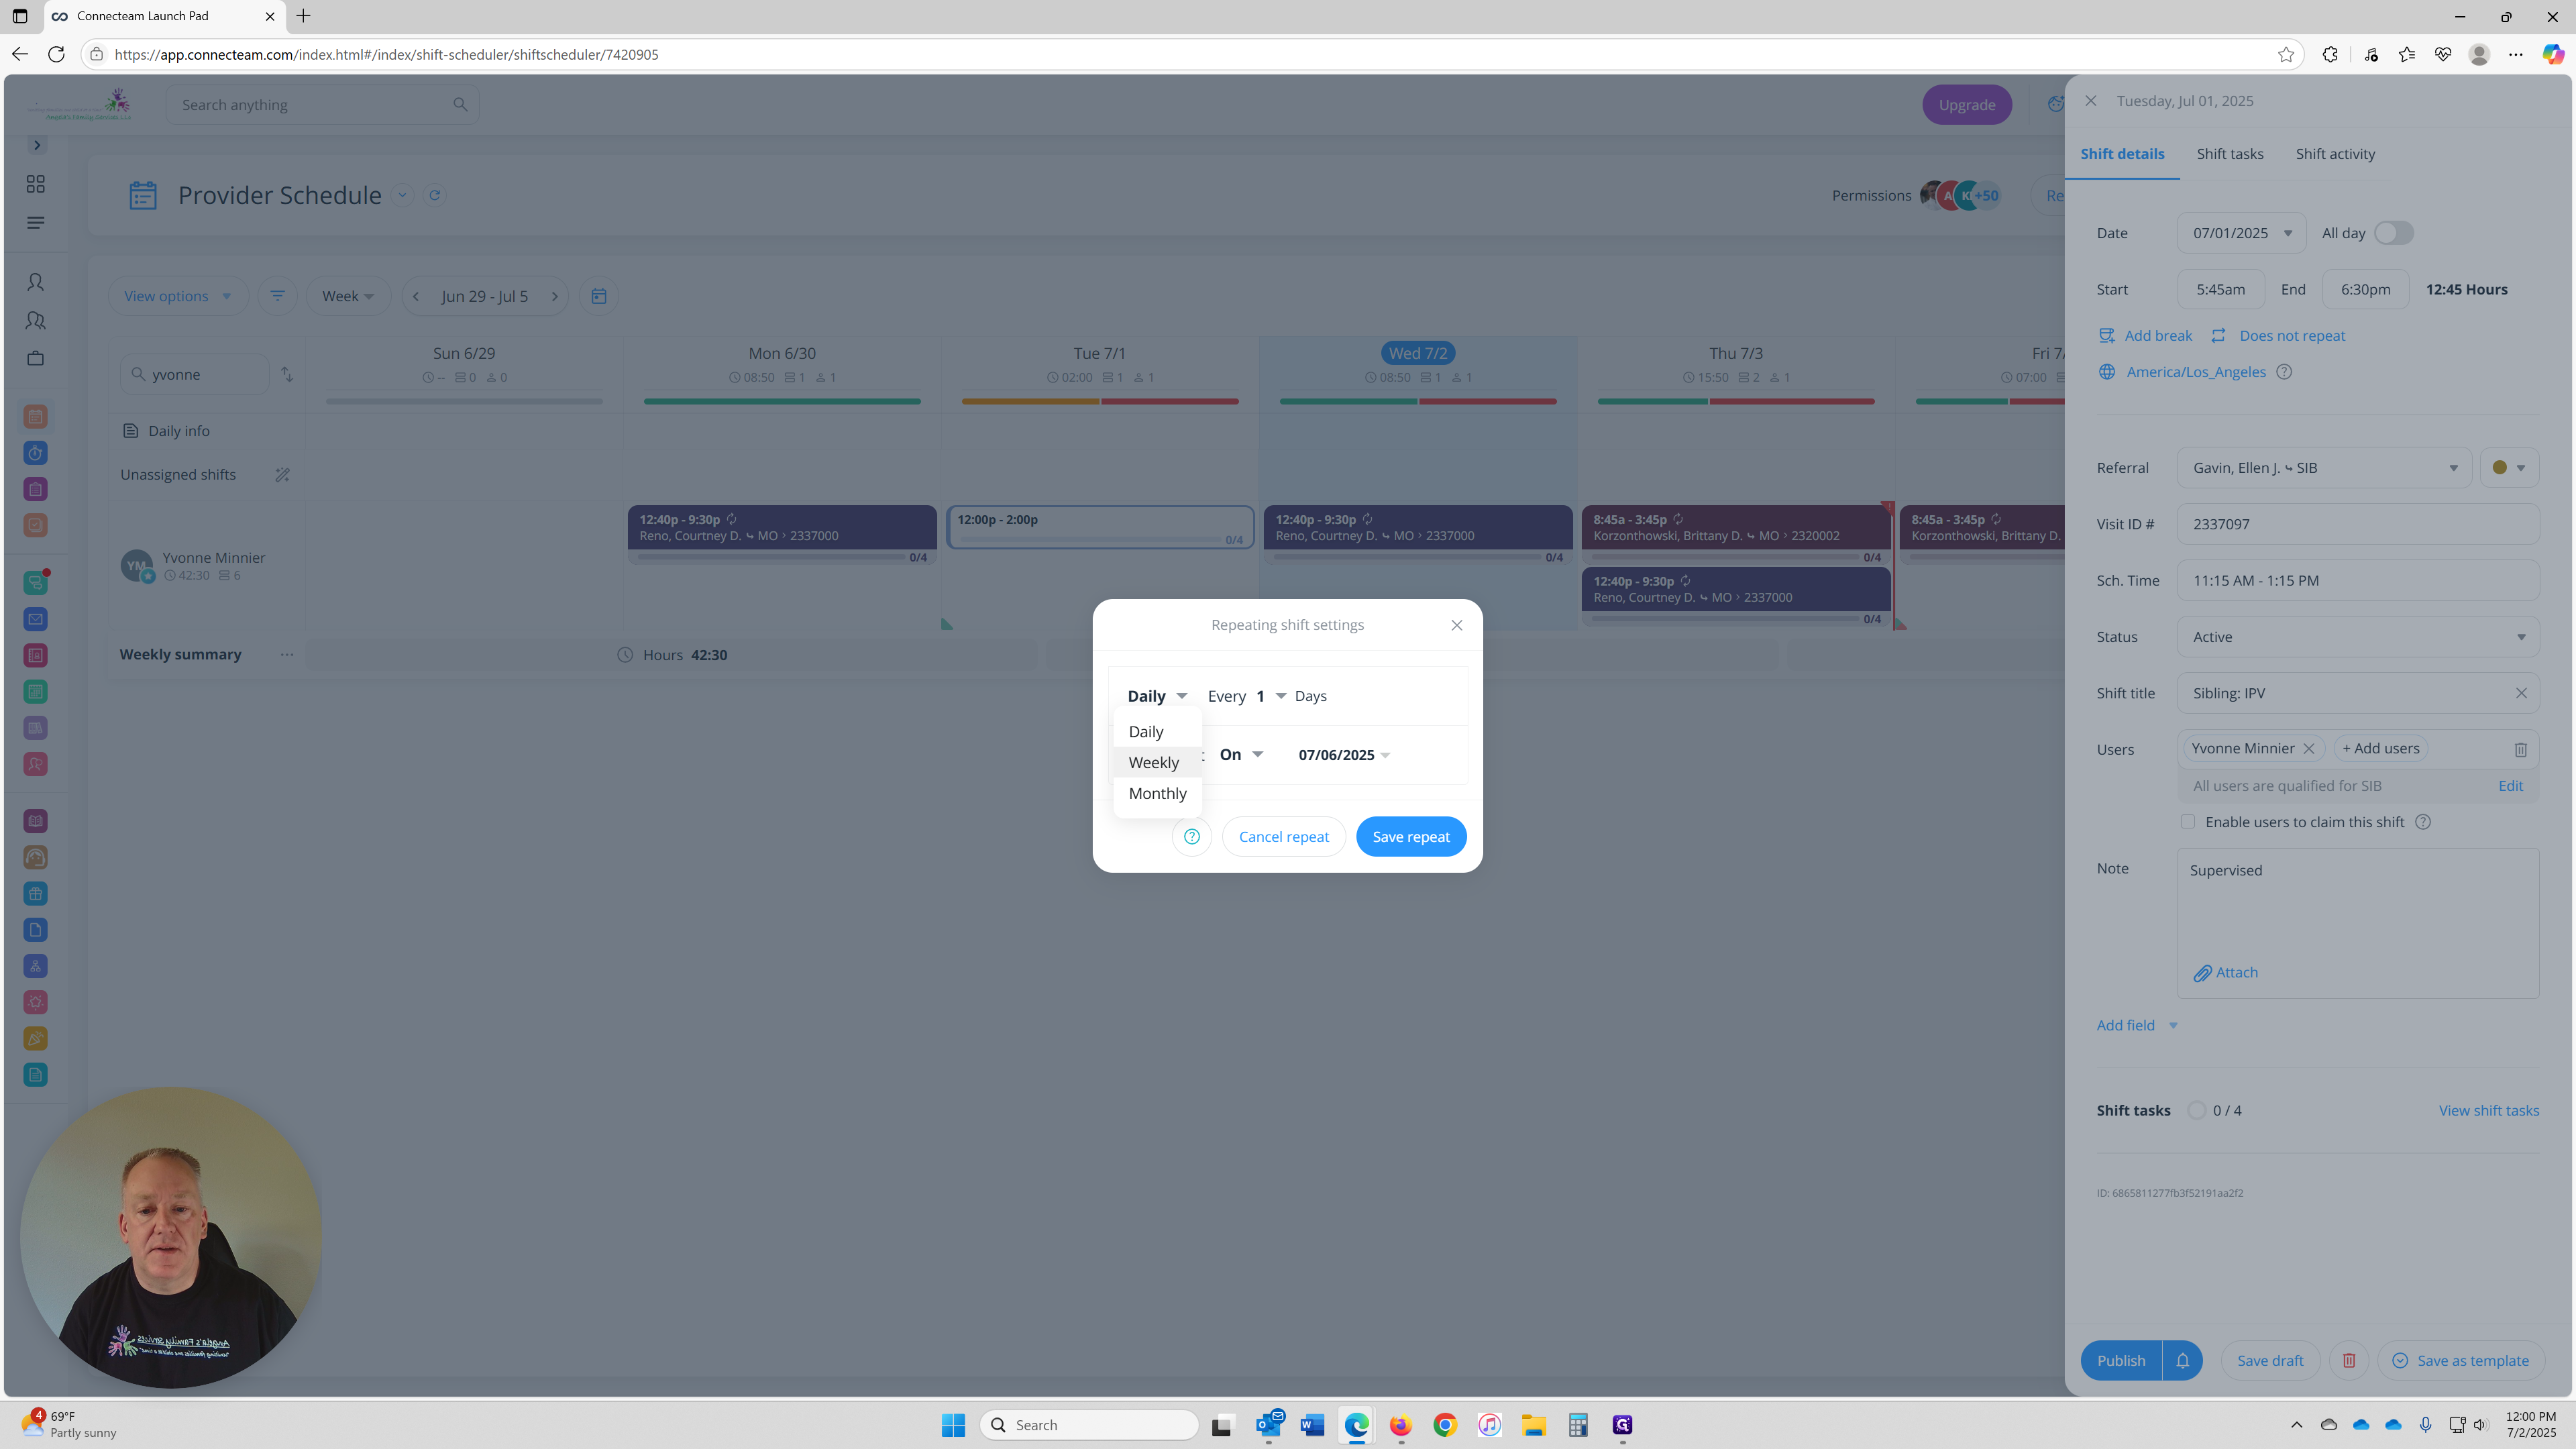
It's weekly, every Tuesday.
Change the blue, and it ends on 11/09.


Keeping Your Intake Up to Date
Here’s how to manage this in Connecteam:
Such ideas as a case Resolves and is updated, the "Visit ID #" changes; you’ll want to:
Keep the original shift and its intake as-is.
Break the repeating shift at the point of the new referral's date.
Update the new shift with the latest intake and apply changes from that point forward.
When saving changes to a repeating shift, Connecteam will ask:
“This shift is part of a repeating series. How would you like to edit?”
✅ Choose “Edit this shift only” if the change is specific to this one visit.
✅ Choose “Edit this and all future shifts” if the change applies from one and this point forward.
✅ Choose “Edit all shifts in this series” only if the change applies to every visit in the entire series.
📌 Note: These same options will appear any time you make changes to a shift that’s part of a repeating series — not just when updating intakes. You may also see similar prompts in other areas of the platform when editing repeating entries.
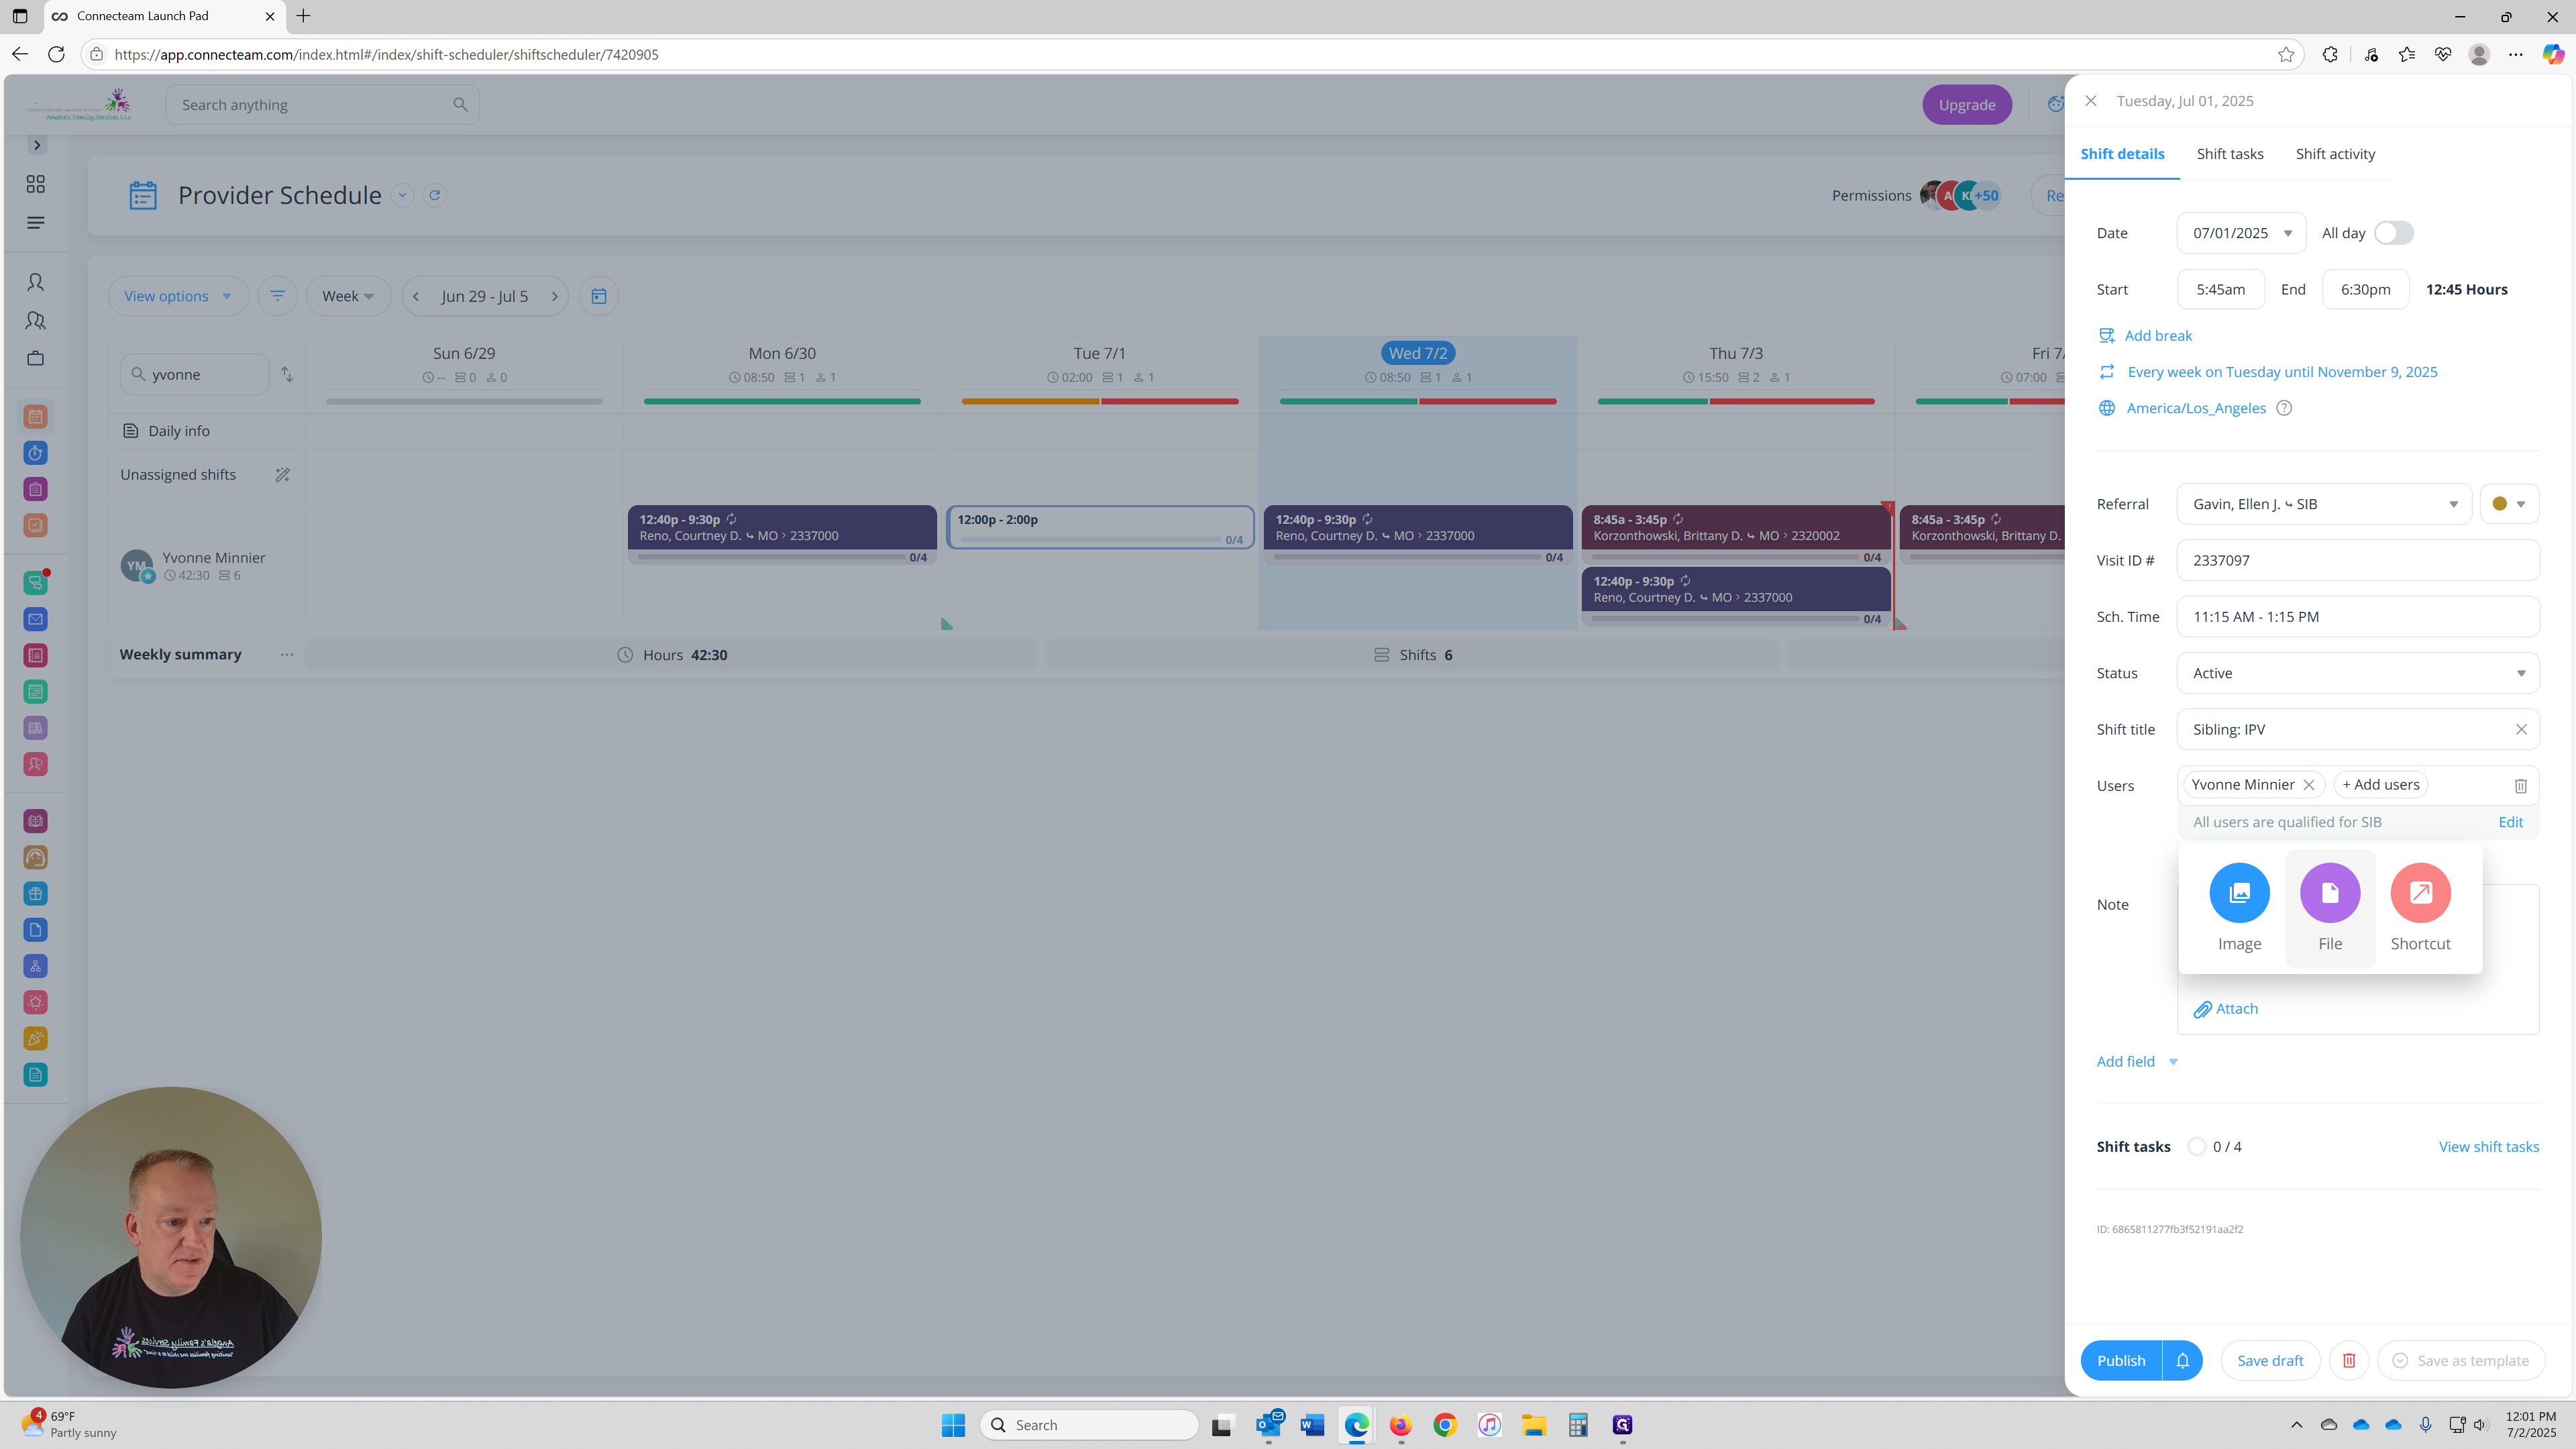
If you want to keep notes on this shift, you can add them here. I normally add it it's a Monitored or Supervised visit.
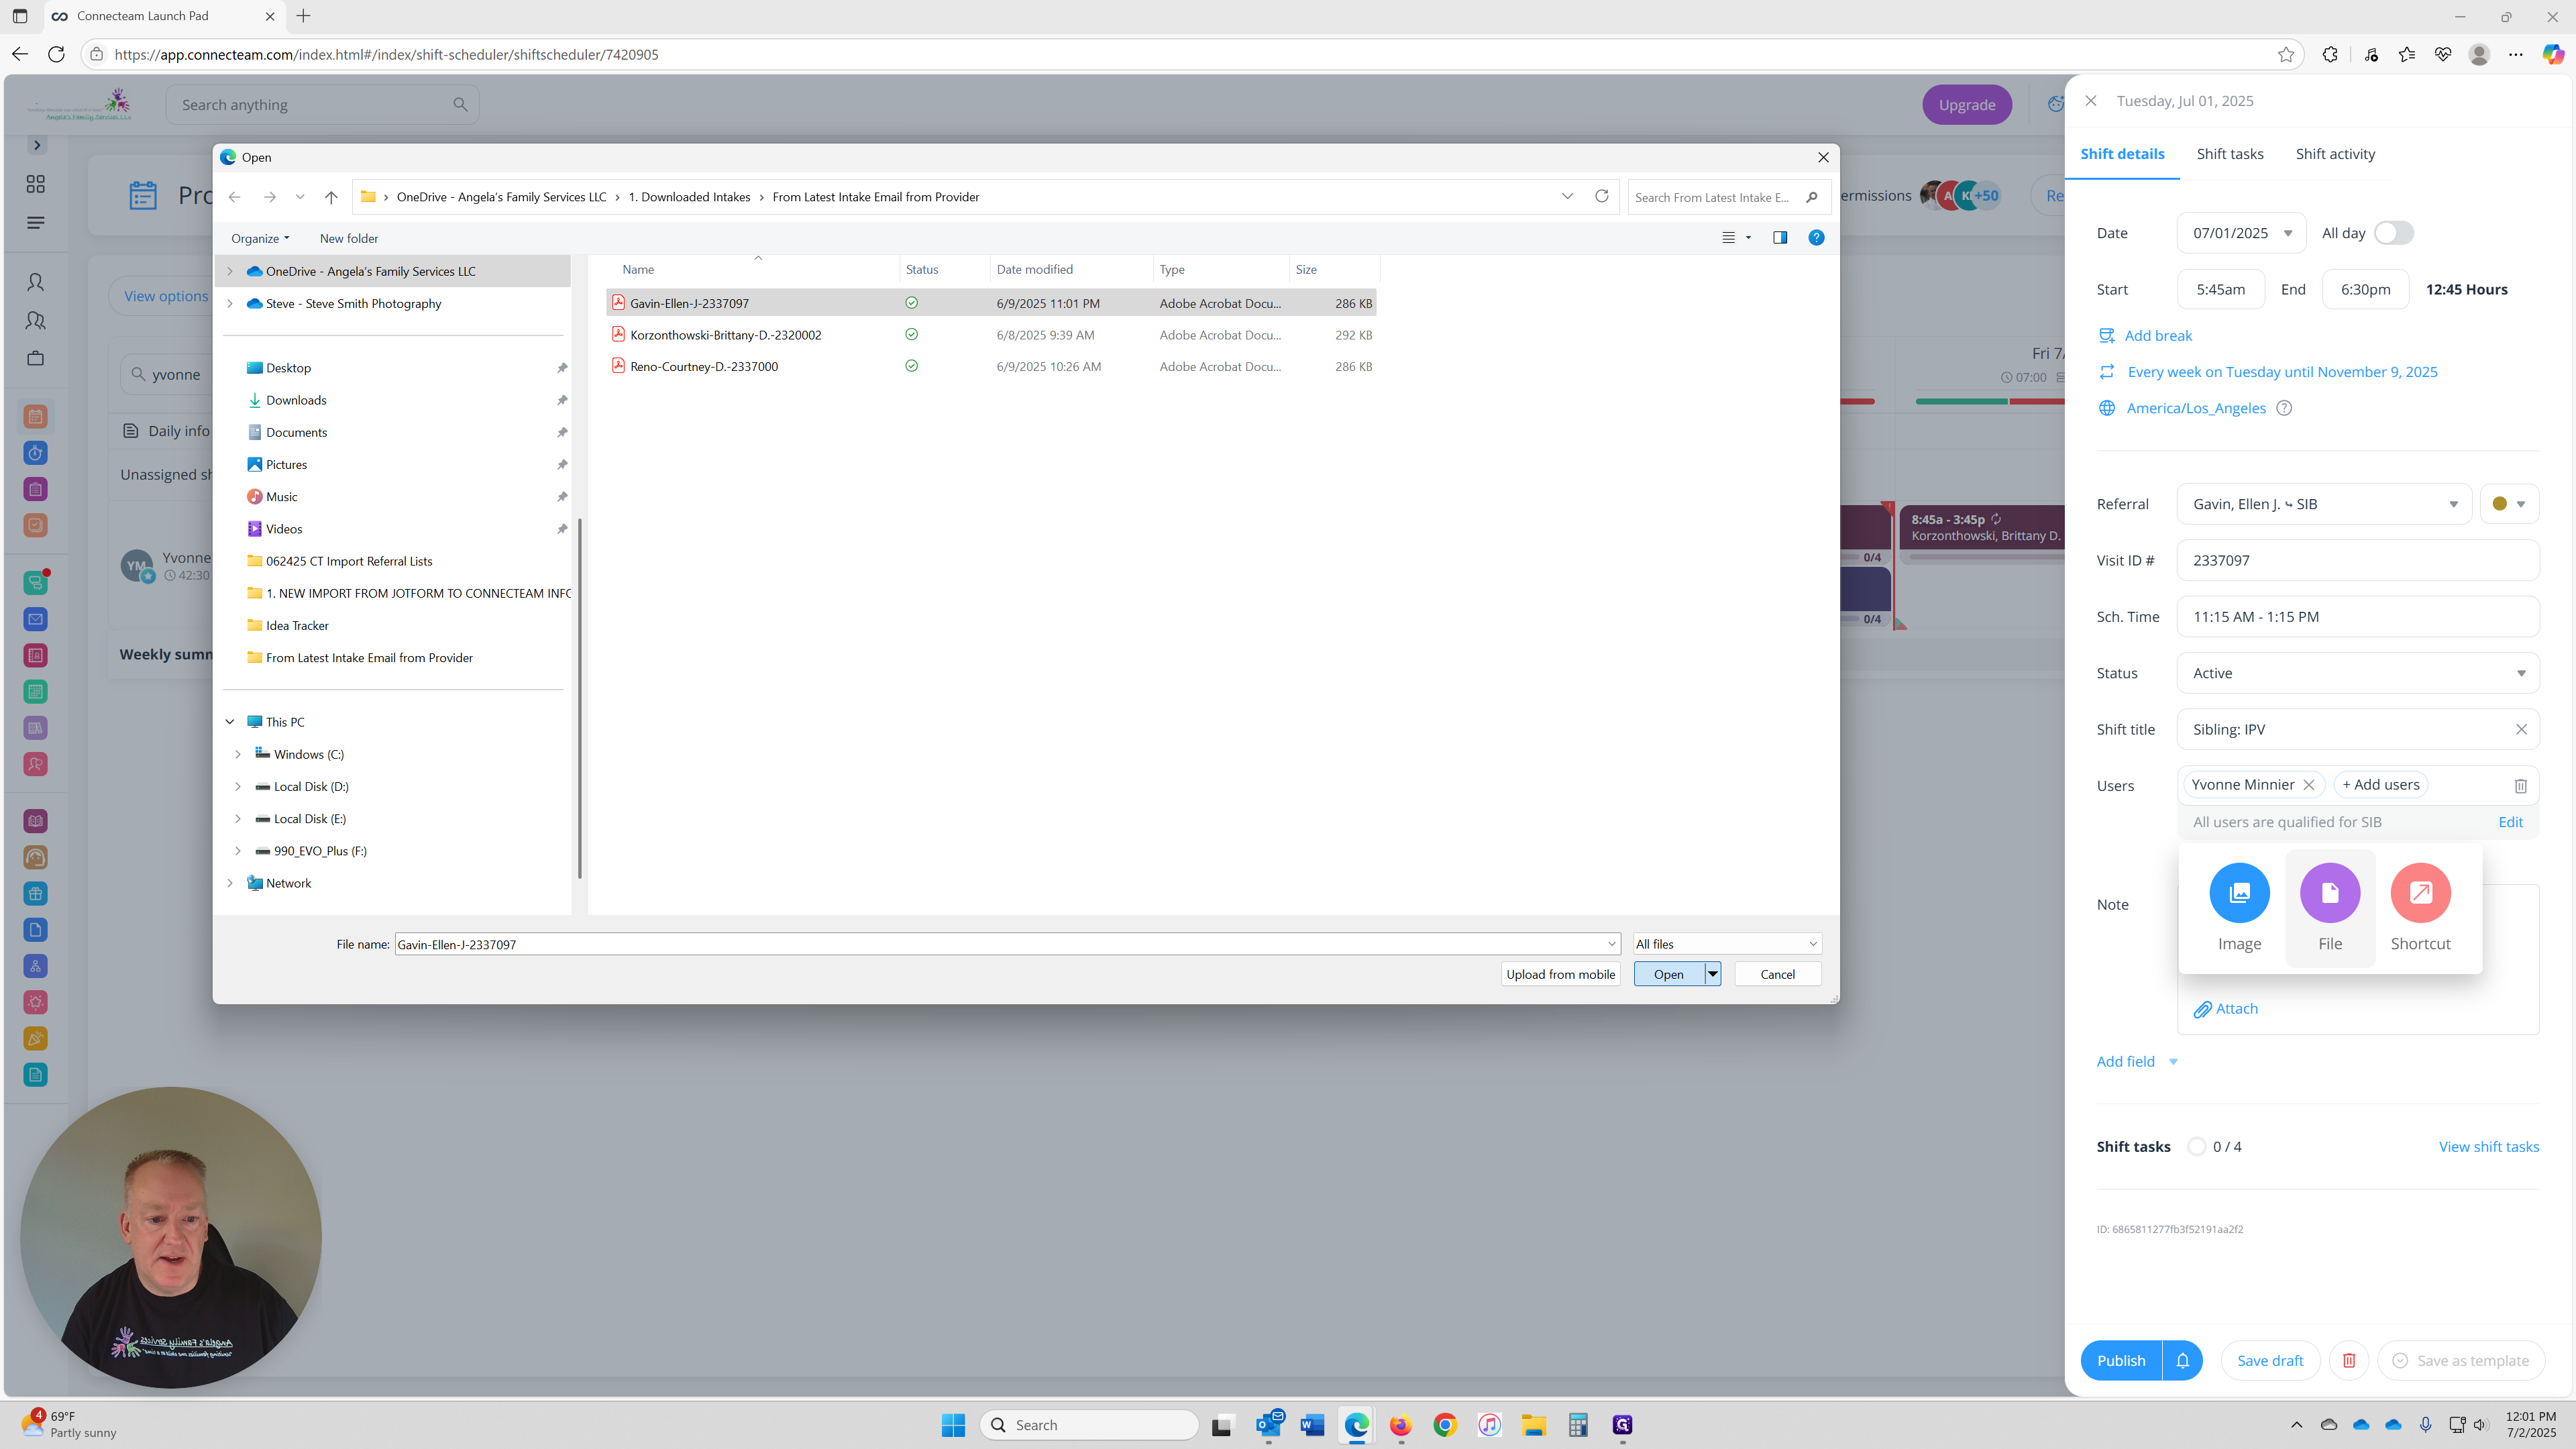
Also, click "Attach" to add your current intake, you can attach it here. Just remember that if your intake is updates or your referral becomes Update, Resolved or any other status that you continue working to upload and attach your most current Intake to the shift that it applies to.
Click "Attach" under "Notes," then select "File." I already have this one saved to my desktop.
You will have to save your forms directly on your computer in order to attach, or saved on your mobile device.
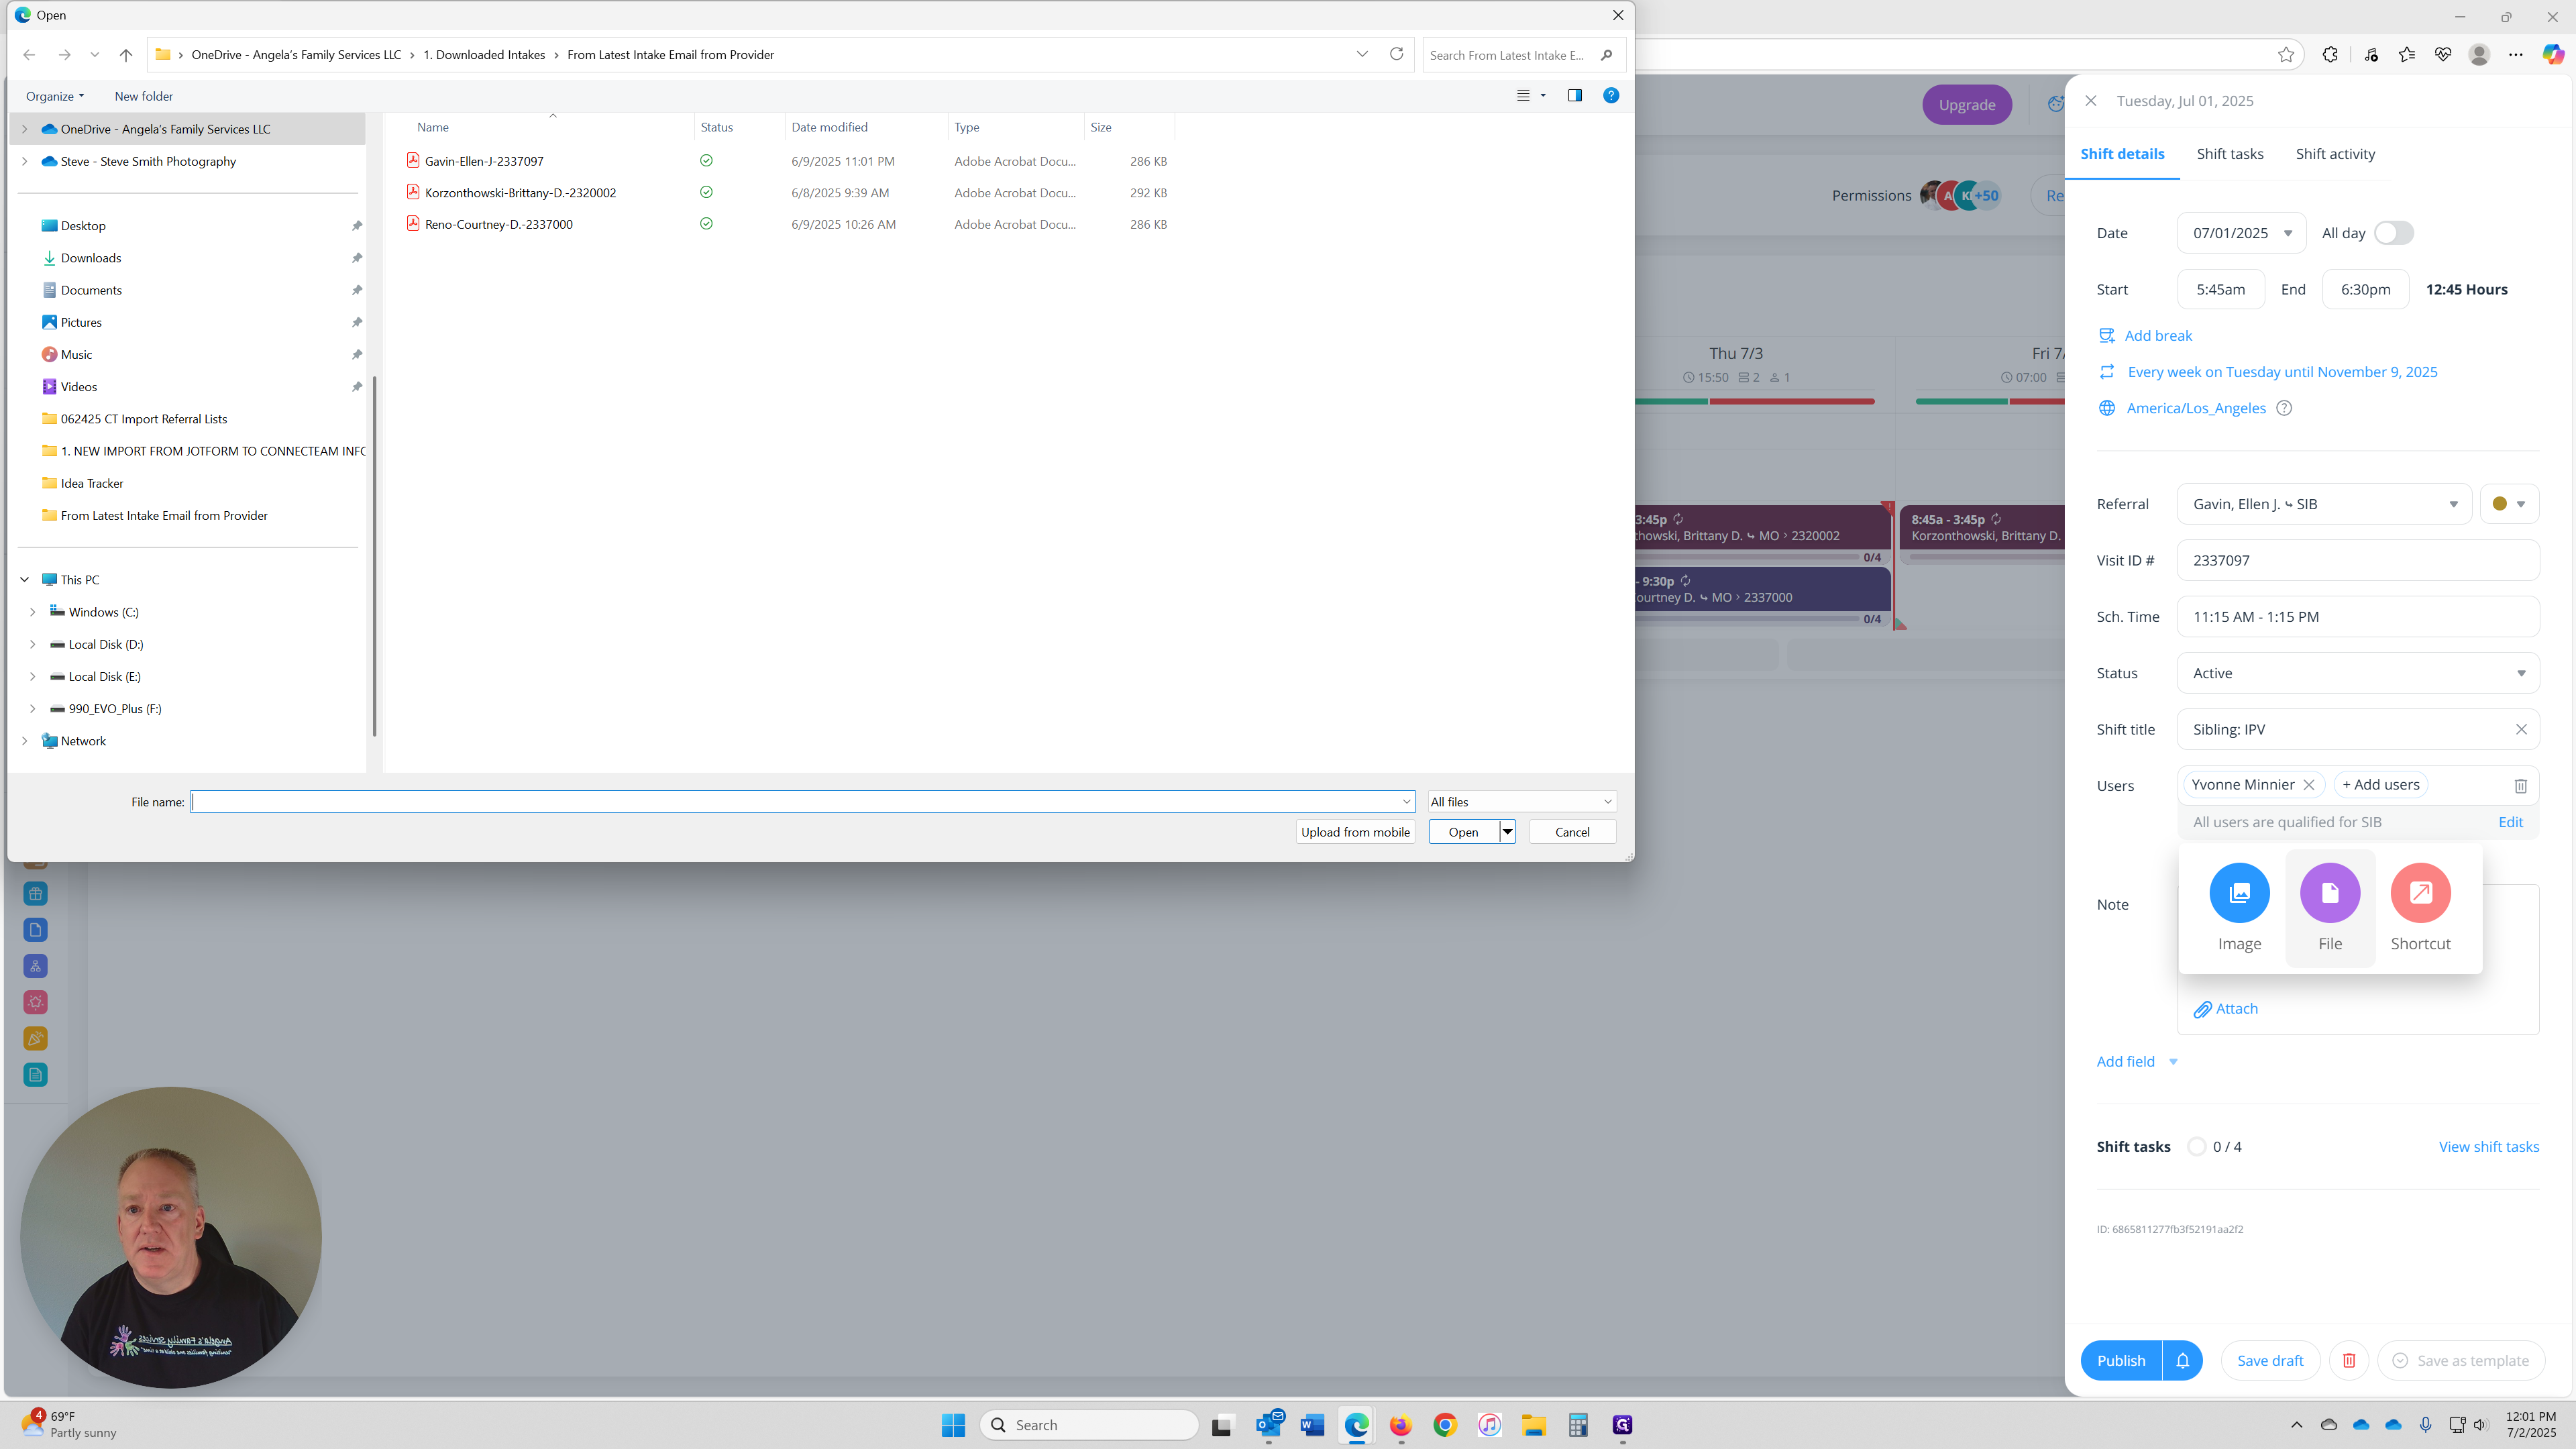
Attach the file, then once you are finished with entering your shift you can click publish.
There it is, you've completed and published your shift onto your Provider Schedule.