Icon

Creating Shipments and Manifests in Team Global Express

Learn how to use data from Excel to create shipments, add new receivers, and print completed manifests in the Team Global Express portal.

By Minibeasts Enterprises

This guide outlines how to process shipment labels and complete dispatch manifests in the Team Global Express portal. By matching tracking data in your local Excel workbook to the shipments in the web portal, you ensure that every box dispatched is accounted for.

This workflow is primarily used by logistics coordinators, warehouse operators, and shipping teams responsible for daily dispatch and freight balancing.

Before preparing your labels, please ensure TGE Contact (Deepika at time of this guide), has been messaged with box quantity to ensure pick up.

Preparing Your Data

Before creating shipments, ensure your Excel box balancing sheet and your Team Global Express tracking portal are aligned.
1
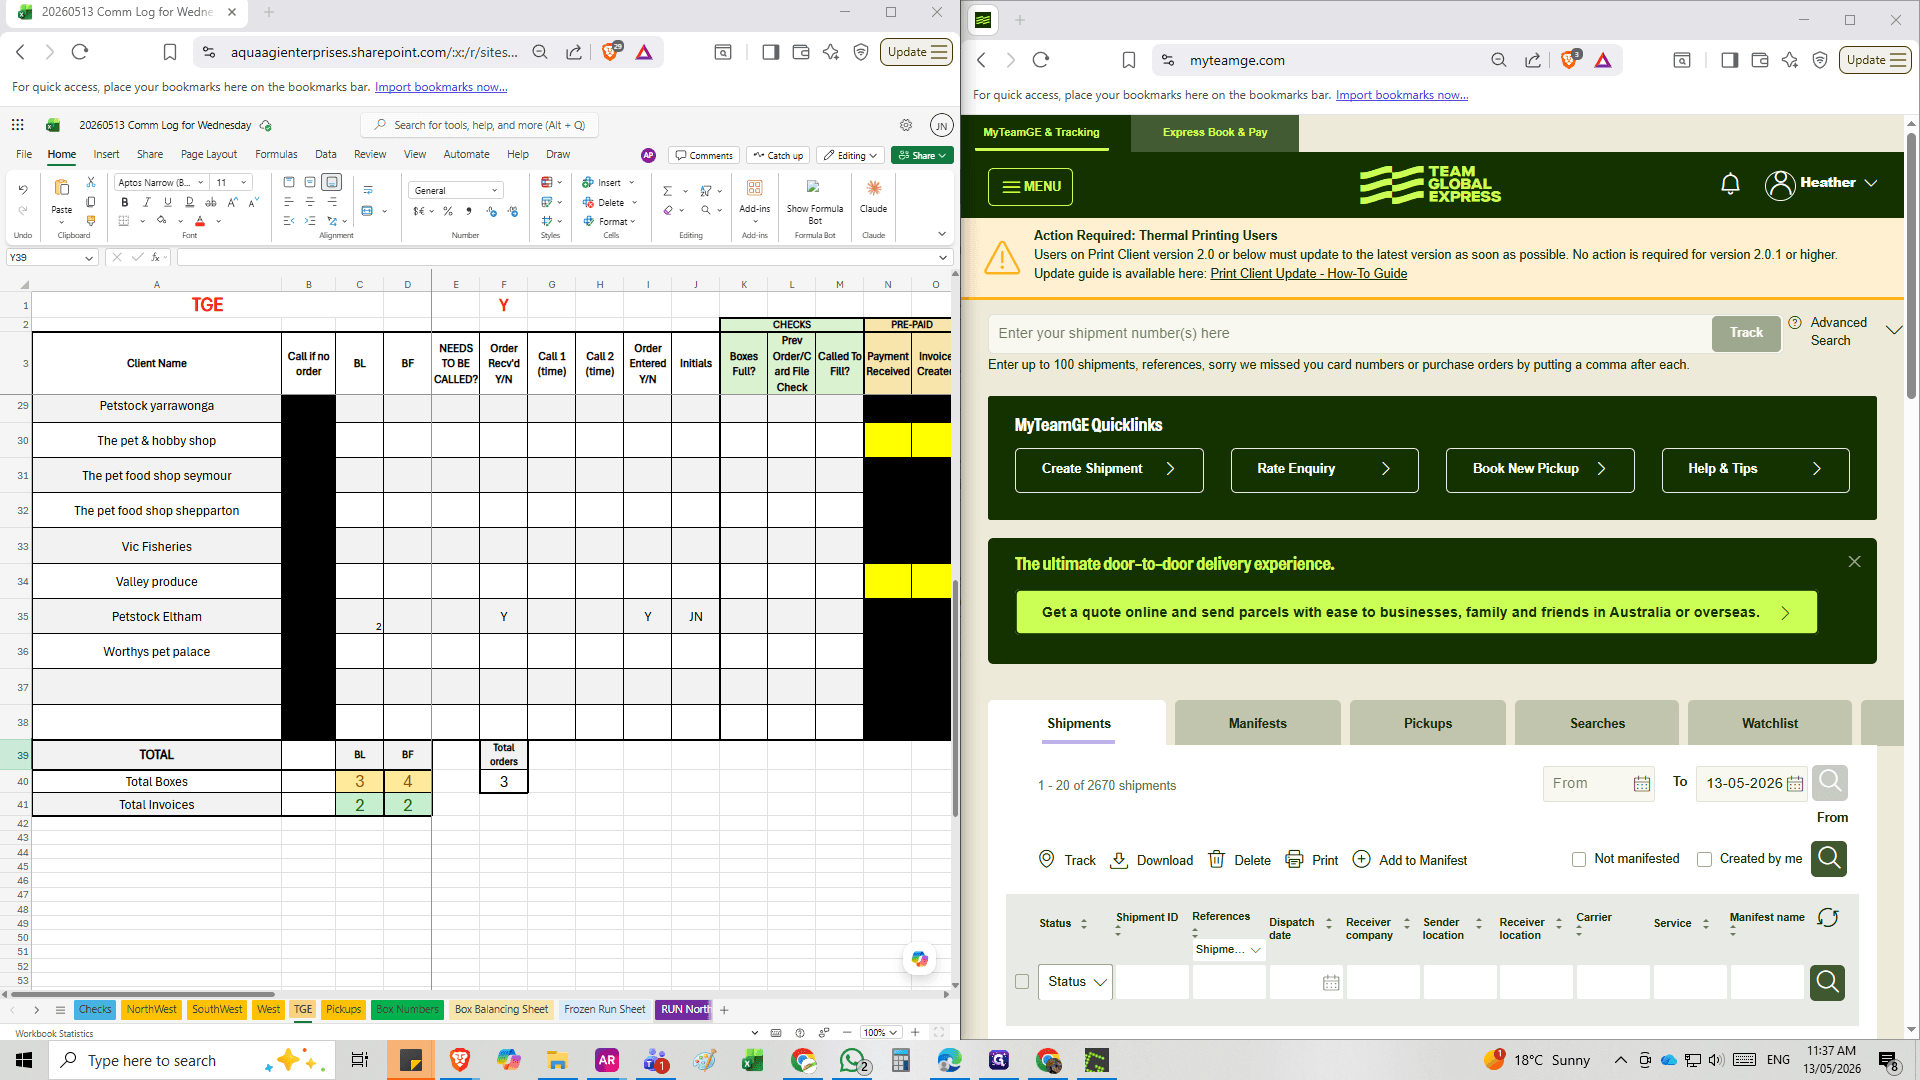
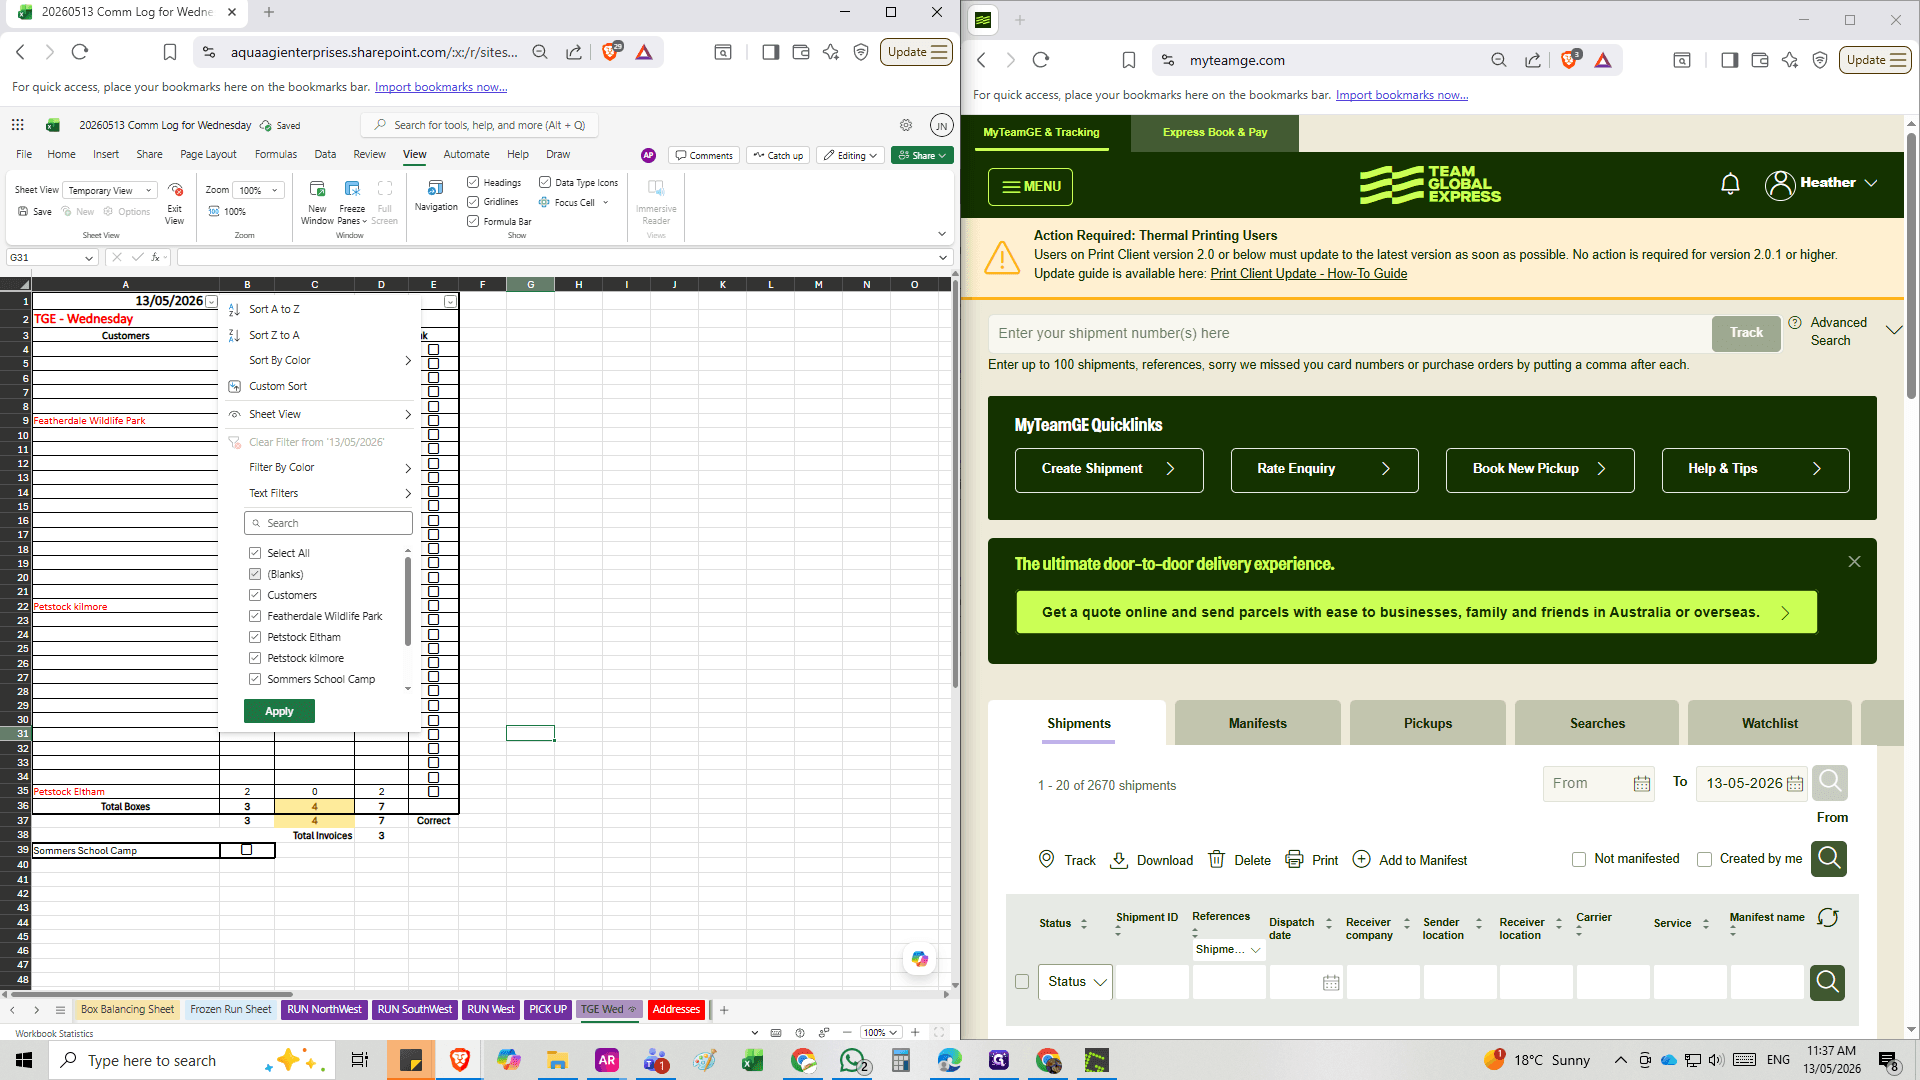
Click on the TGE Run tab on Comm Logs (e.g., TGE-TUES) in your Excel spreadsheet to open the tracking data.
Step #1: Click on the TGE Run tab on Comm Logs (e.g., TGE-TUES) in your Excel spreadsheet to open the tracking data.
2
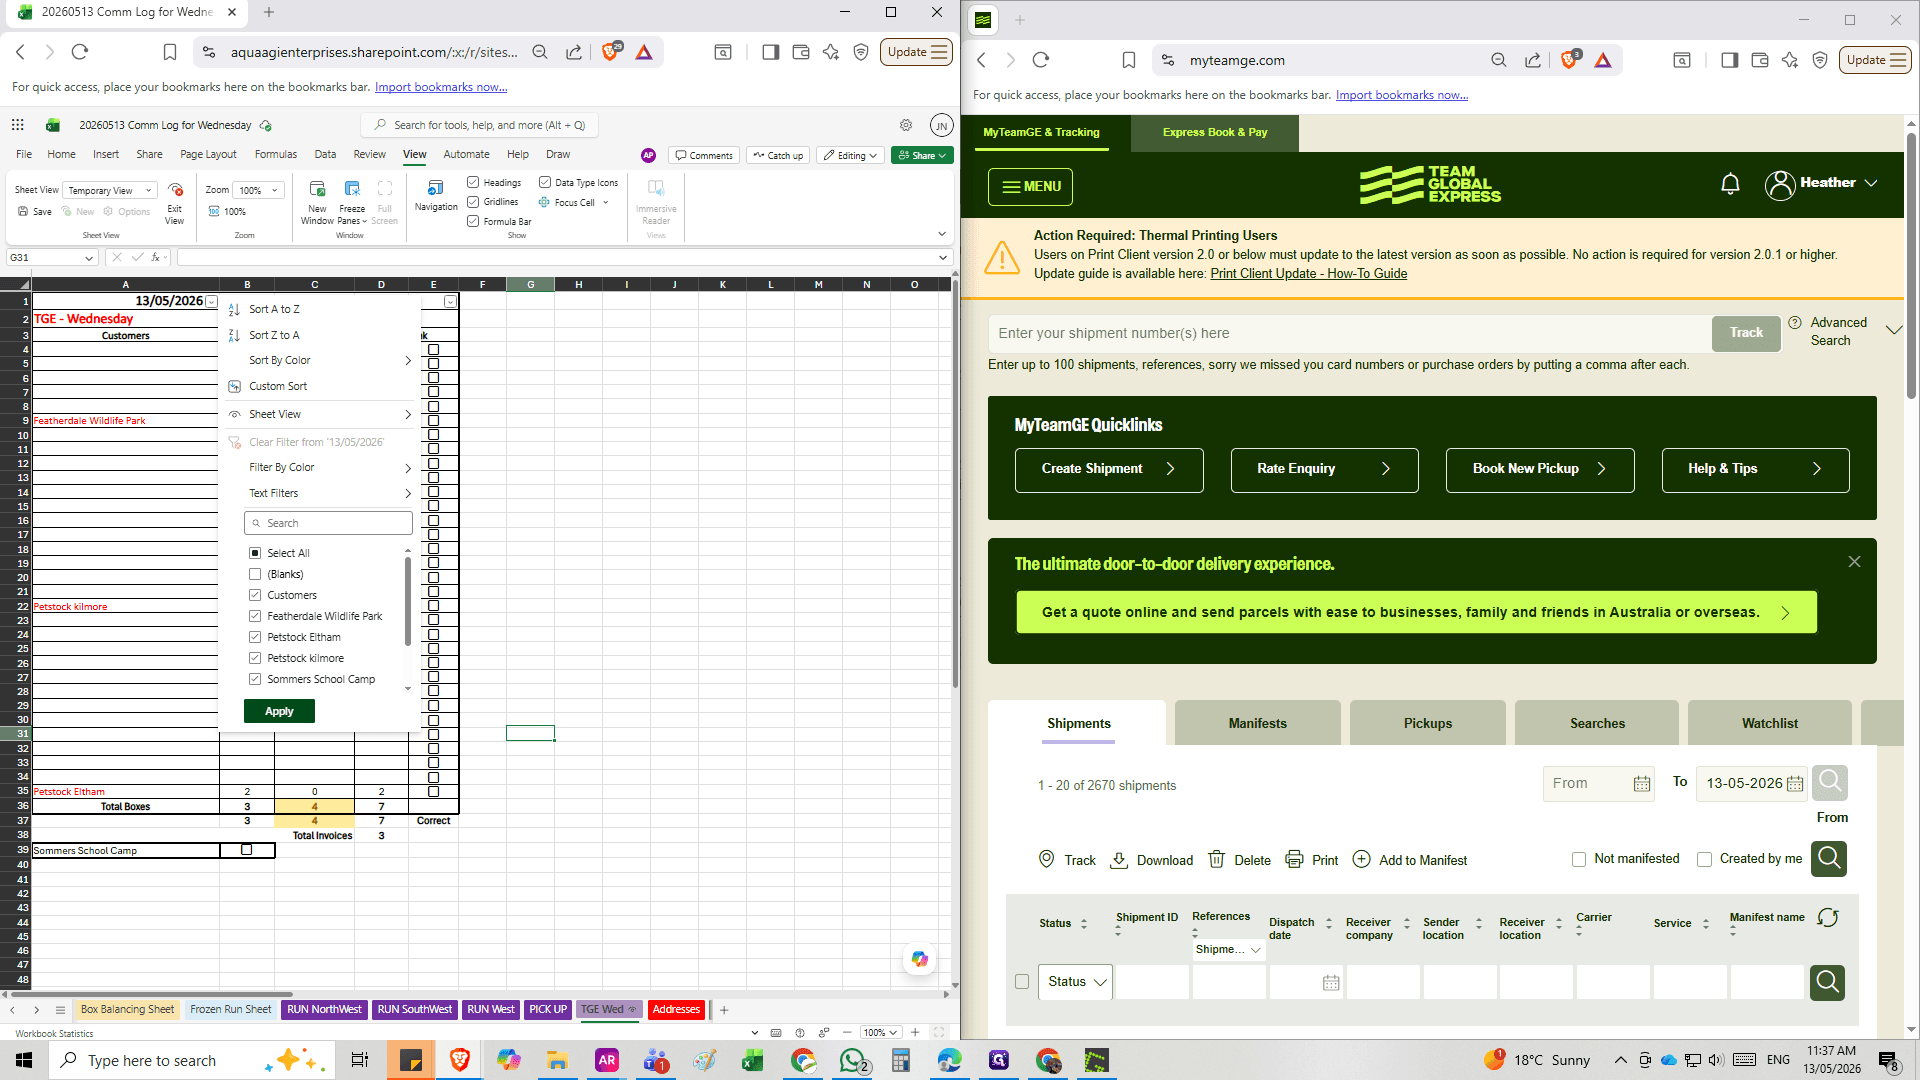
Click select all to deselect everything, and then click it again to reselect everything. This ensures that nothing is missing when you perform your check. Select ( Blanks ) to filter out blank Rows.
Step #2: Click select all to deselect everything, and then click it again to reselect everything. This ensures that nothing is missing when you perform your check. Select ( Blanks ) to filter out blank Rows.
3
Click Apply to update the Sheet.
Step #3: Click Apply to update the Sheet.

Creating a Shipment- TGE Dashboard

For existing customers, you can search the address book directly to assign shipments.
4
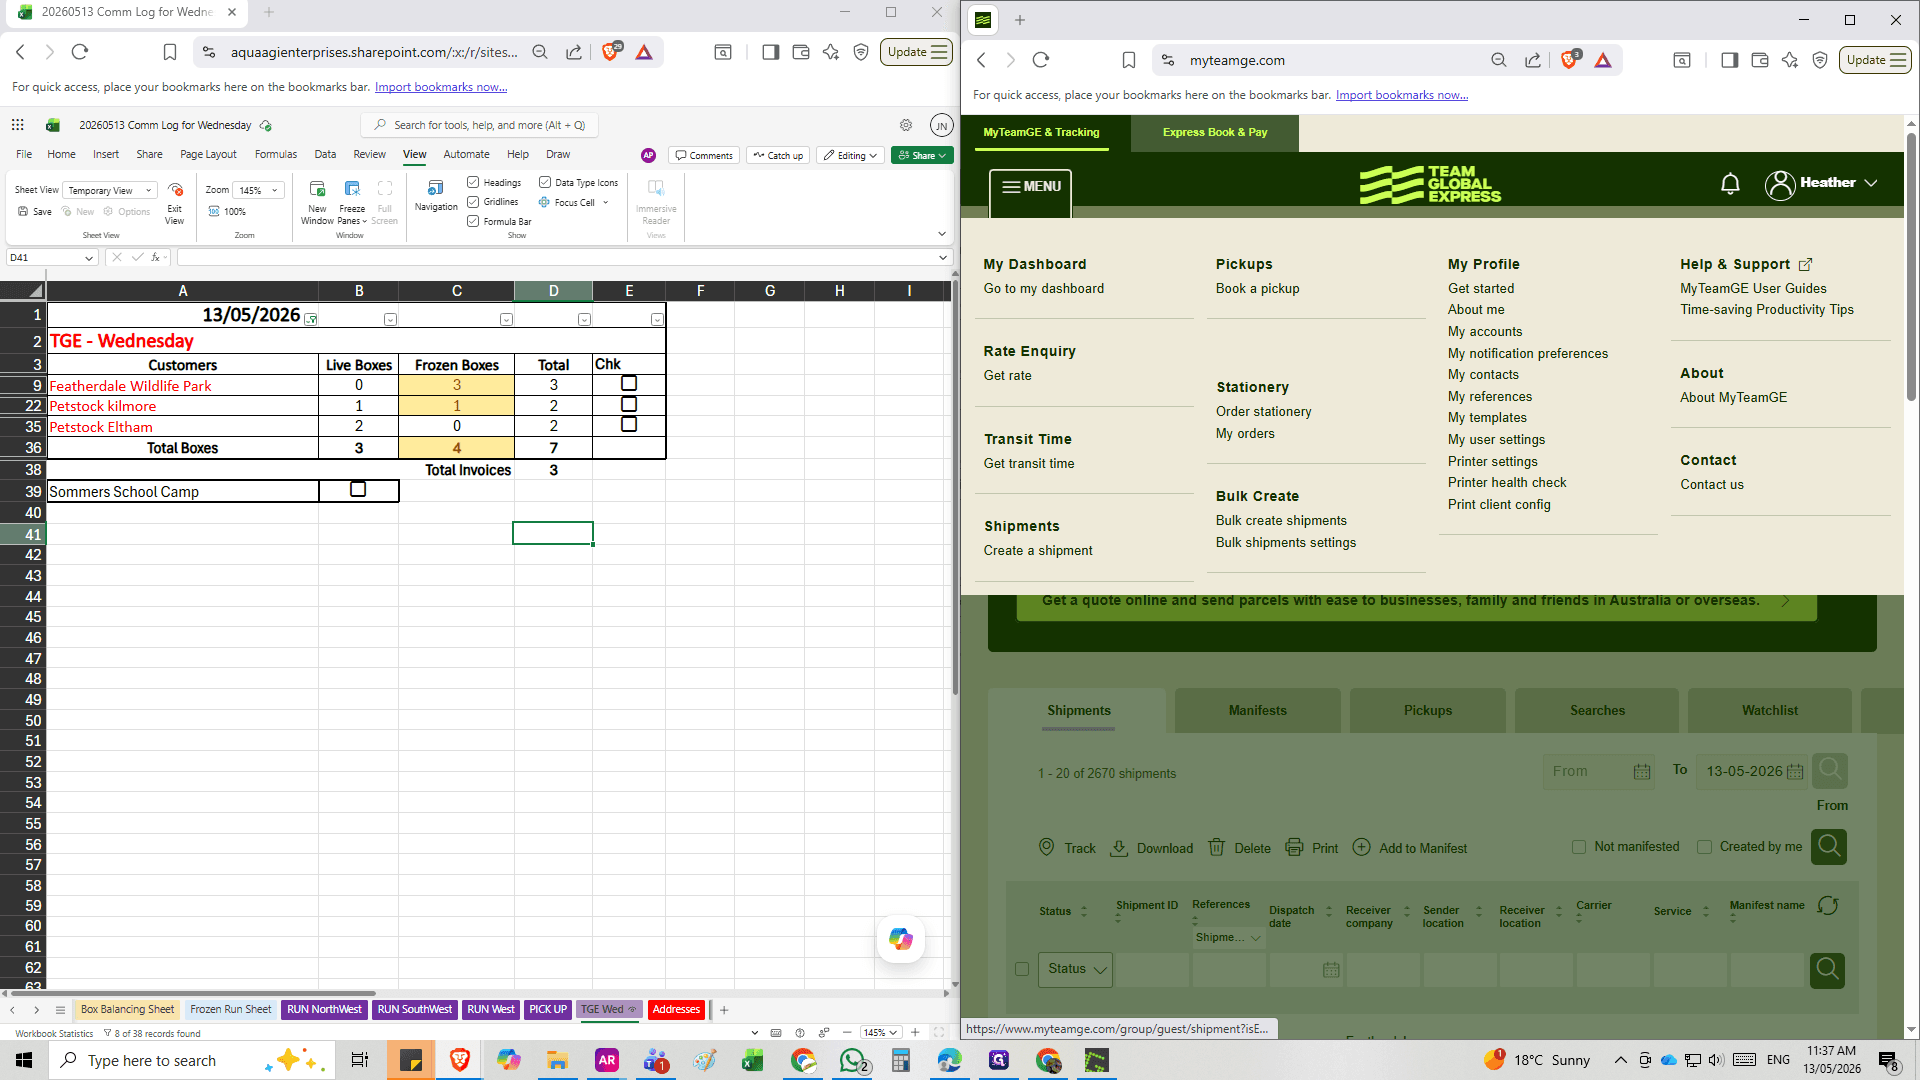
Click Create a shipment in the Team Global Express portal.
Step #4: Click Create a shipment in the Team Global Express portal.
5
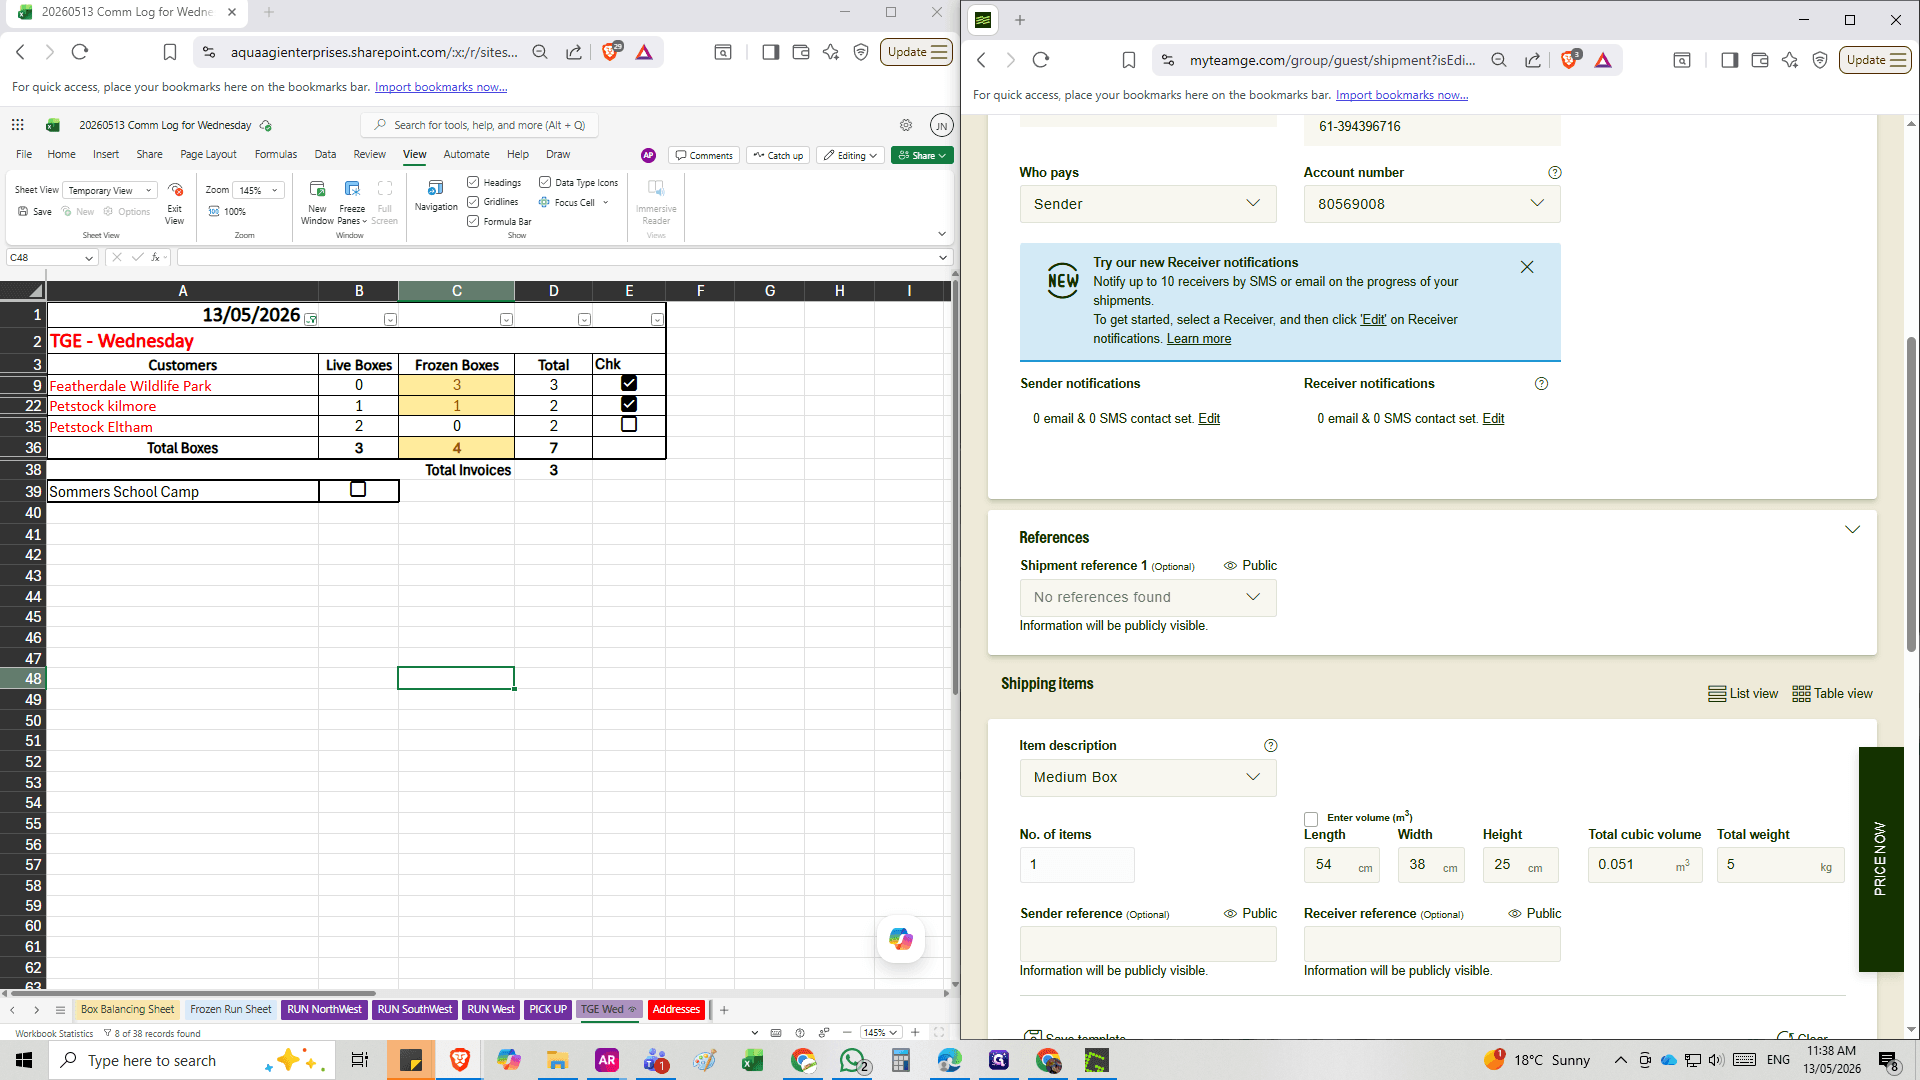
Ensure Carrier is correctly assigned (IPEC is standard freight, Prioirty AUS is Frozen/Overnight freight)
Click the Select receiver dropdown to search for the destination.
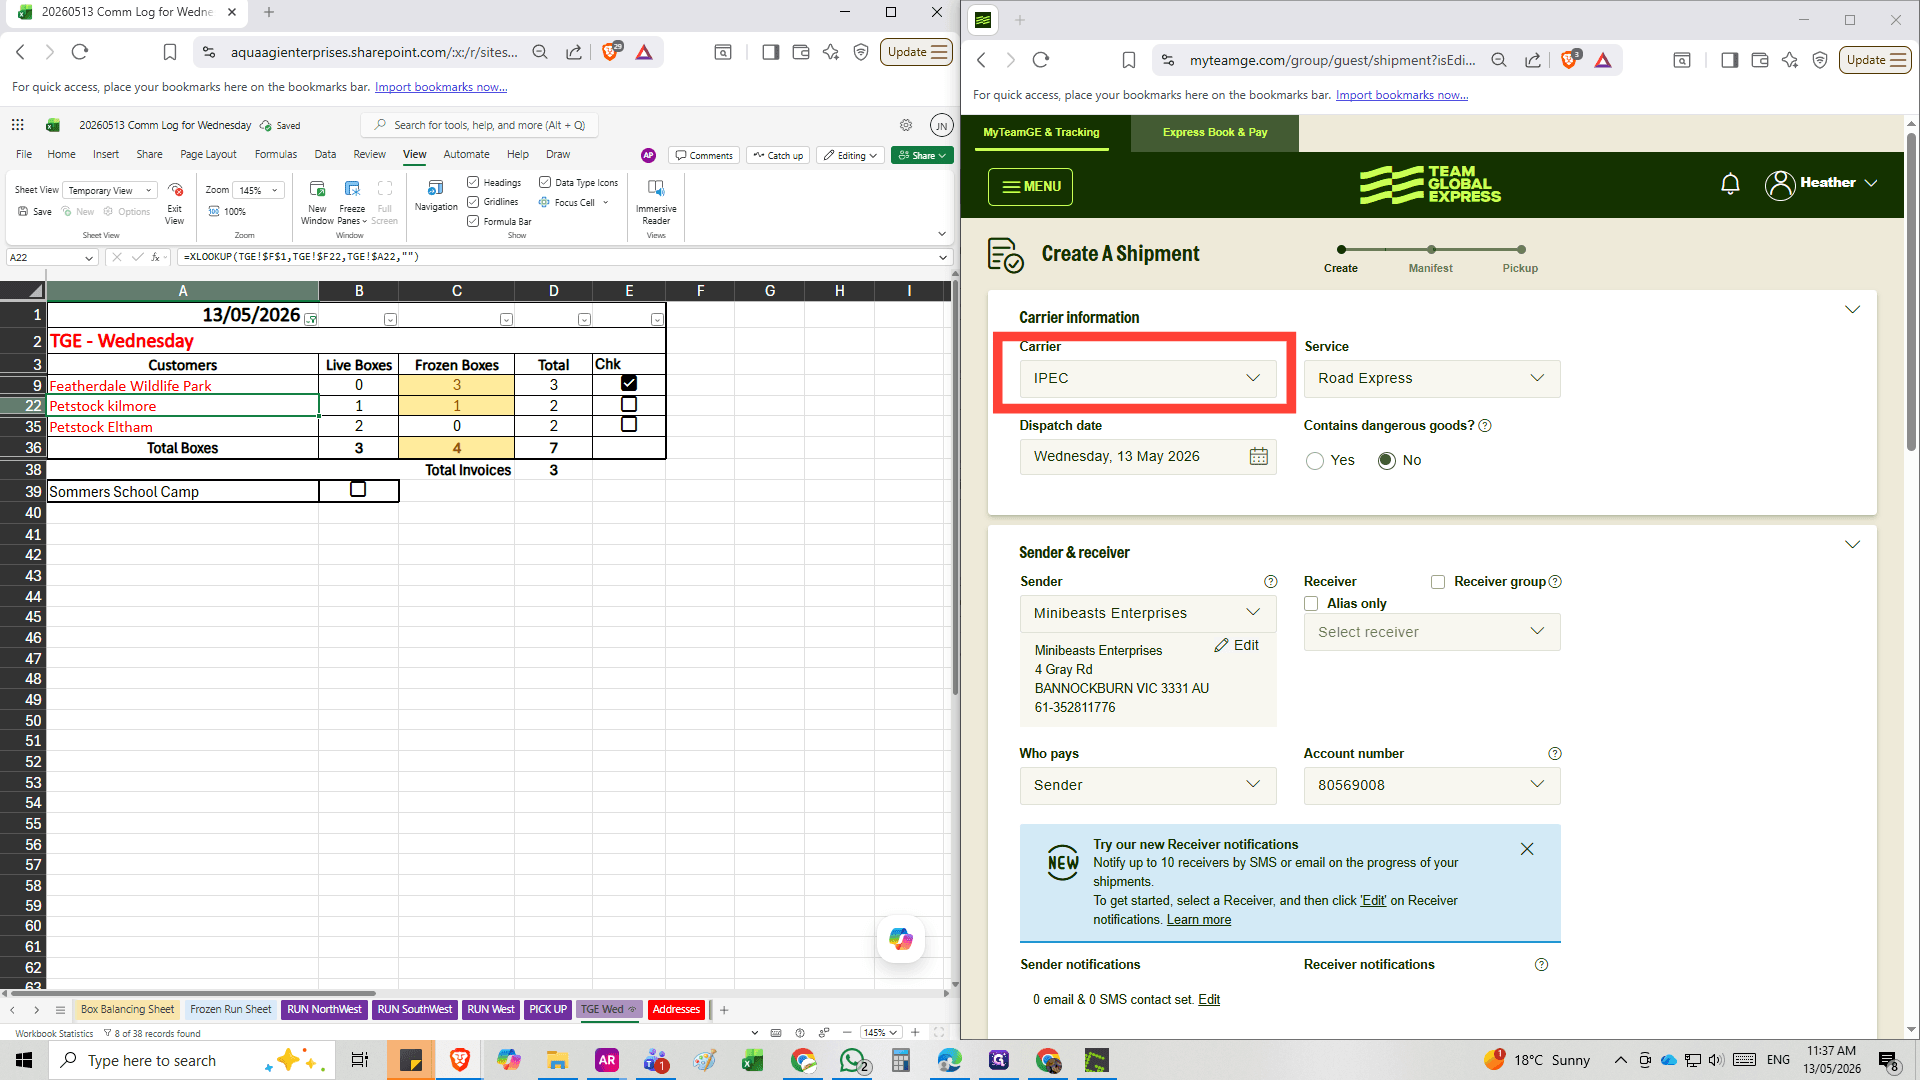
Step #5: Ensure Carrier is correctly assigned (IPEC is standard freight, Prioirty AUS is Frozen/Overnight freight)Click the Select receiver dropdown to search for the destination.
6
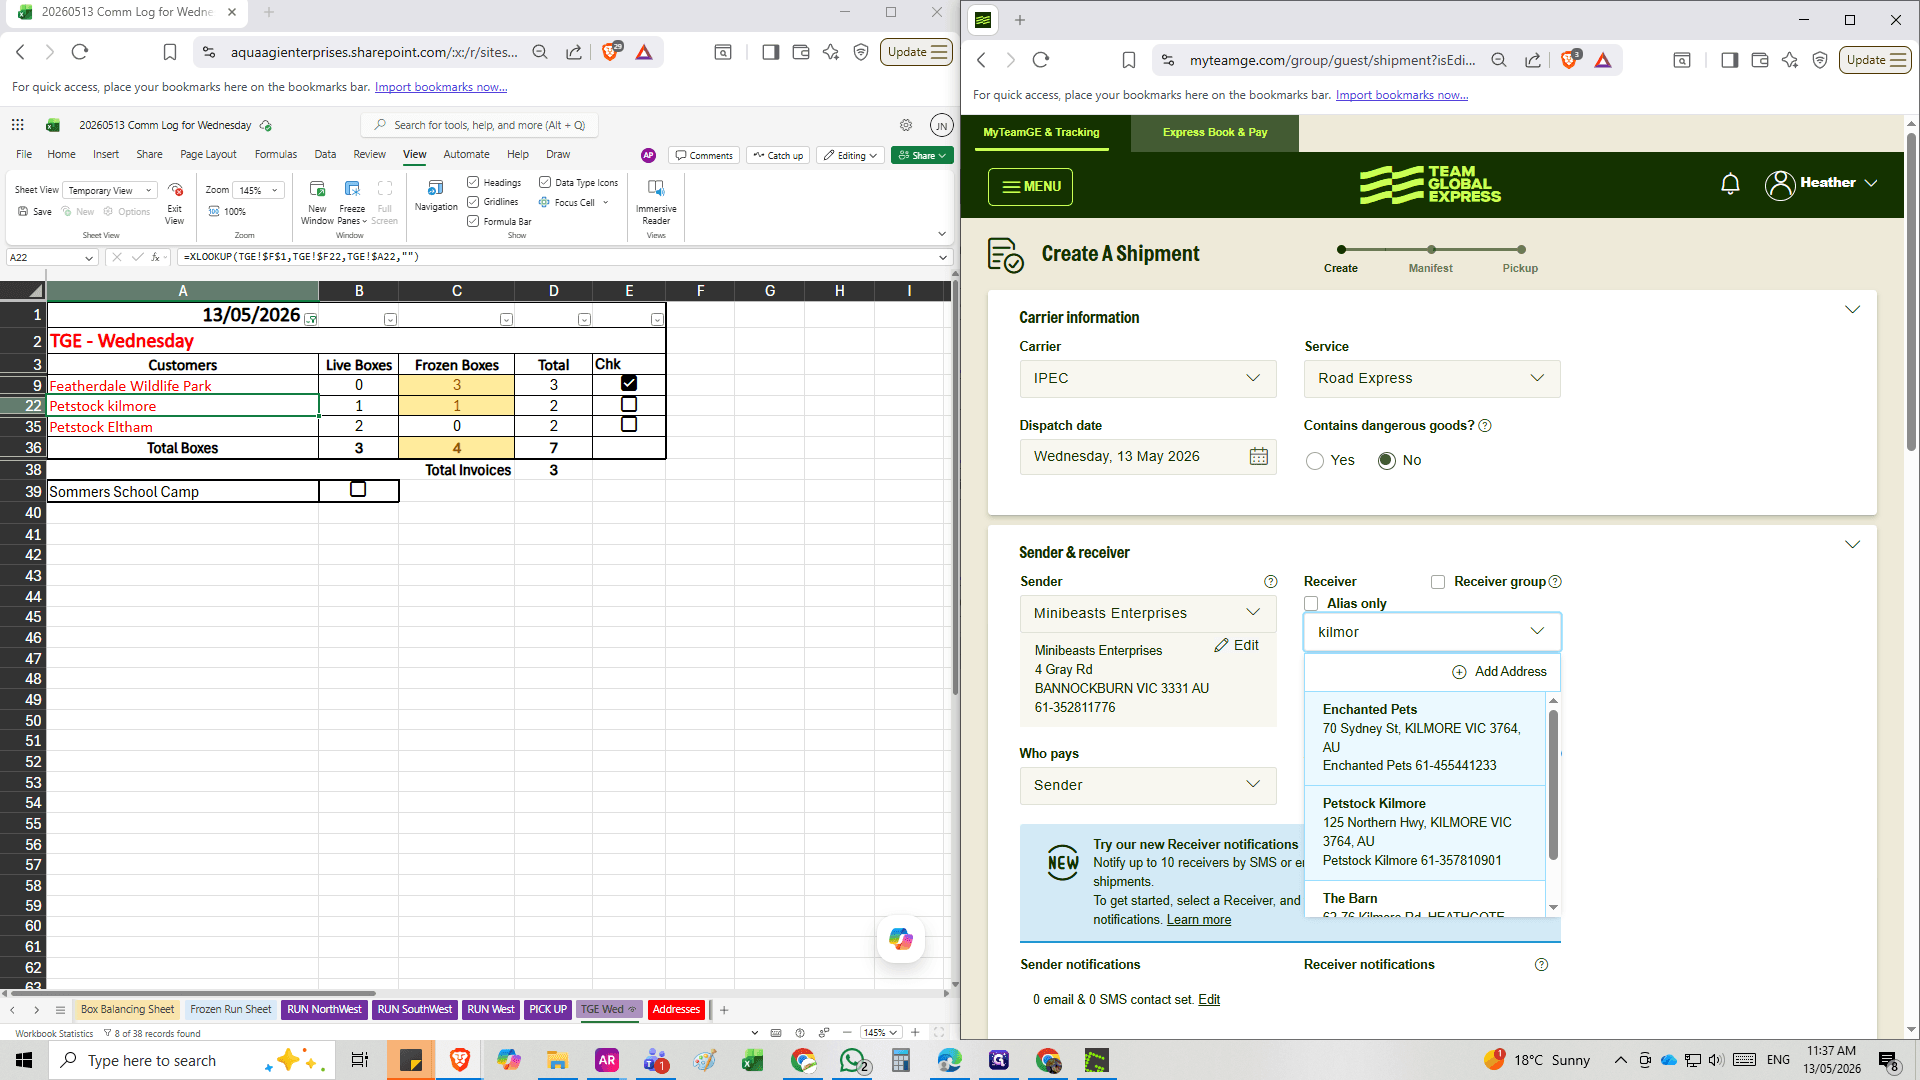
Type a portion of the receiver's name to filter the address book.
7
Select the required client from the results to auto-fill the receiver details by typing client name.
Step #7: Select the required client from the results to auto-fill the receiver details by typing client name.
8
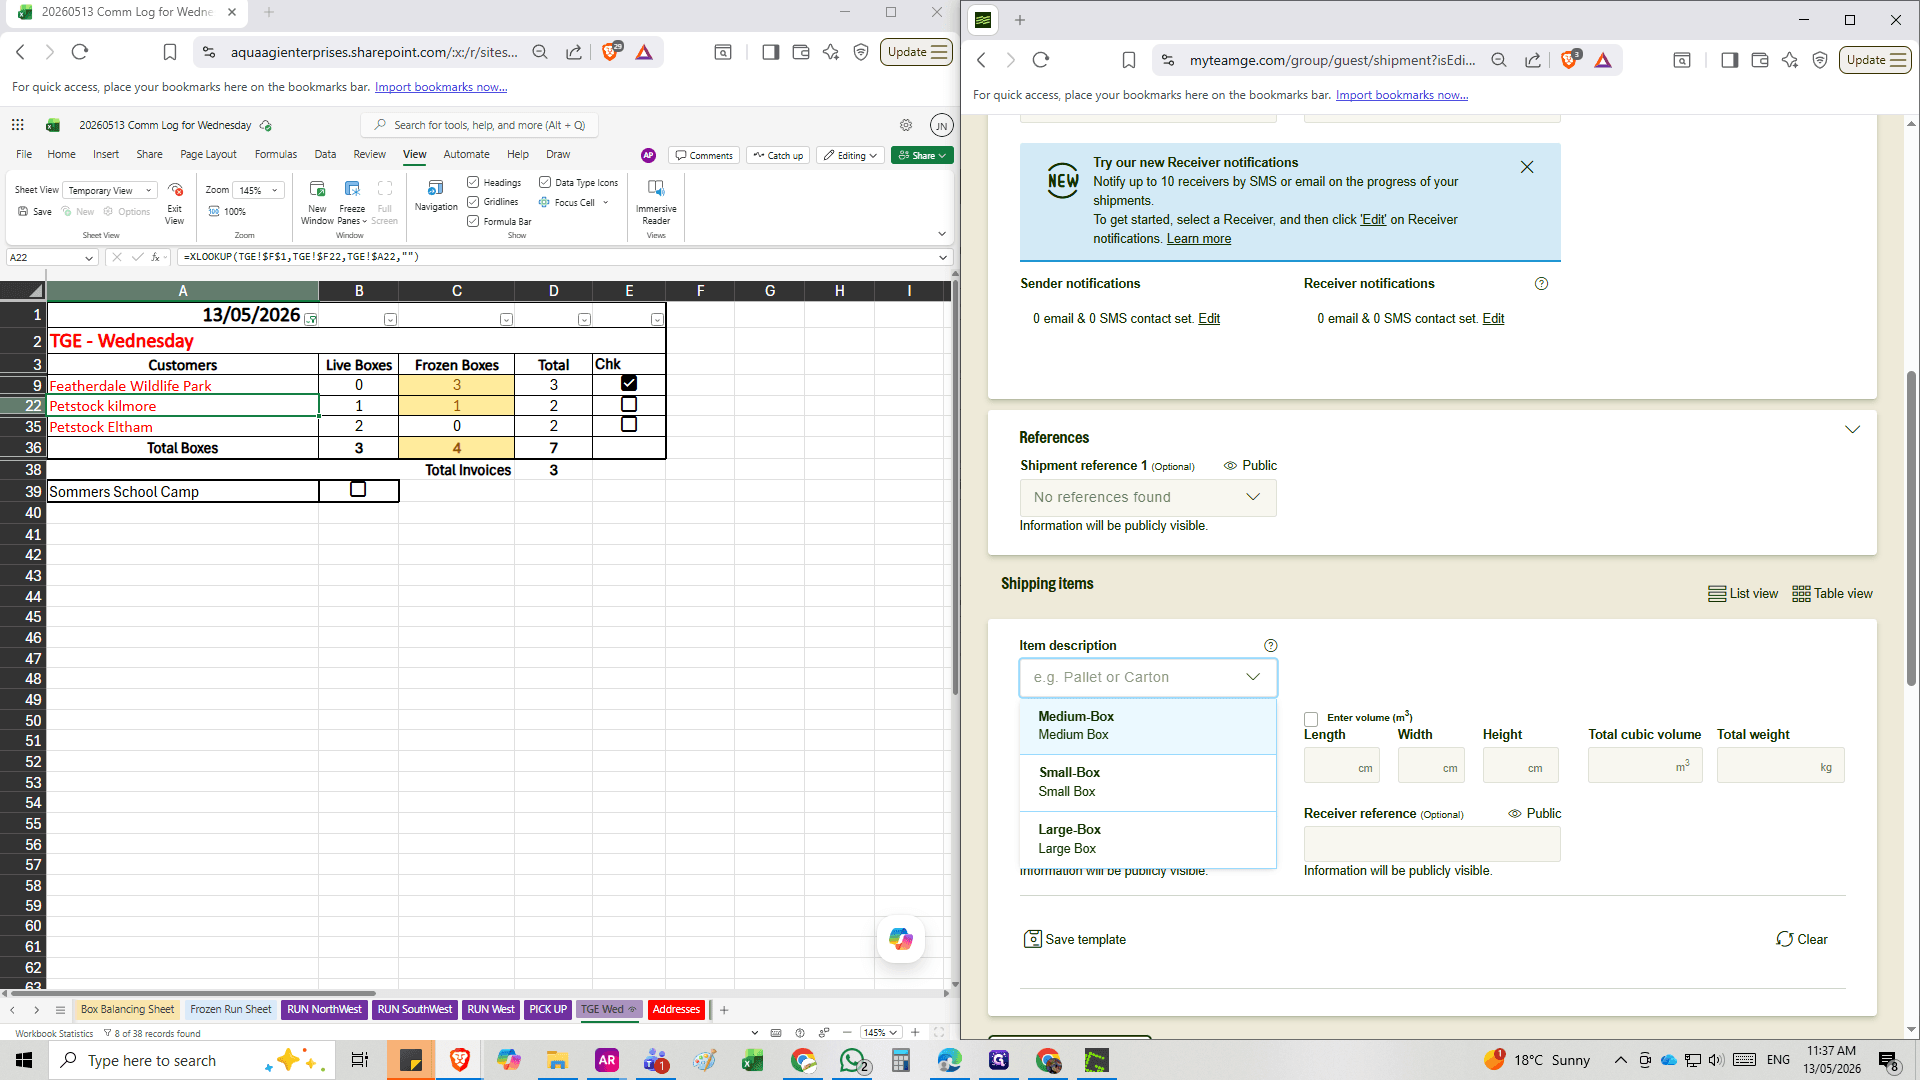
Click the Item description dropdown to select the box size, (Live is always Medium Box regardless of size).
Step #8: Click the Item description dropdown to select the box size, (Live is always Medium Box regardless of size).
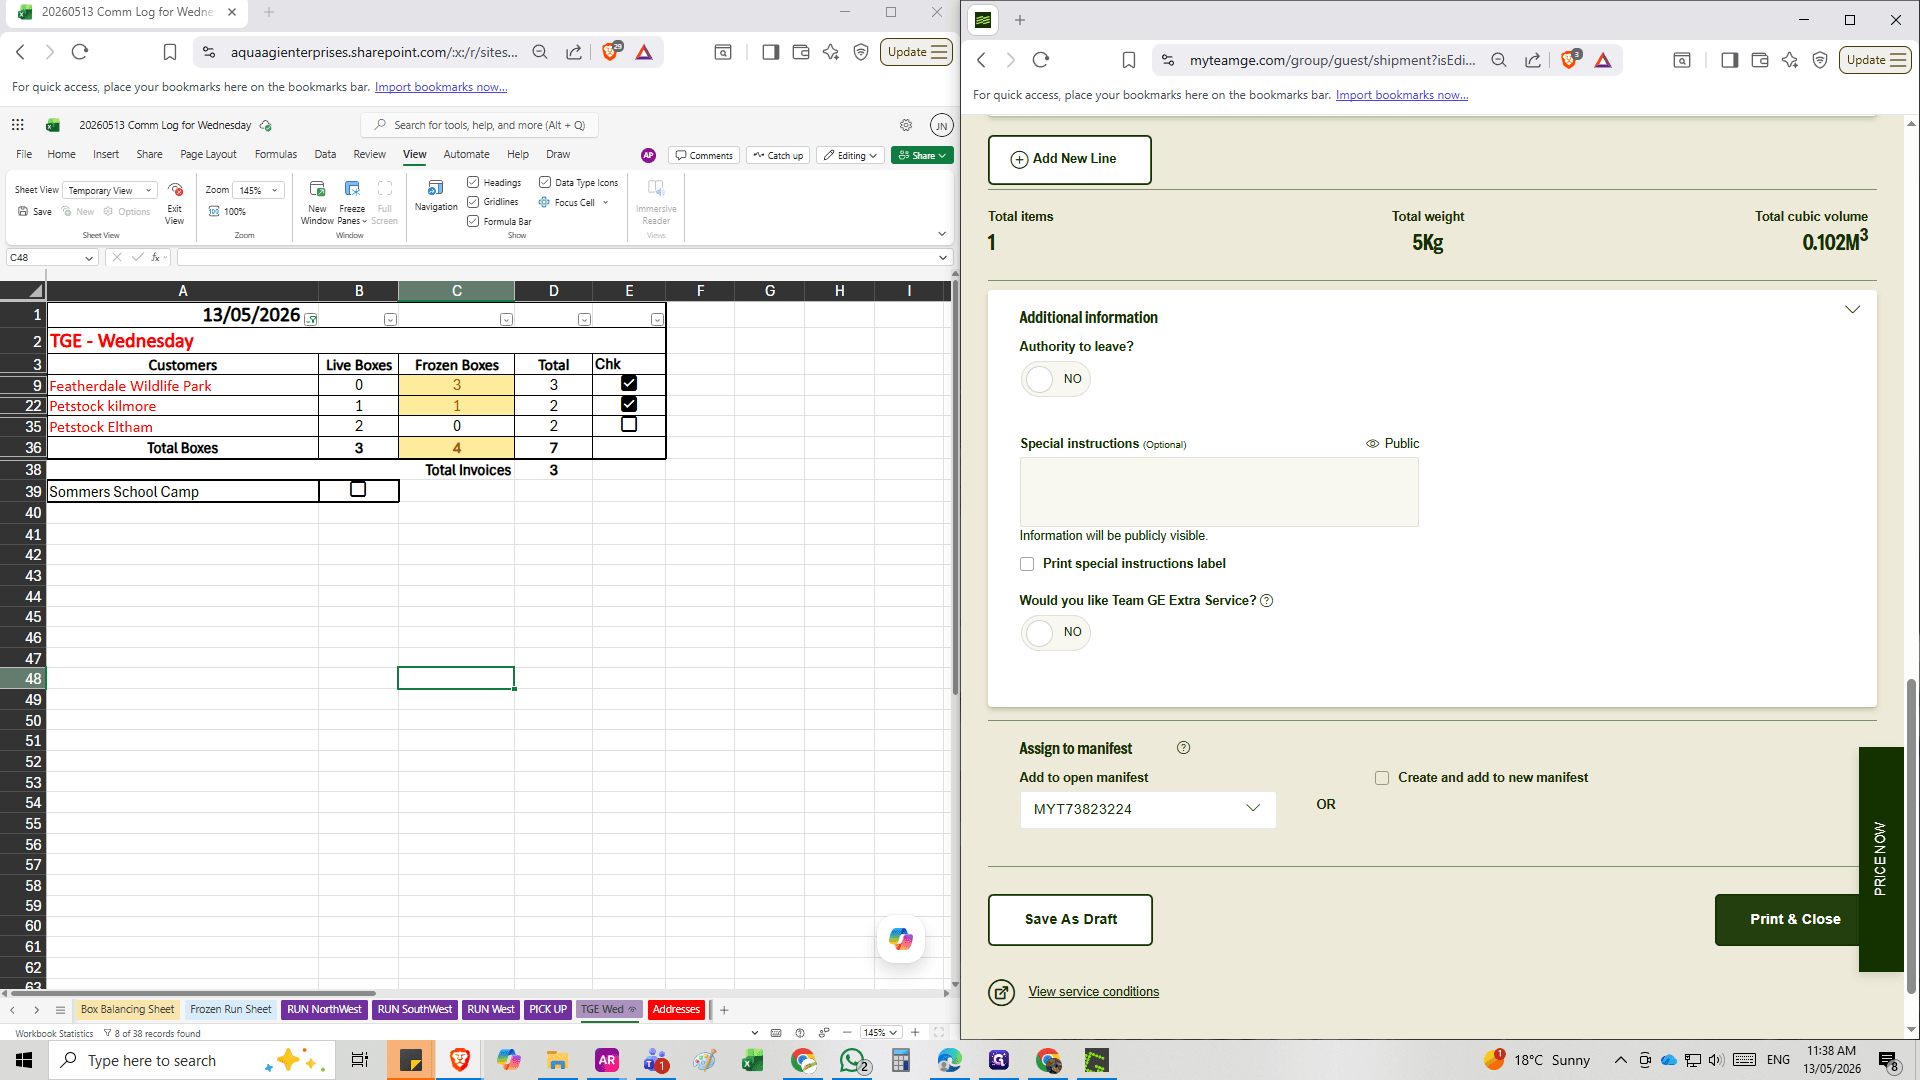
9
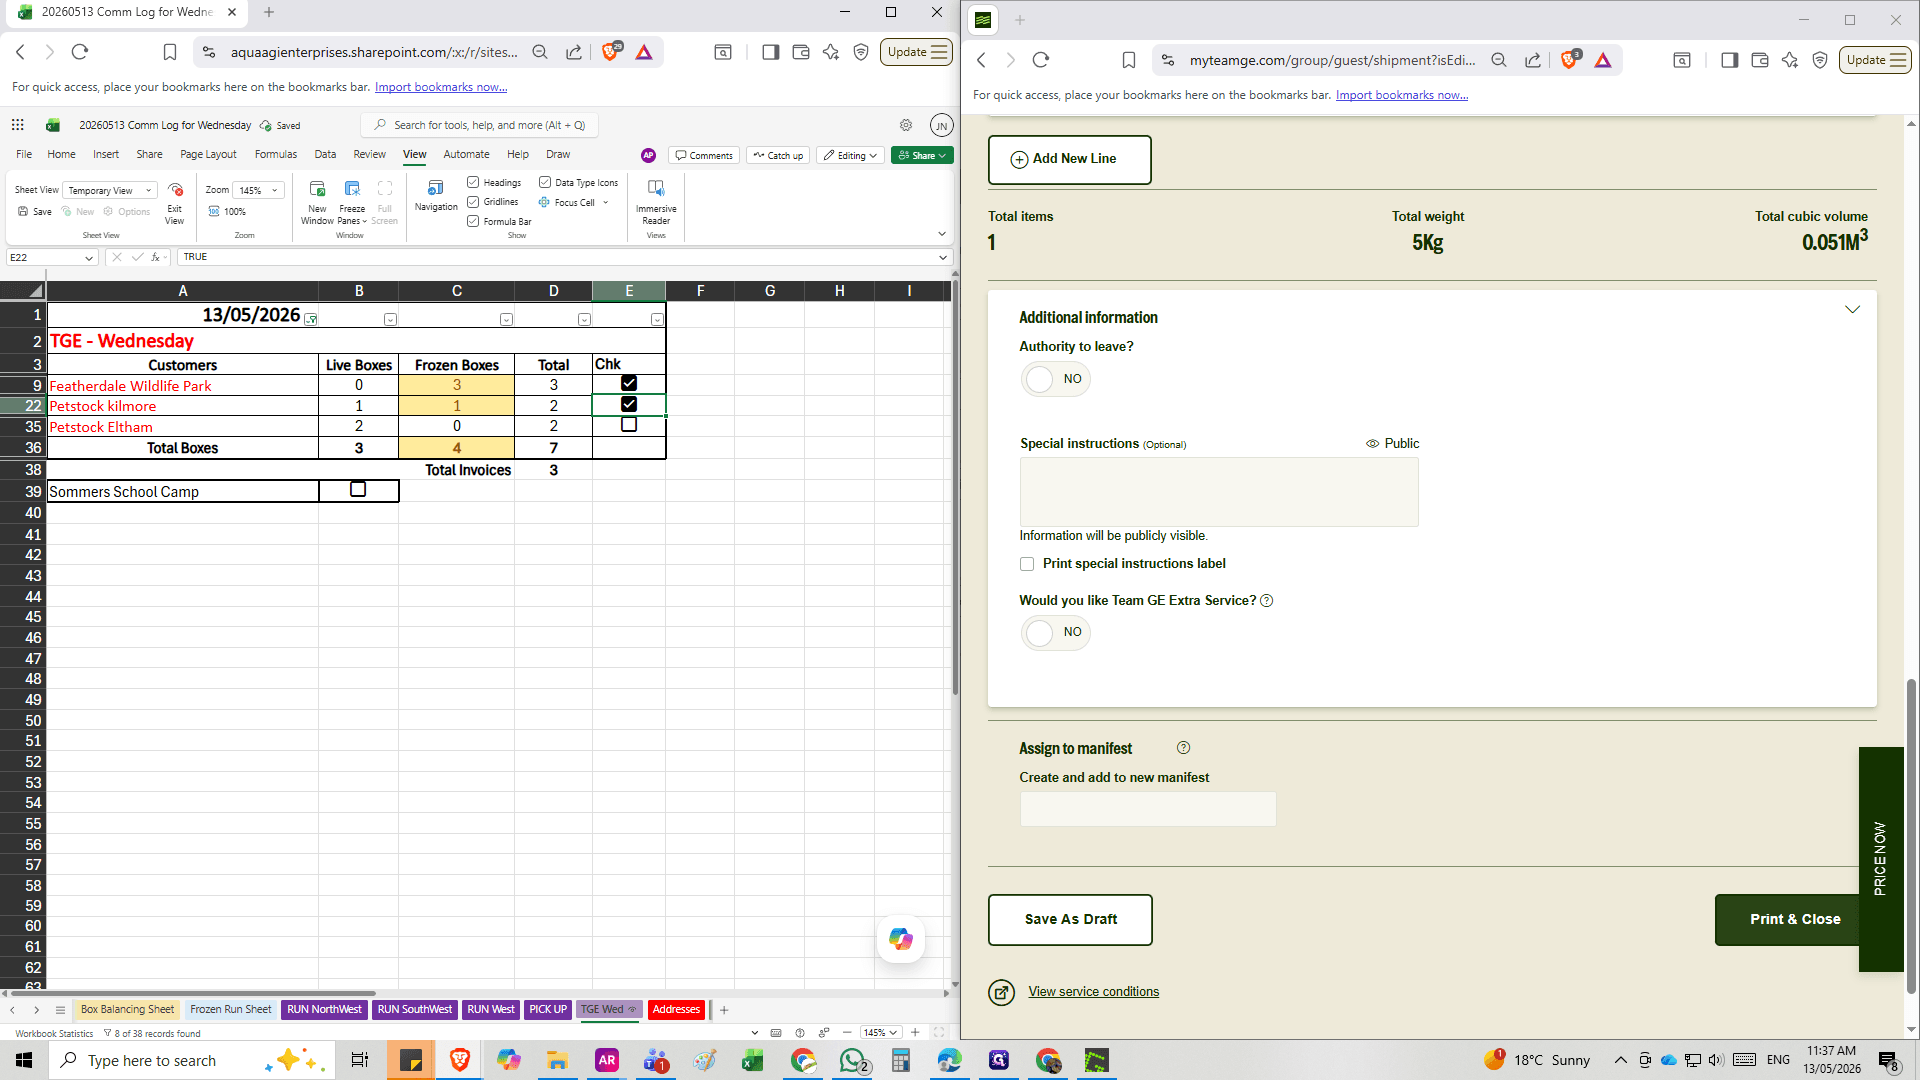
Click Print & Close at the bottom of the form to generate the labels.
Step #9: Click Print & Close at the bottom of the form to generate the labels.
10
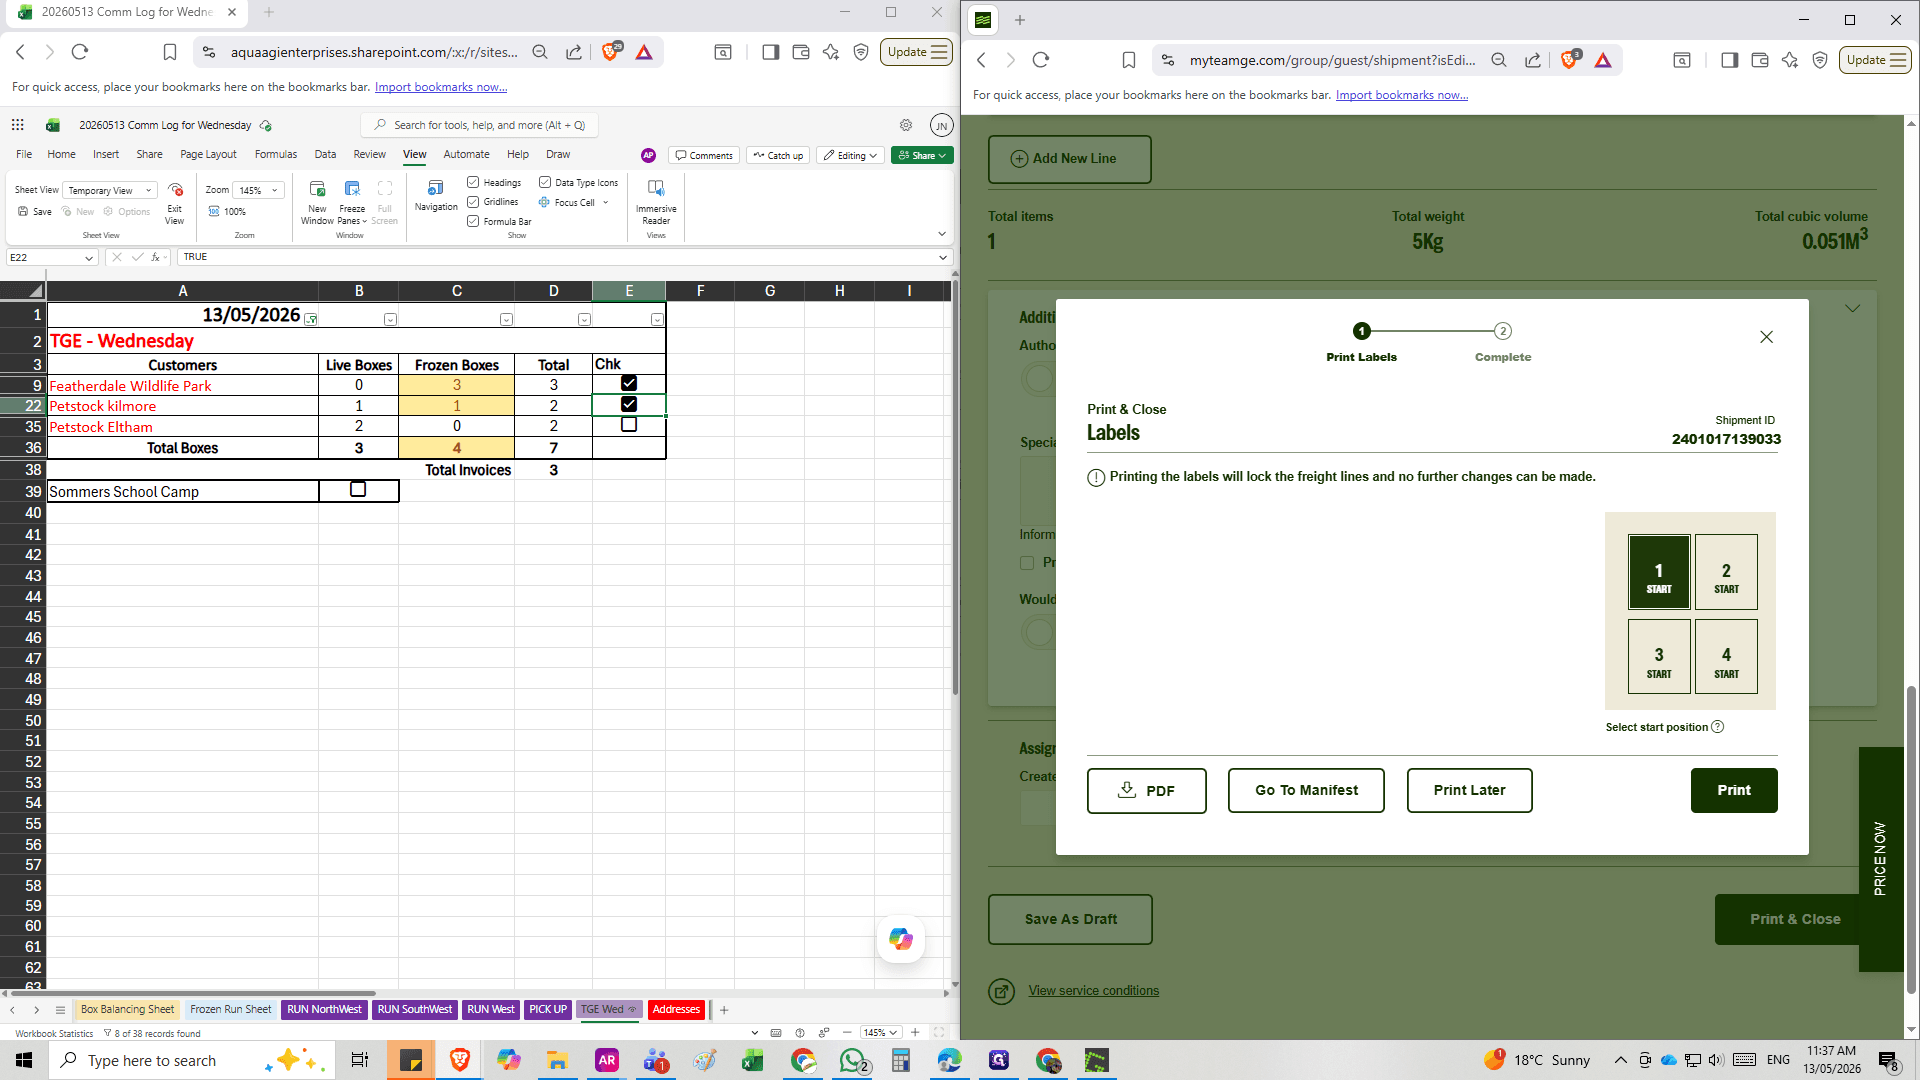
The Labels Print option will Pop up. Close this to continue adding additional shipments.
Step #10: The Labels Print option will Pop up. Close this to continue adding additional shipments.

Adding a New Receiver Address

If the destination does not appear in your address book, you must create a new receiver profile before assigning the shipment.
11
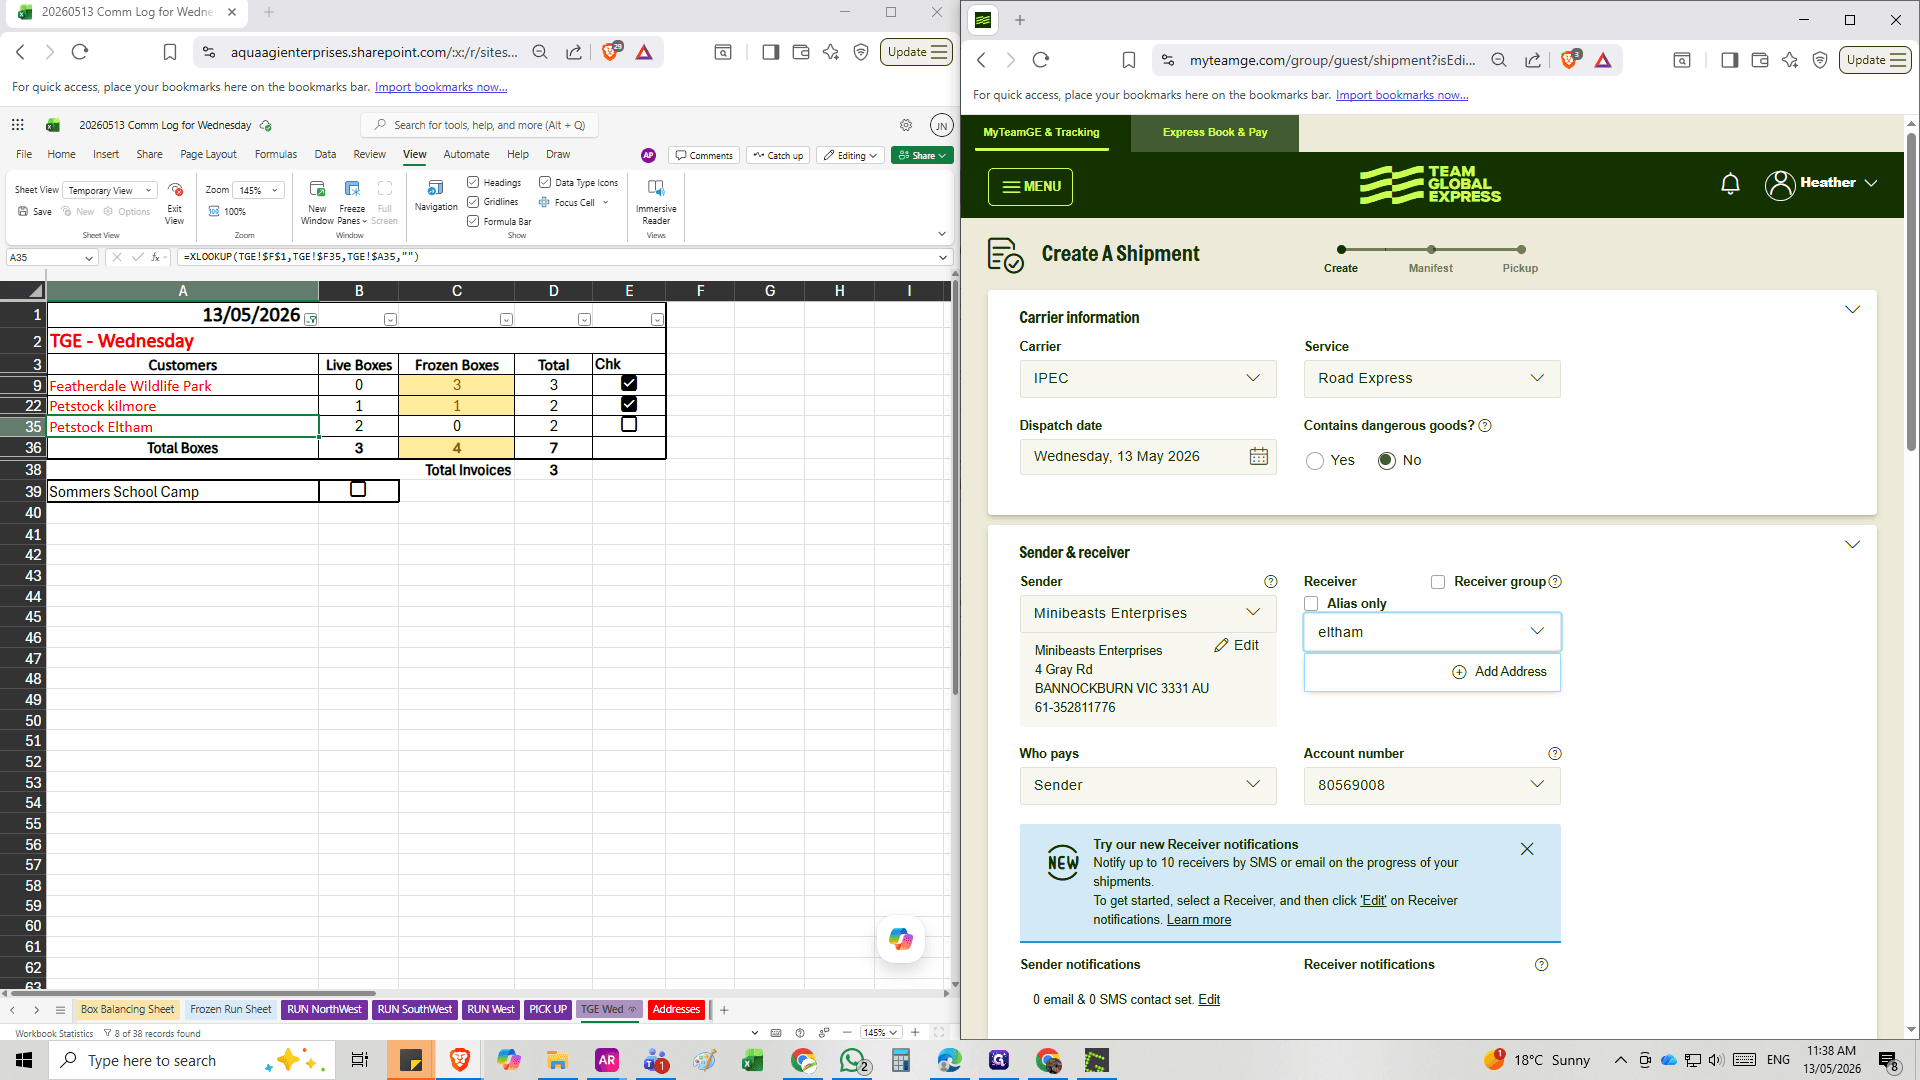
Click Add Address in the Receiver section of the shipment creation form.
Step #11: Click Add Address in the Receiver section of the shipment creation form.
12
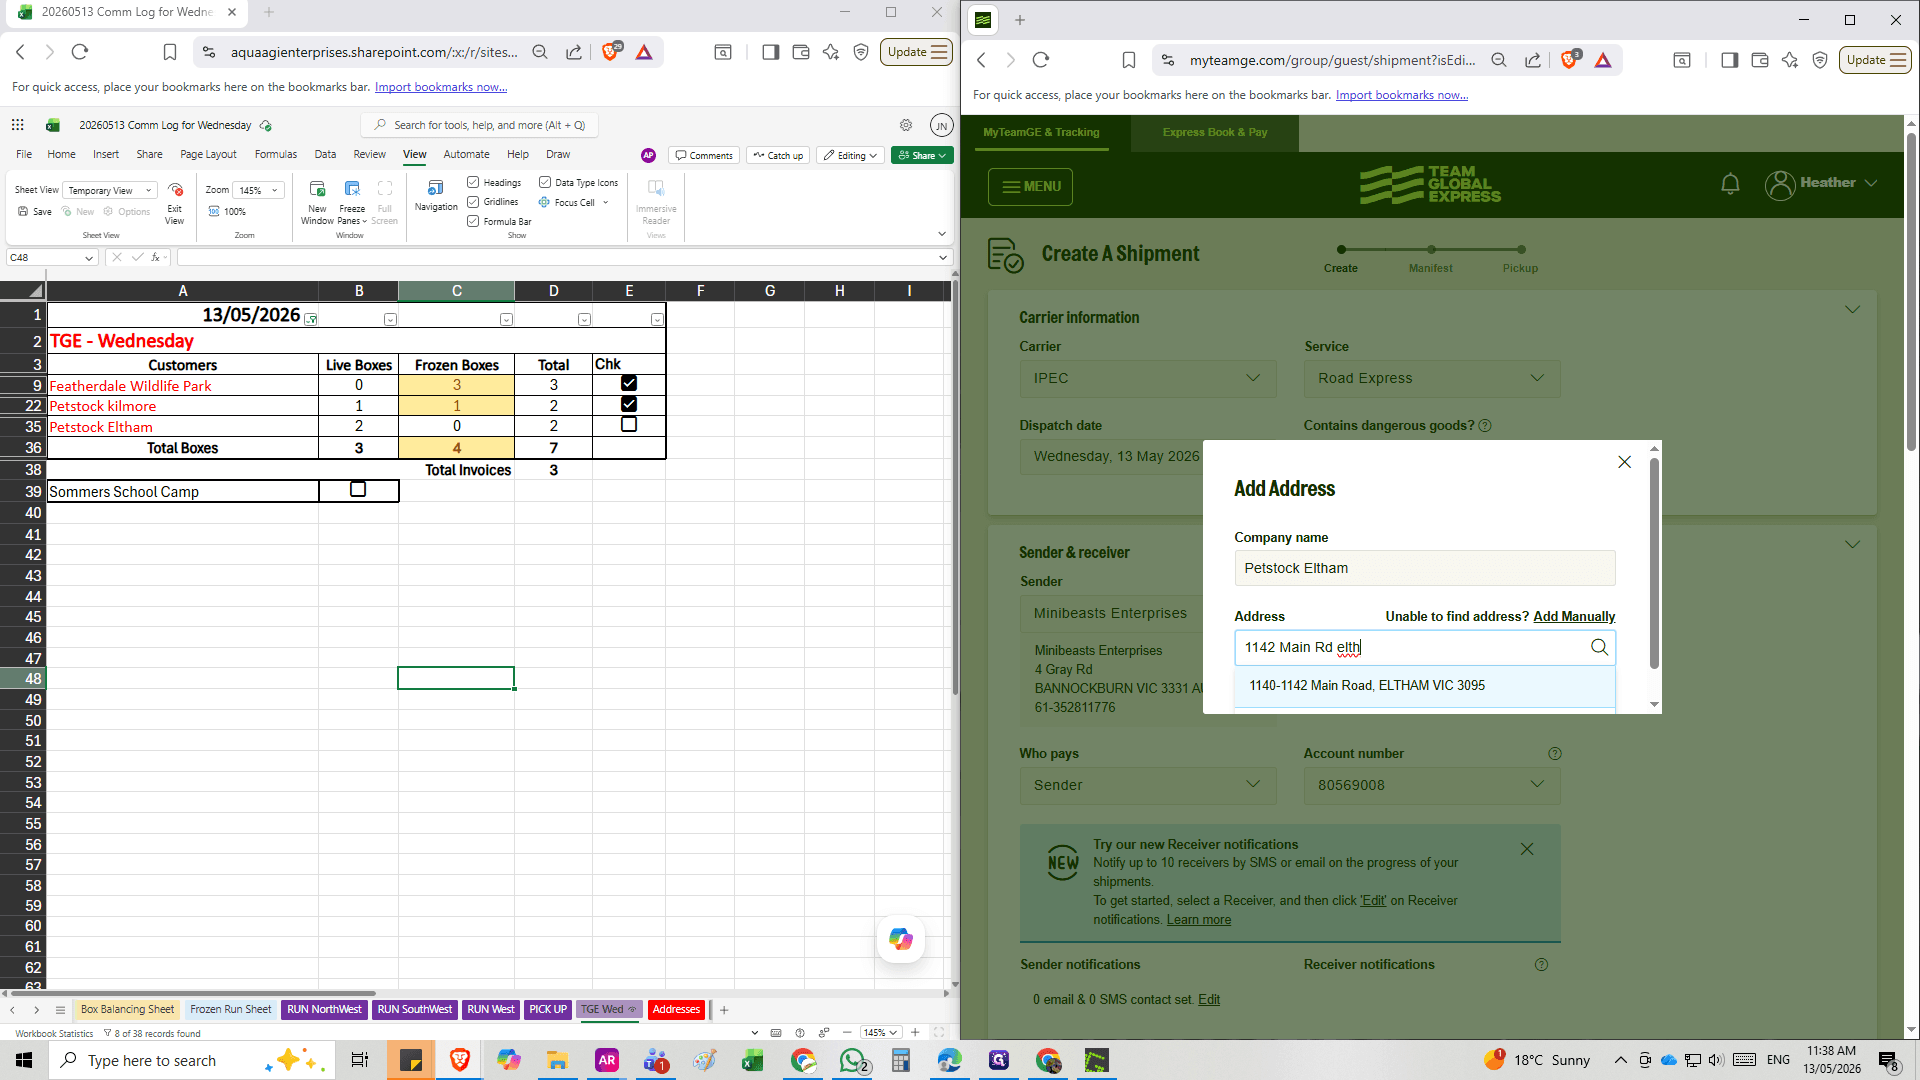
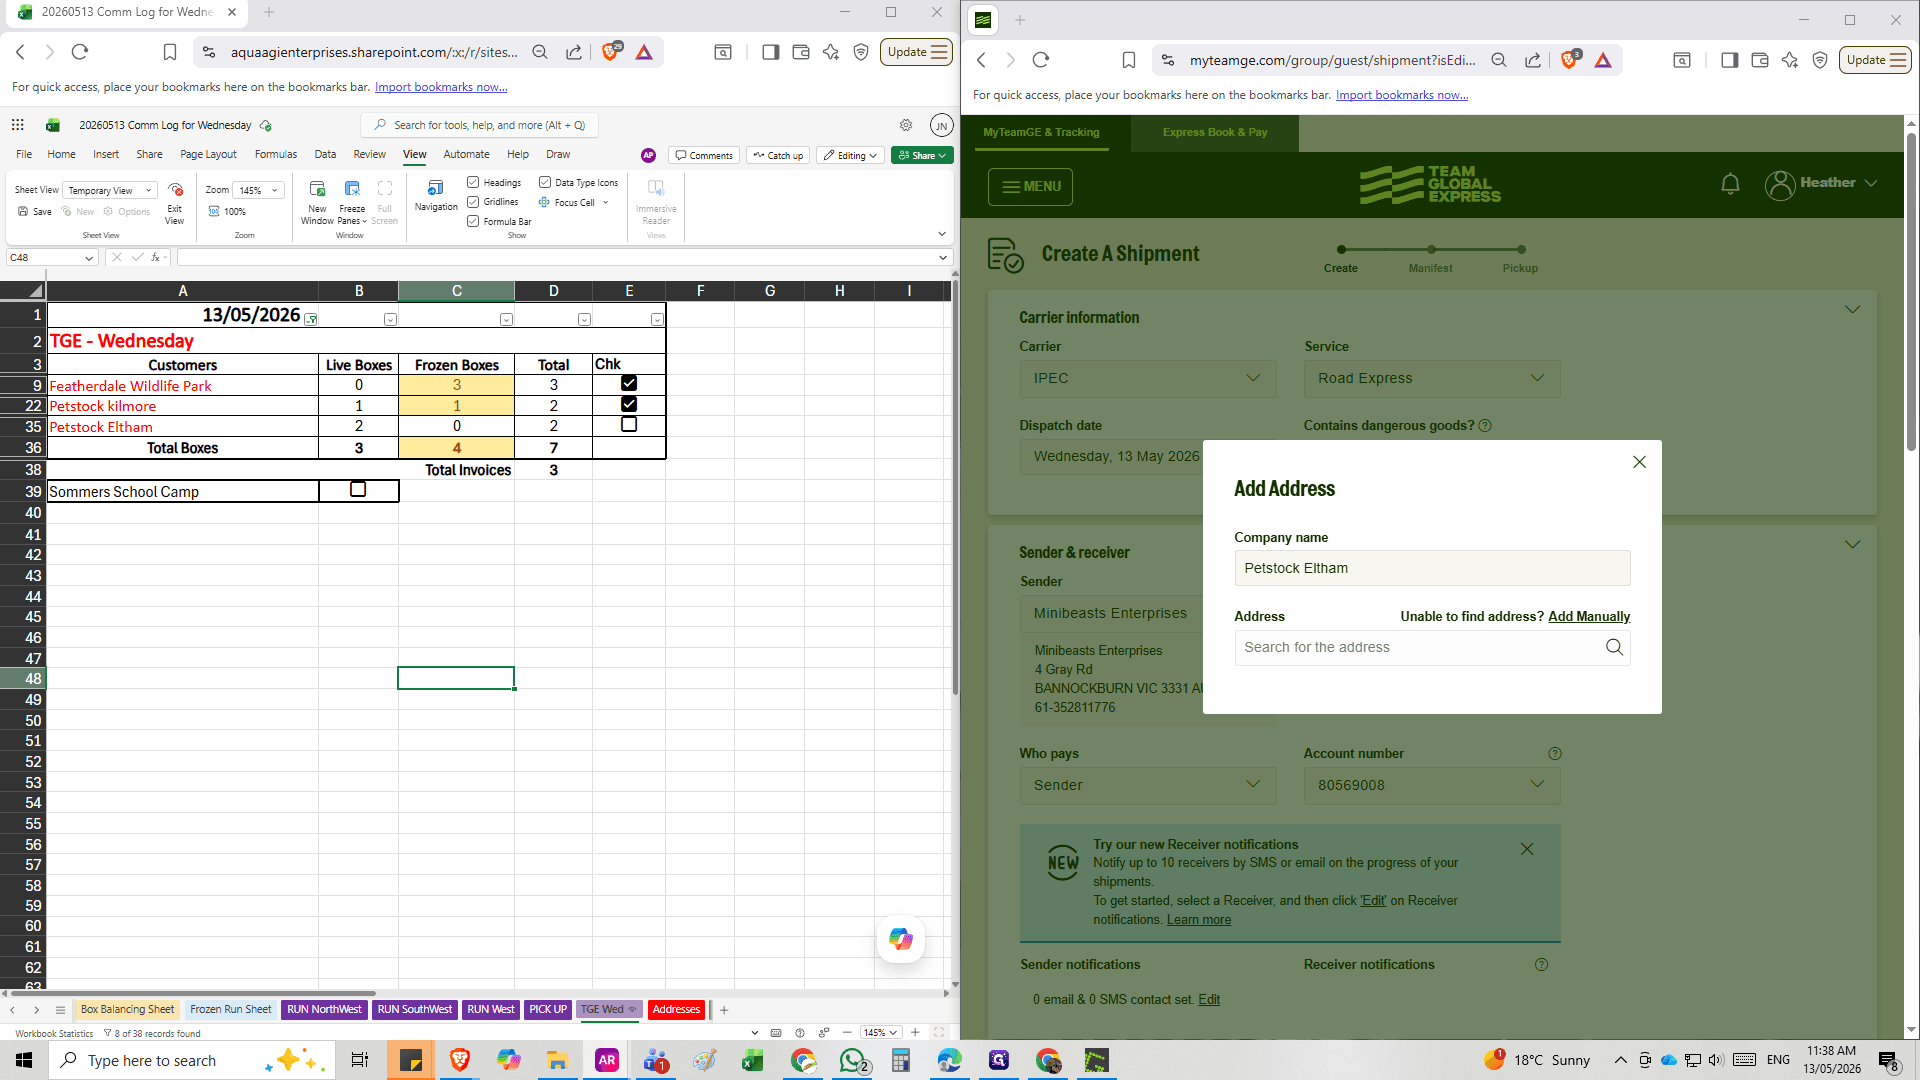
Enter the company name and type the street address into the Search for the address field.
Step #12: Enter the company name and type the street address into the Search for the address field.
13
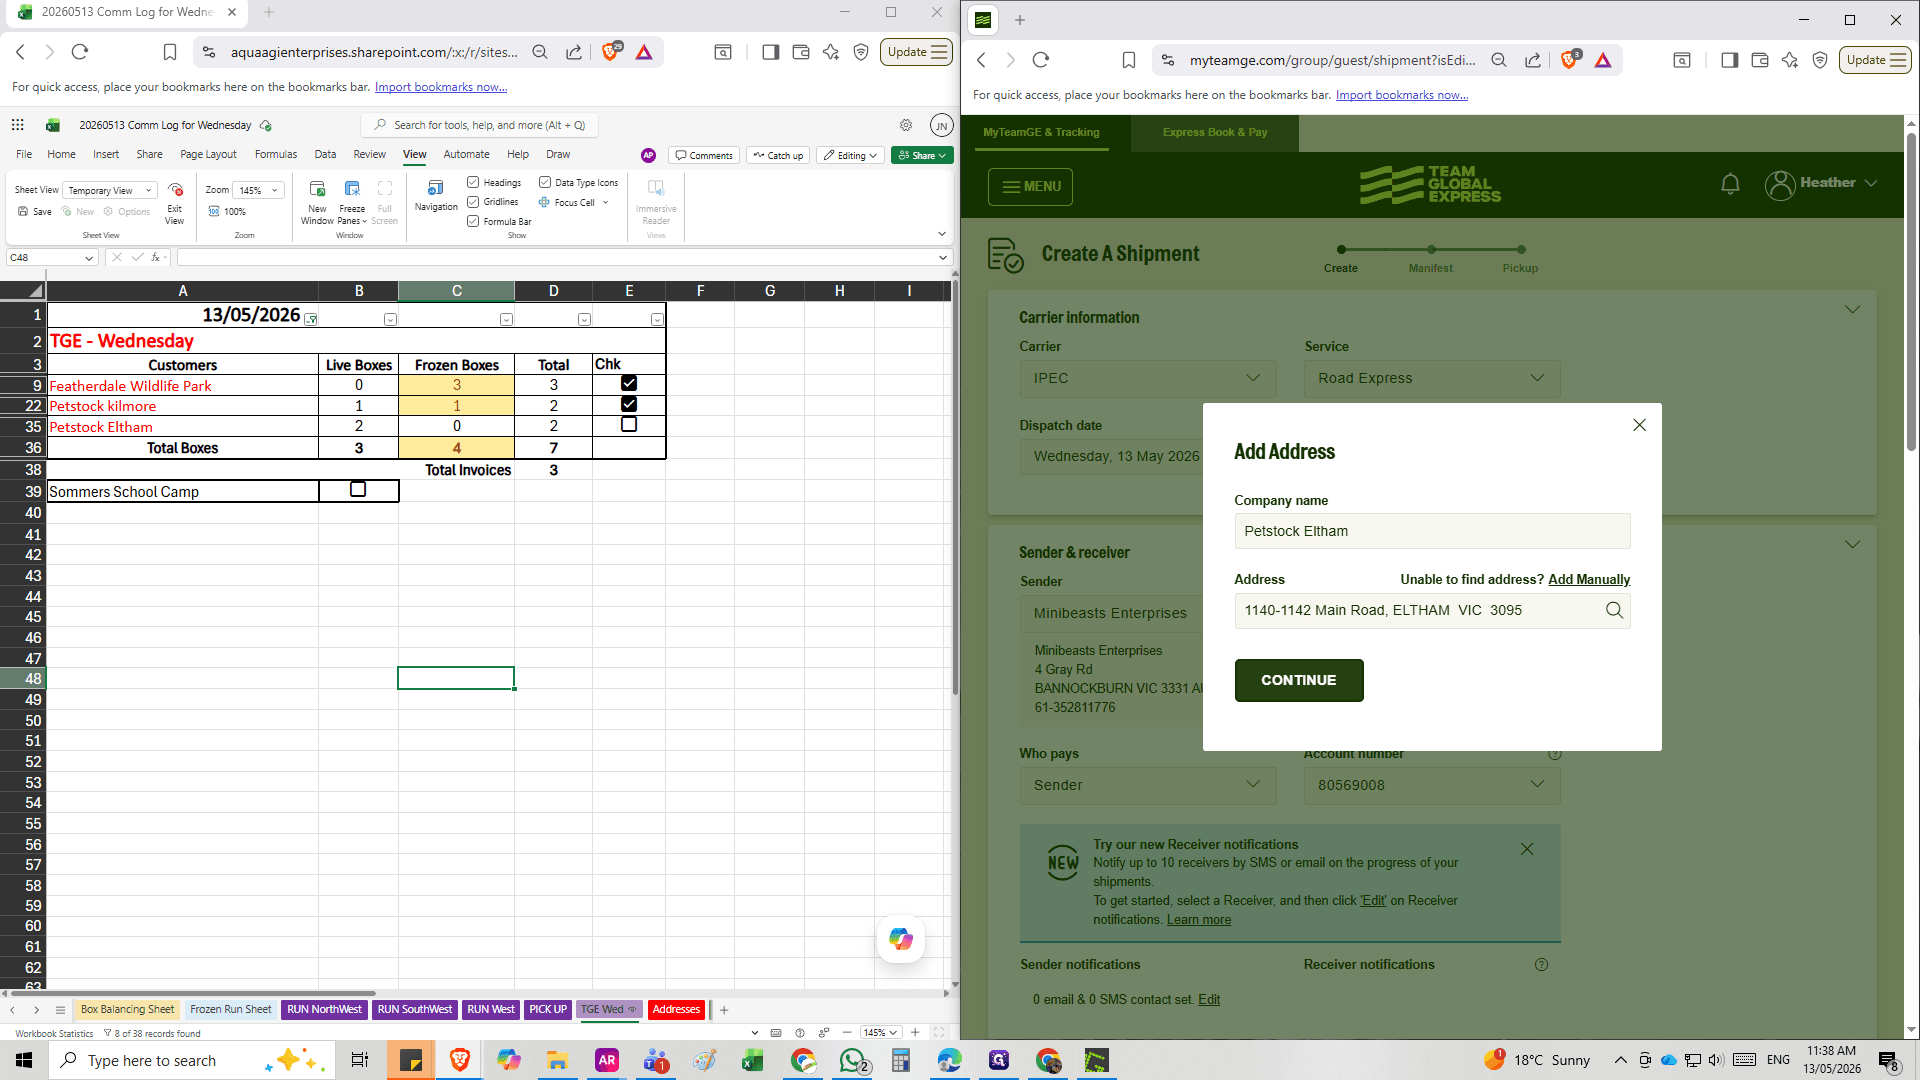
Click on the correct suggested address from the dropdown list to populate the location fields.
Step #13: Click on the correct suggested address from the dropdown list to populate the location fields.
14
Click CONTINUE to proceed to the contact details page.
Step #14: Click CONTINUE to proceed to the contact details page.
15
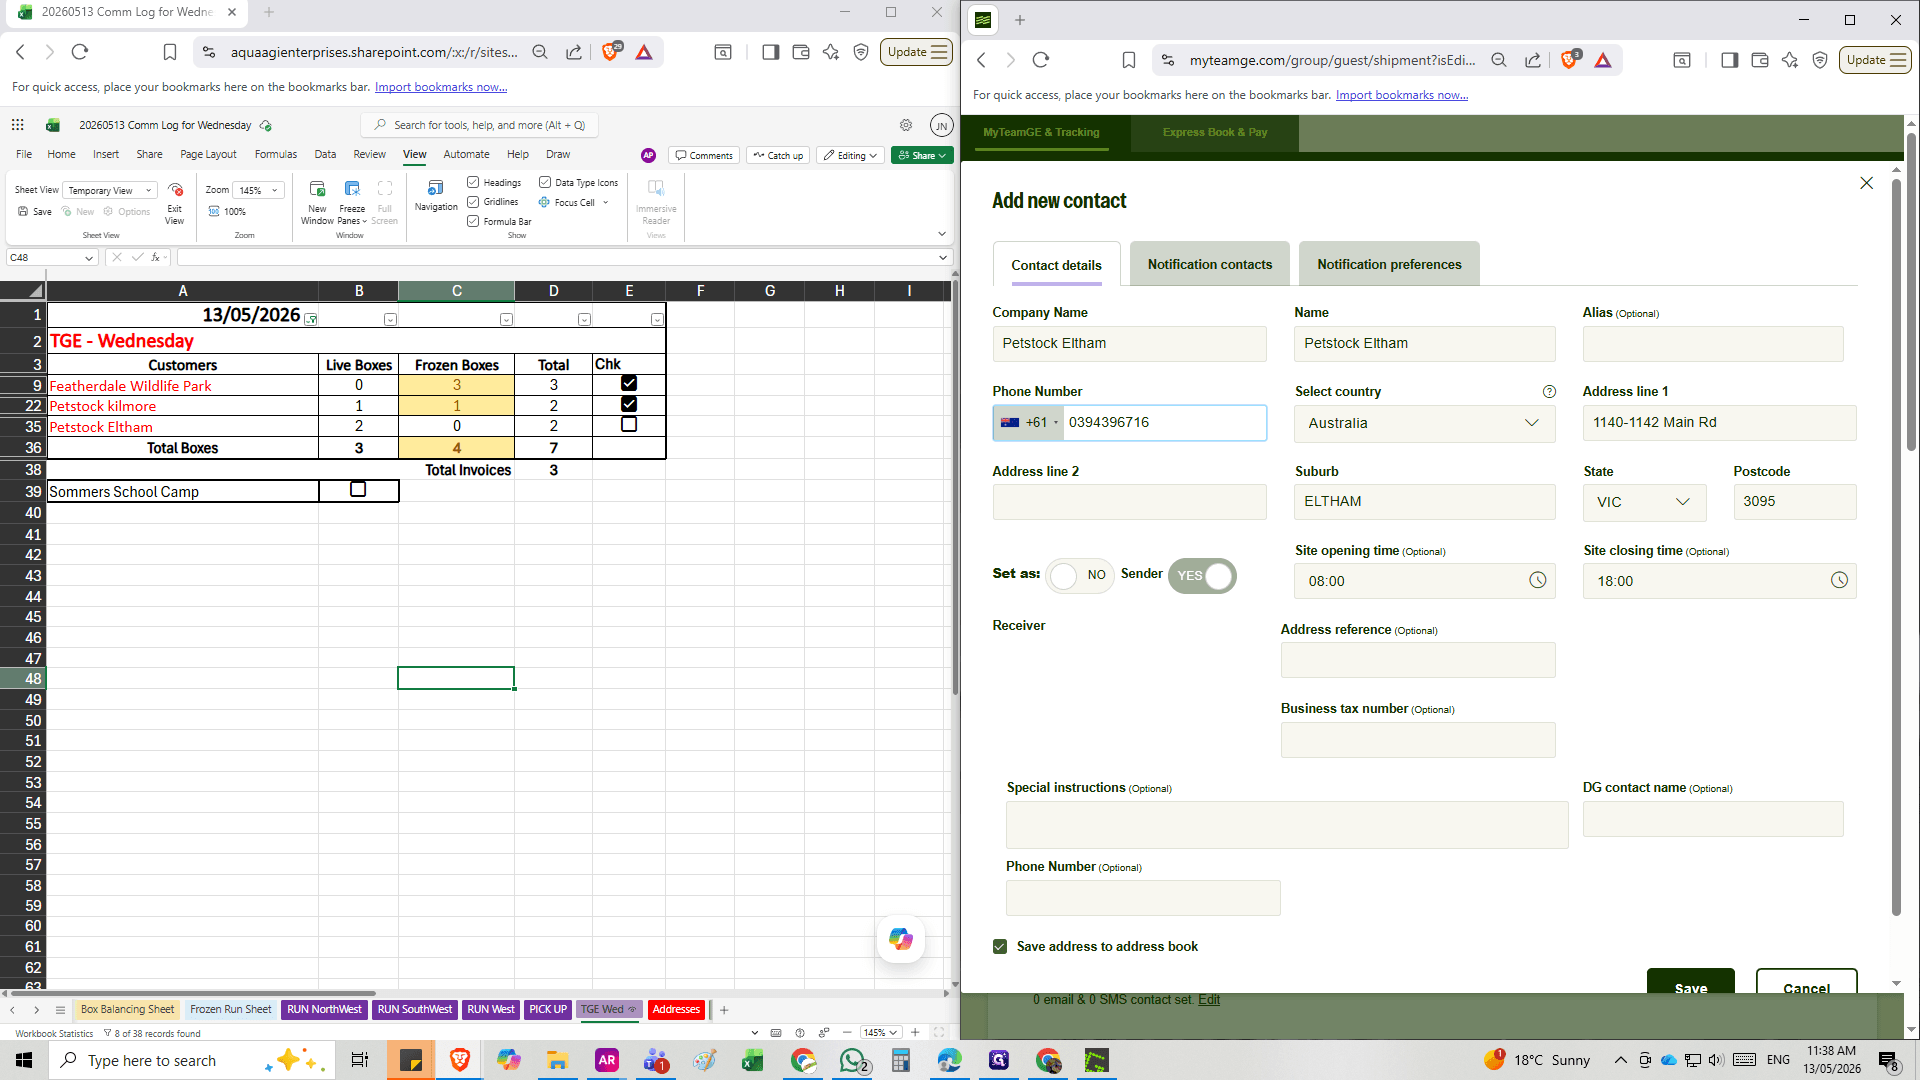
Fill in the contact Name and phone number, copying the details directly from your Excel tracking sheet.
Step #15: Fill in the contact Name and phone number, copying the details directly from your Excel tracking sheet.
16
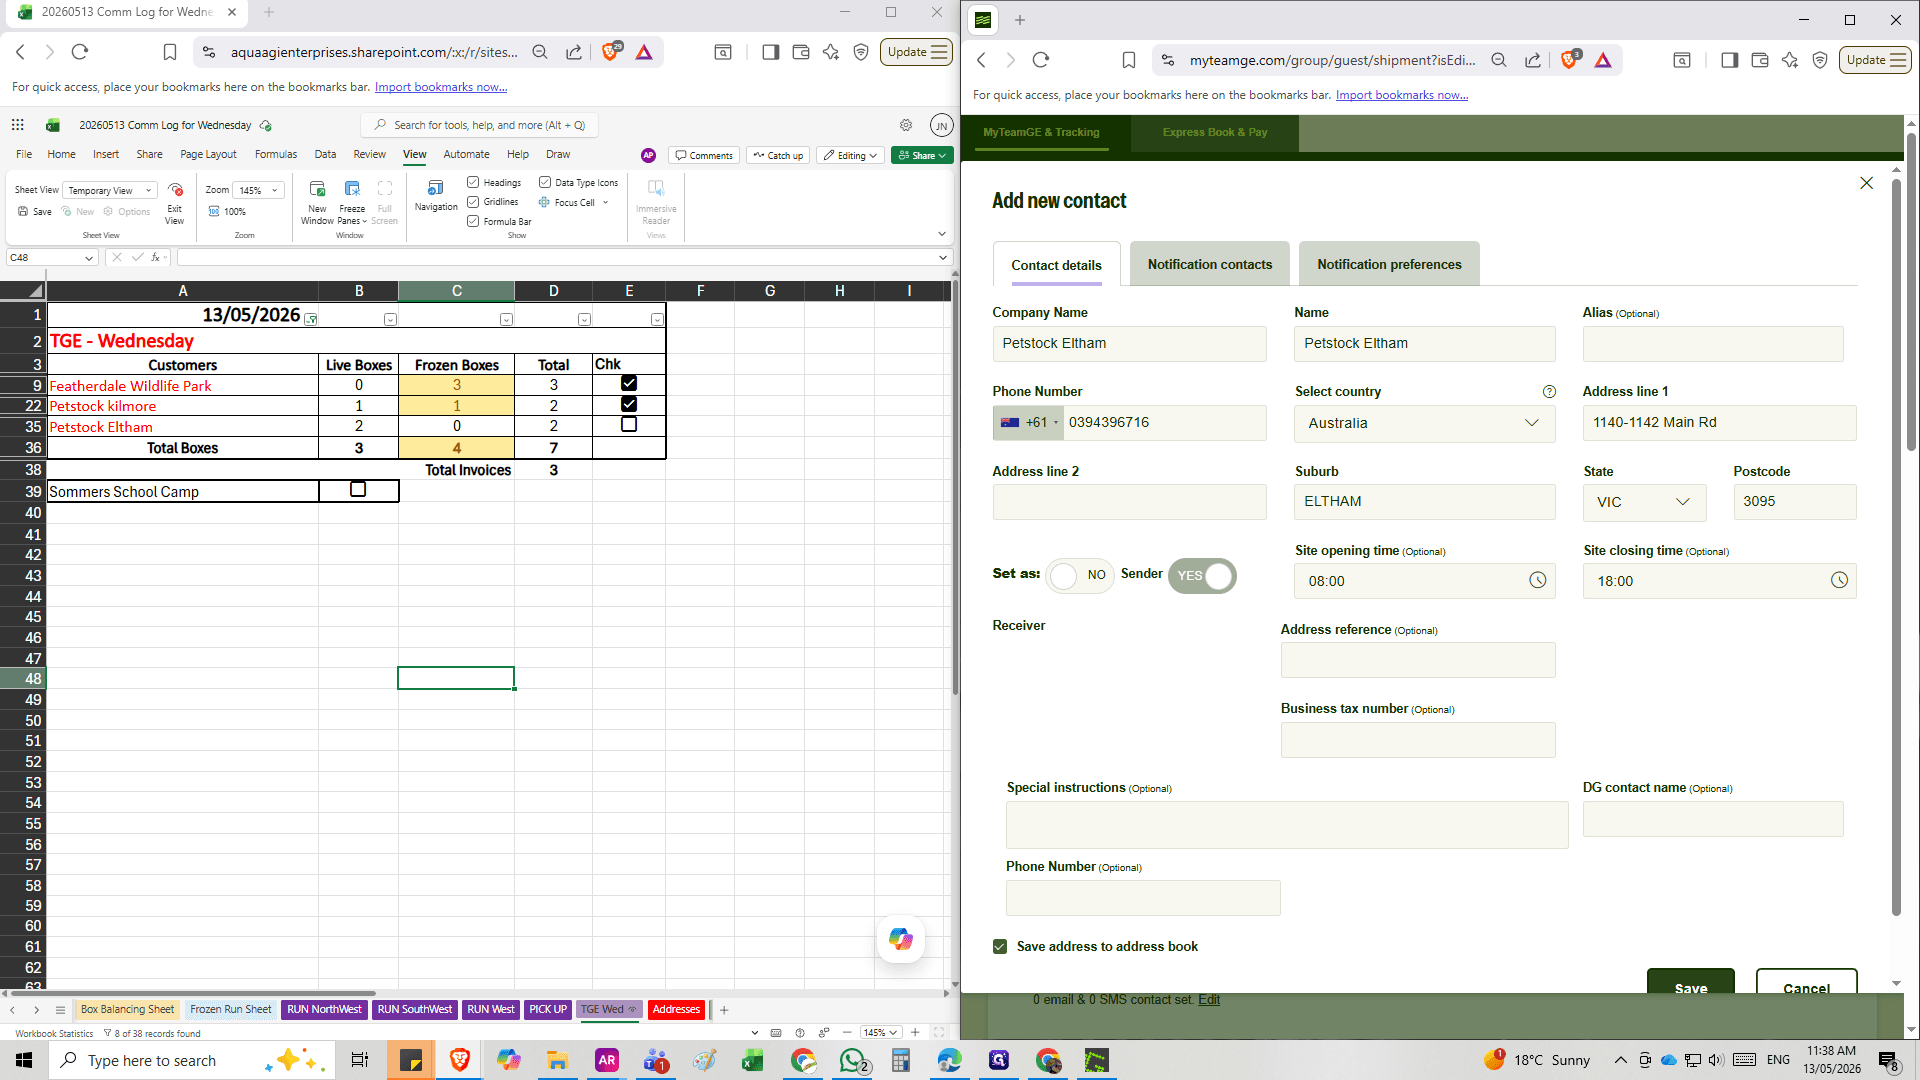
Click Save to store the new receiver and return to the main shipment form.
Step #16: Click Save to store the new receiver and return to the main shipment form.
17
Enter the item description and the total quantity of boxes. Note: For TGE IPEC deliveries, this will always be listed as medium boxes.
Step #17: Enter the item description and the total quantity of boxes. Note: For TGE IPEC deliveries, this will always be listed as medium boxes.
18
Click Print & Close to finalize the creation and print your labels.
Step #18: Click Print & Close to finalize the creation and print your labels.

Printing and Completing Manifests

Once all individual shipments have been added, you must close out the manifest so it can be handed to the driver.
19
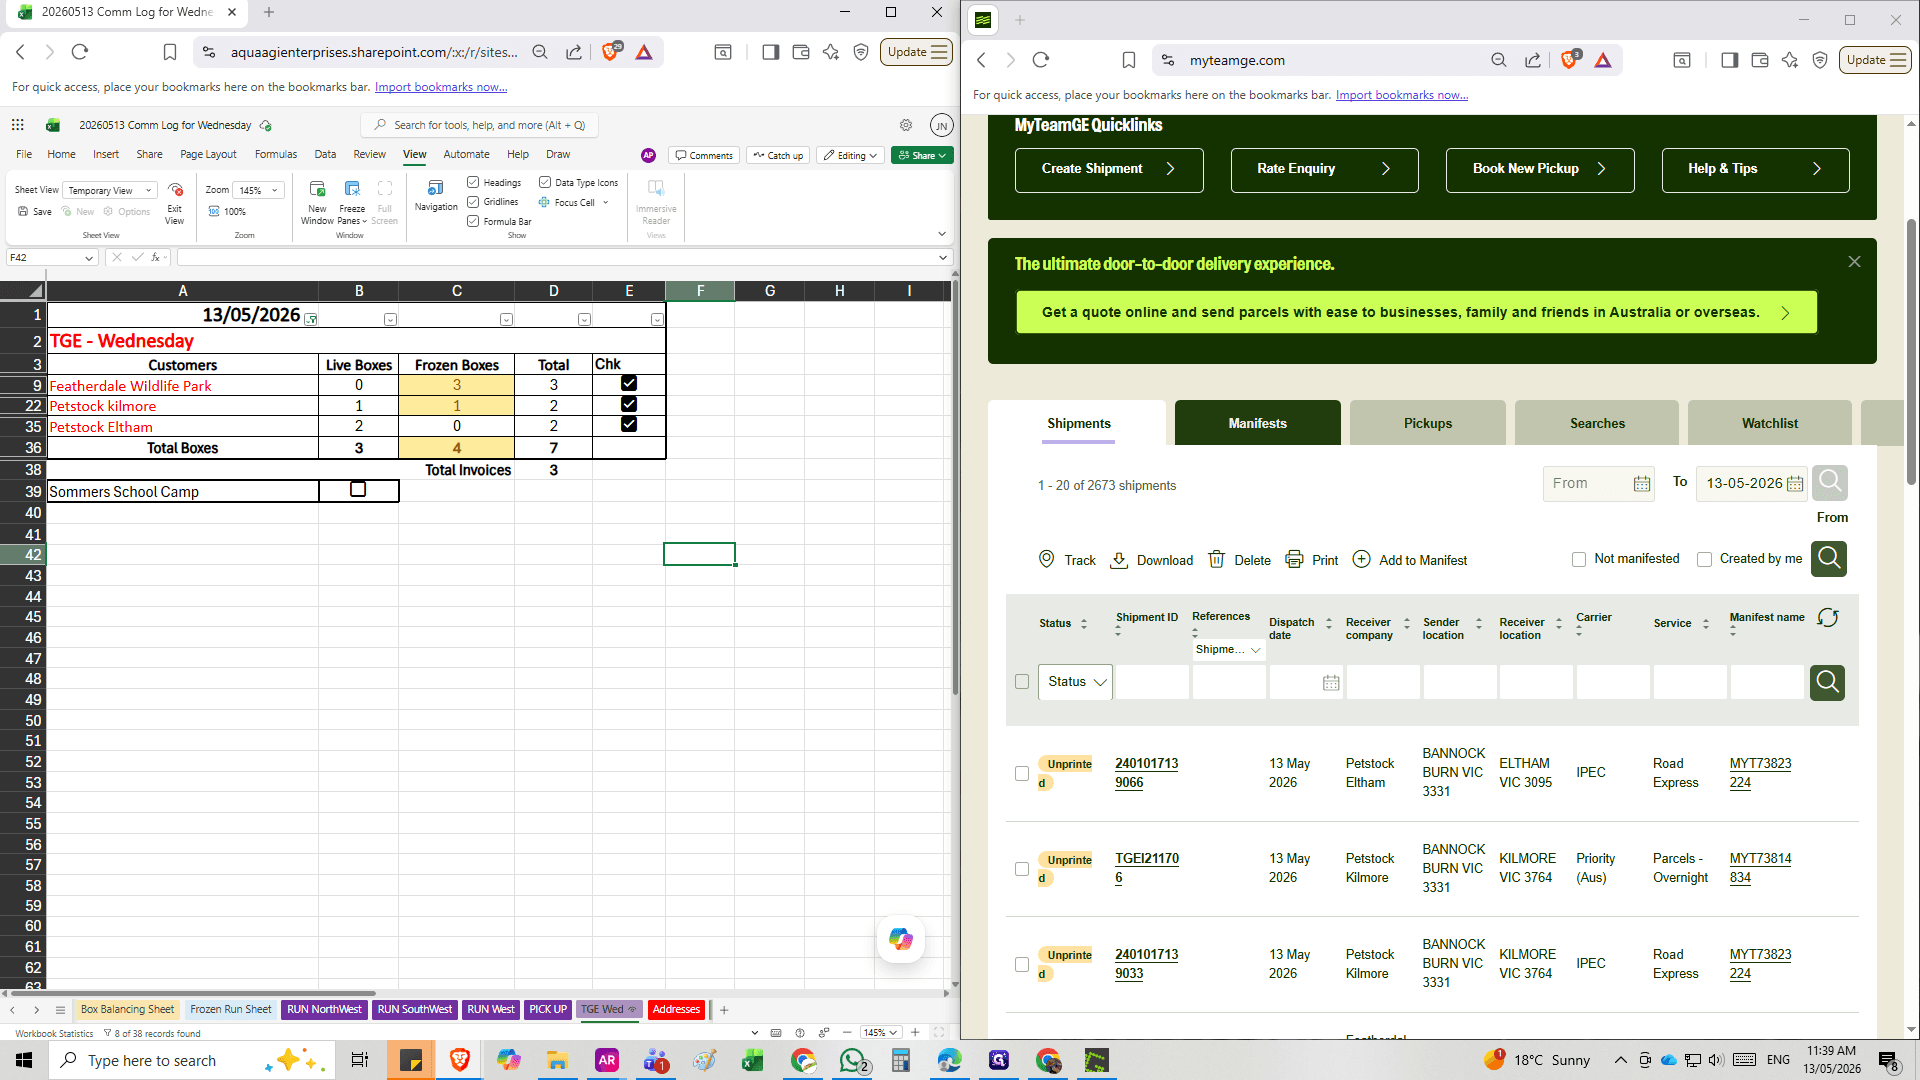
Click on Manifests in the main navigation menu (home screen) of the portal.
Step #19: Click on Manifests in the main navigation menu (home screen) of the portal.
20
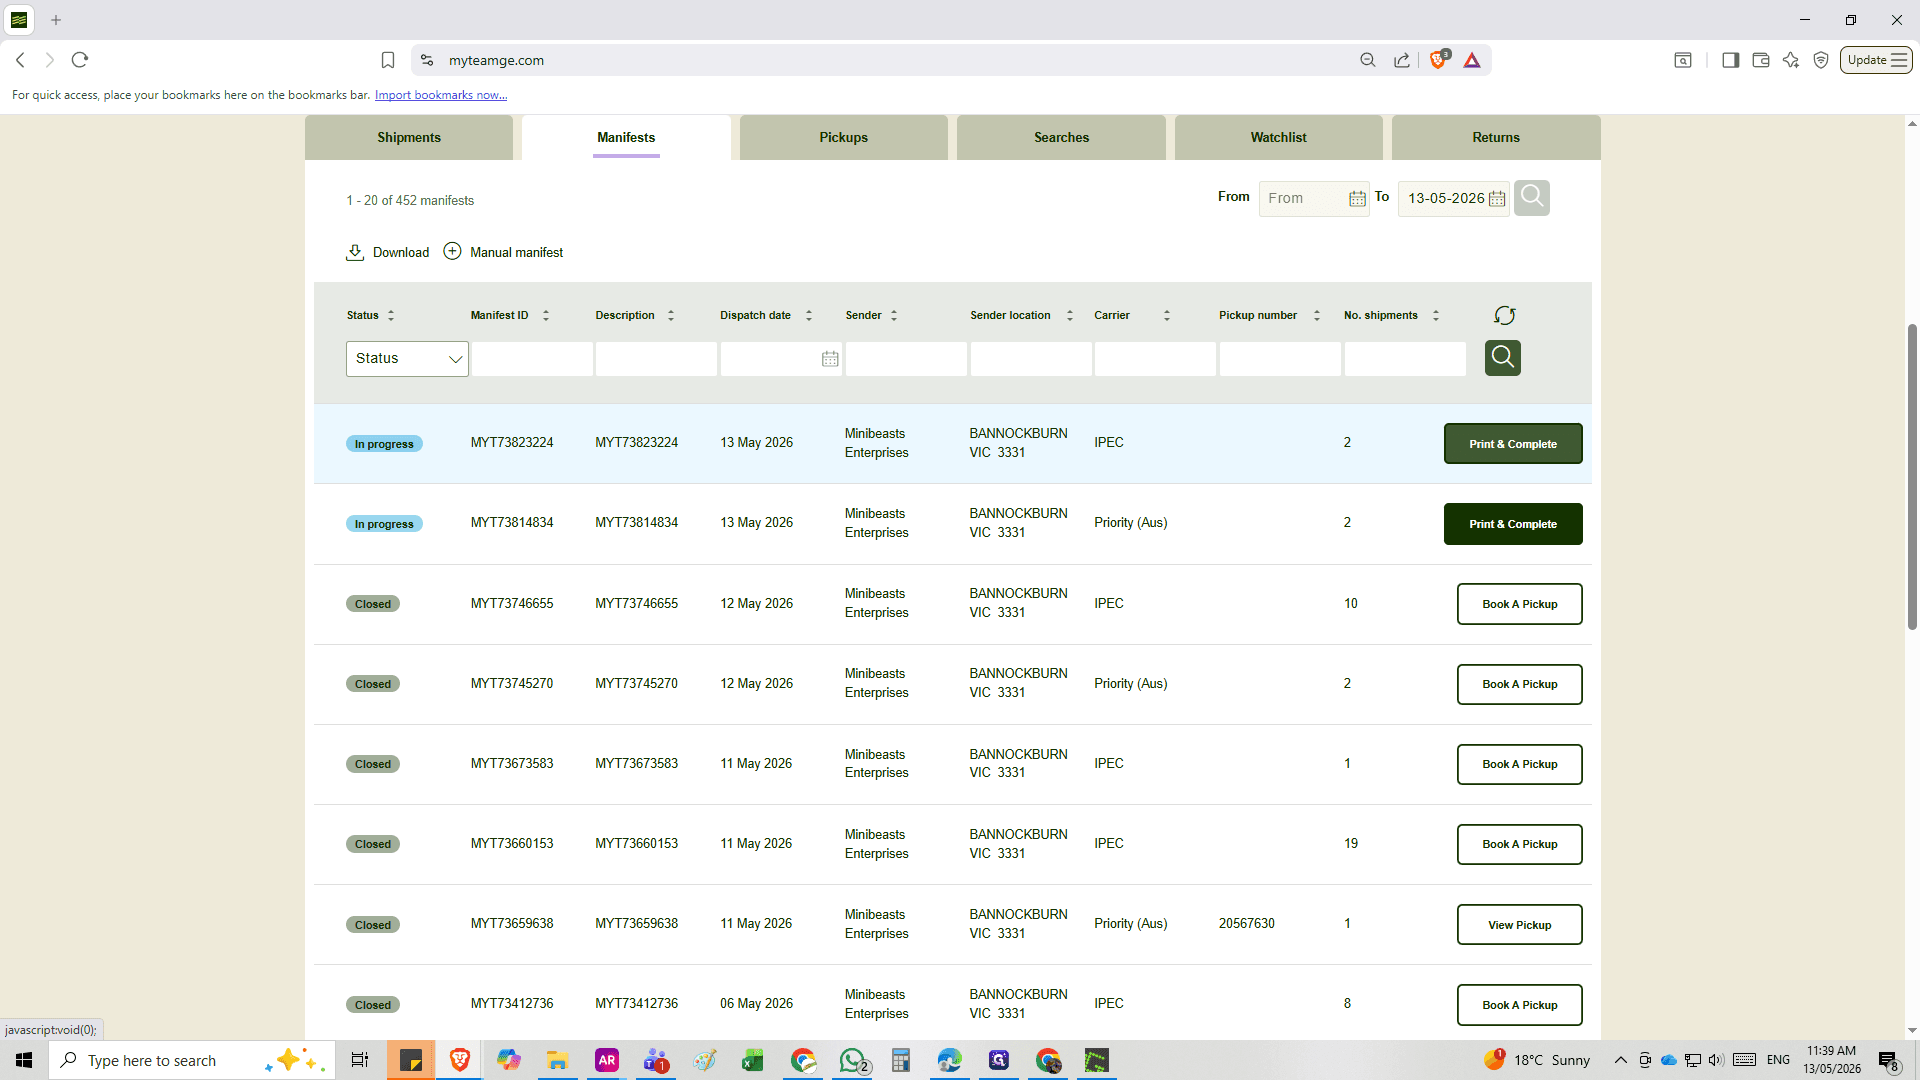
Locate the manifest designated as "In progress" and click Print & Complete. (If there are both IPEC and Priority Aus deliveries, you will need to do this for each of them).
Step #20: Locate the manifest designated as "In progress" and click Print & Complete. (If there are both IPEC and Priority Aus deliveries, you will need to do this for each of them).
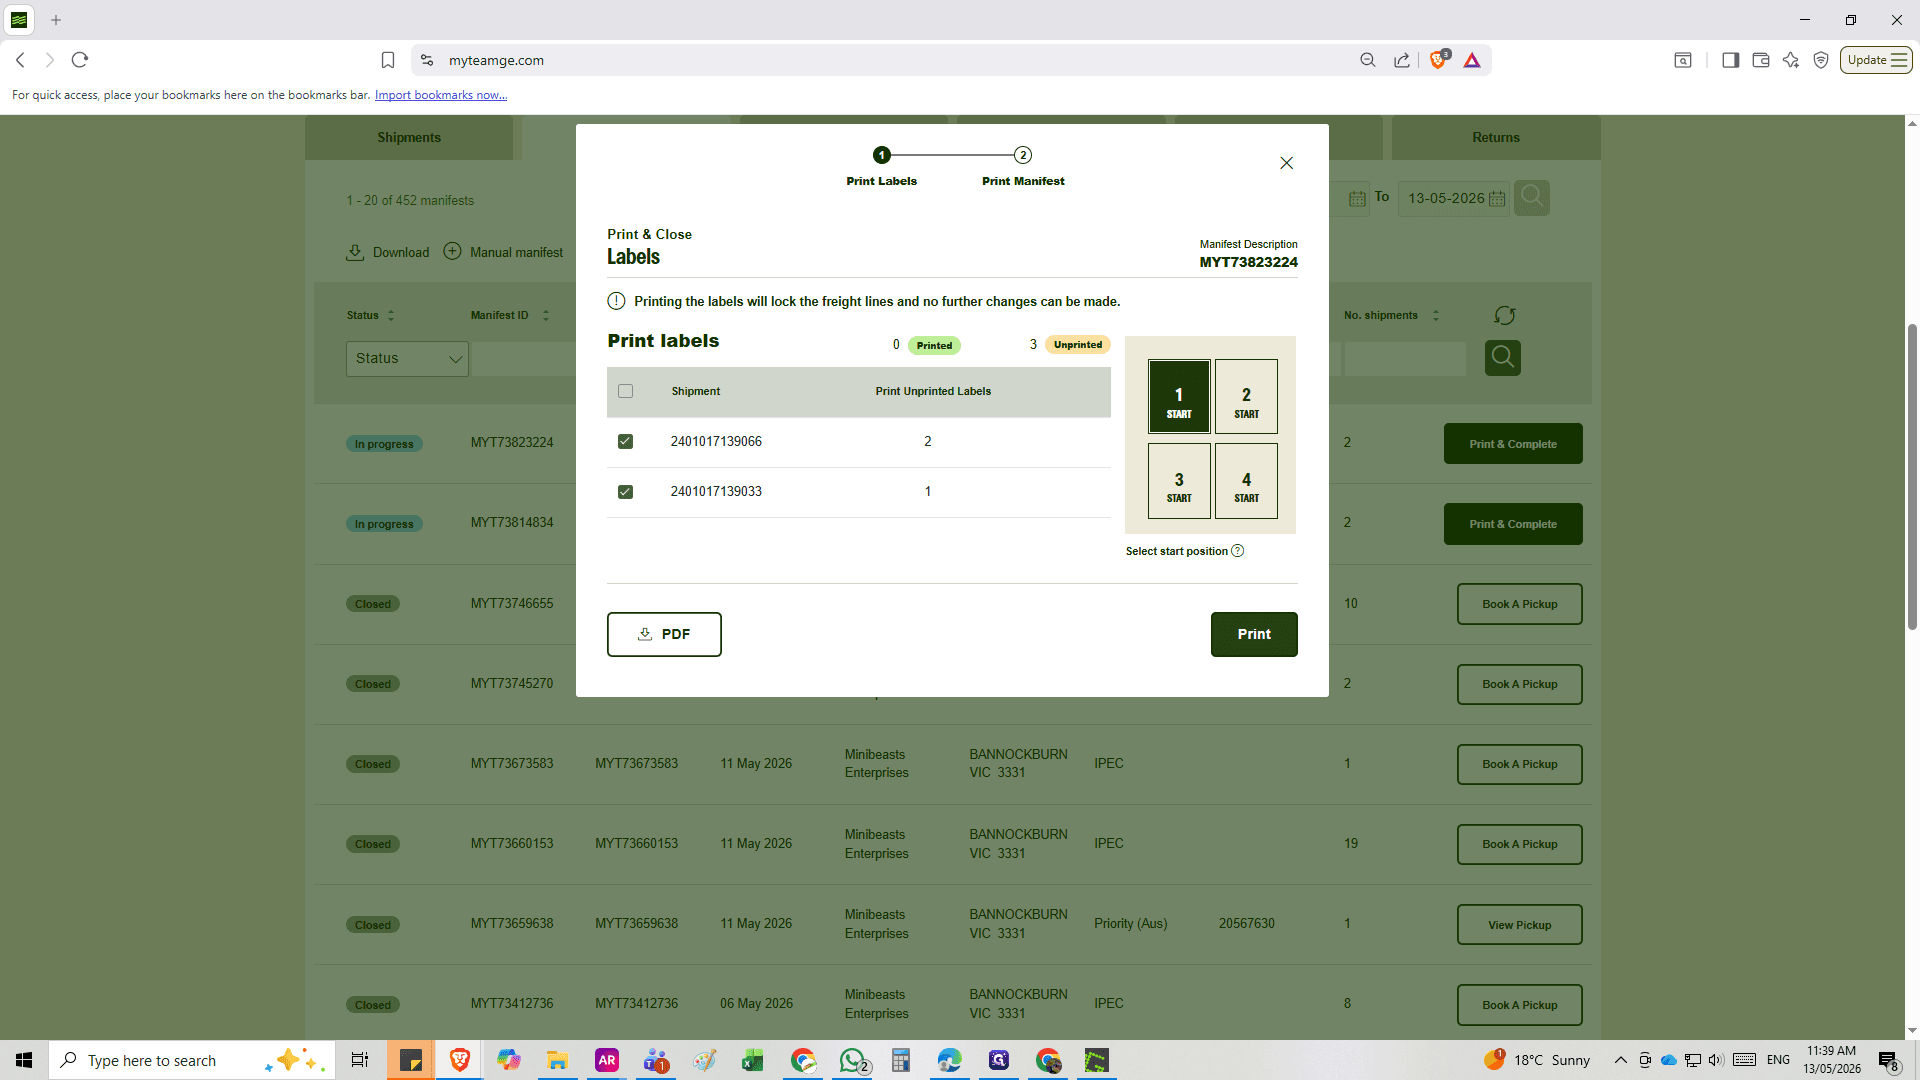
21
In the confirmation modal, click Print to download or open the official manifest document.
Step #21: In the confirmation modal, click Print to download or open the official manifest document.
22
Firstly check how many pages are required by scrolling through your document preview.
Place the correct amount of labels into your Printer face down.
Click Print in your browser's print dialog to finalize the physical copies.
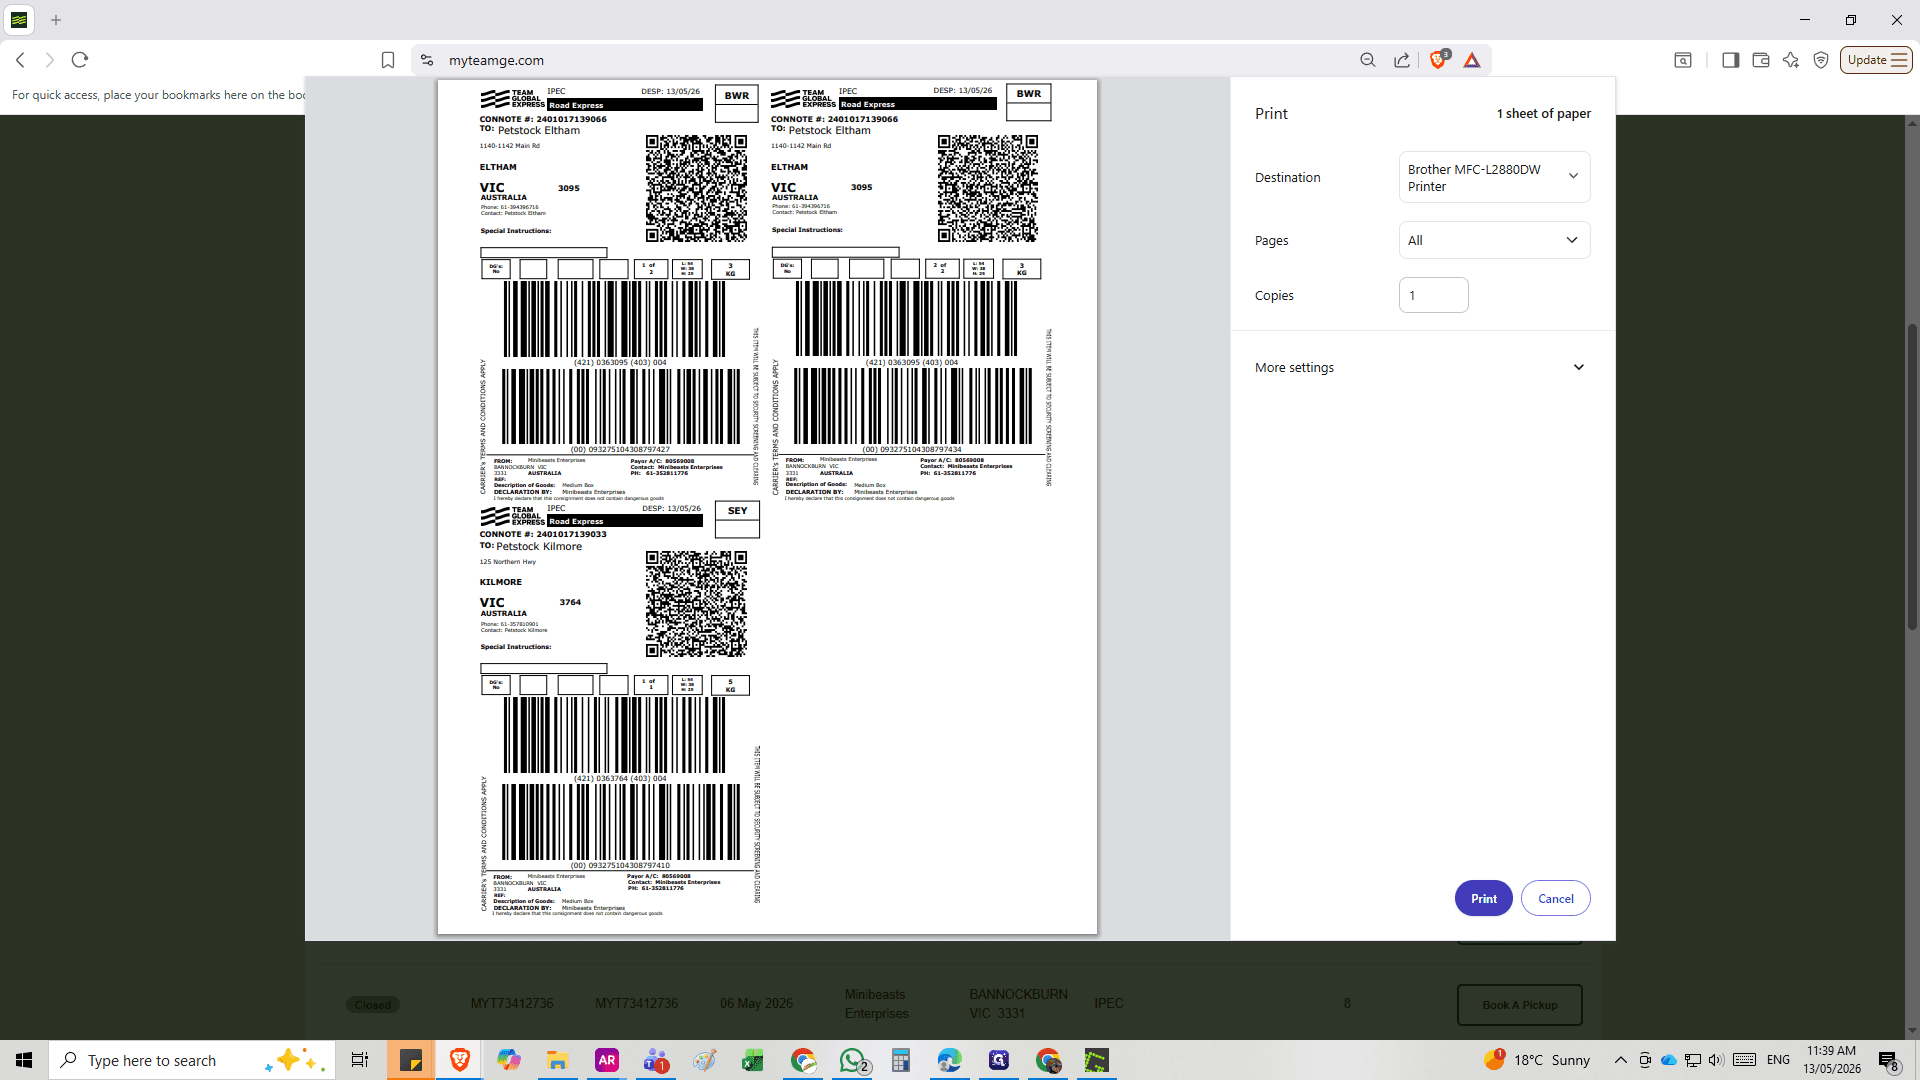
Step #22: Firstly check how many pages are required by scrolling through your document preview.Place the correct amount of labels into your Printer face down. Click Print in your browser's print dialog to finalize the physical copies.
23
Once all labels have been printed, the Manifest pop up will appear.
Press print & print manifest sheet onto normal paper (not labels) to complete.
If you had both IPEC and Priority, you will have to complete steps 20-23 for each Shipping type.
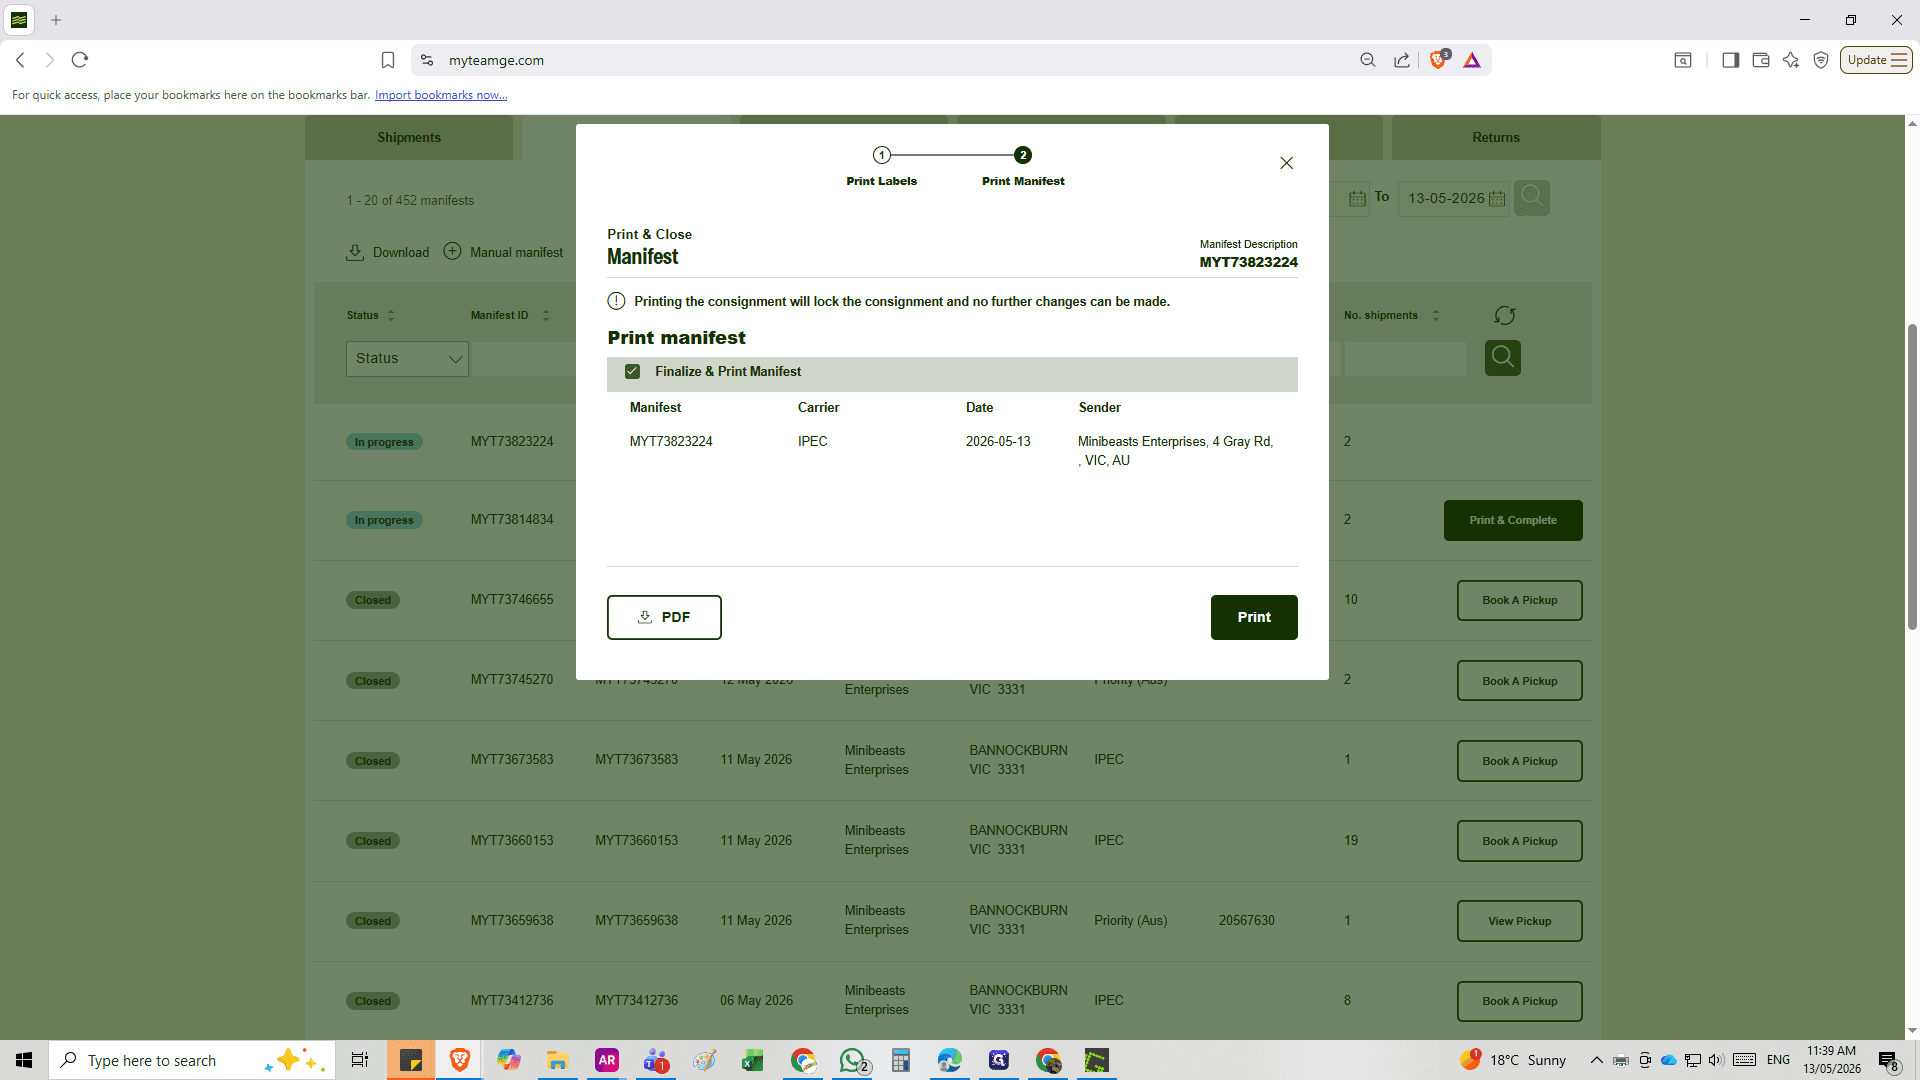
Step #23: Once all labels have been printed, the Manifest pop up will appear. Press print & print manifest sheet onto normal paper (not labels) to complete. If you had both IPEC and Priority, you will have to complete steps 20-23 for each Shipping type.

Final Check

24
To ensure all clients have been added and ready for print:
Total invoices, and No. Shipments should be equal.
(One exception to this, is if a client has boxes in both Priority & IPEC).
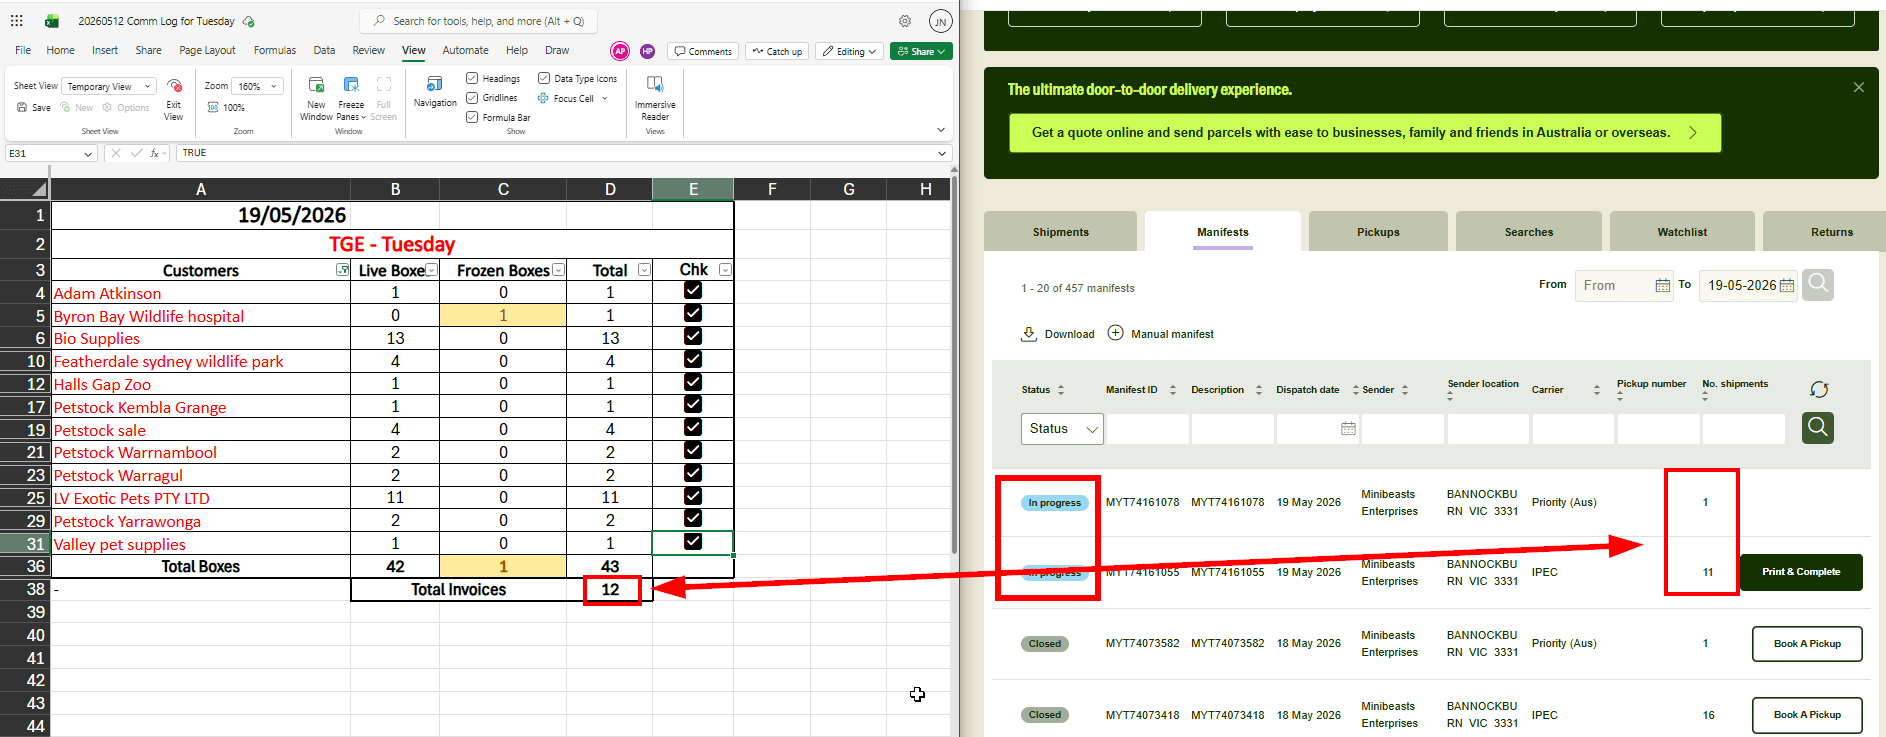
Step #24: To ensure all clients have been added and ready for print: Total invoices, and No. Shipments should be equal. (One exception to this, is if a client has boxes in both Priority & IPEC).

25
To ensure all boxes have been booked in:
Total Boxes (Live For IPEC), and Total Labels should be equal.
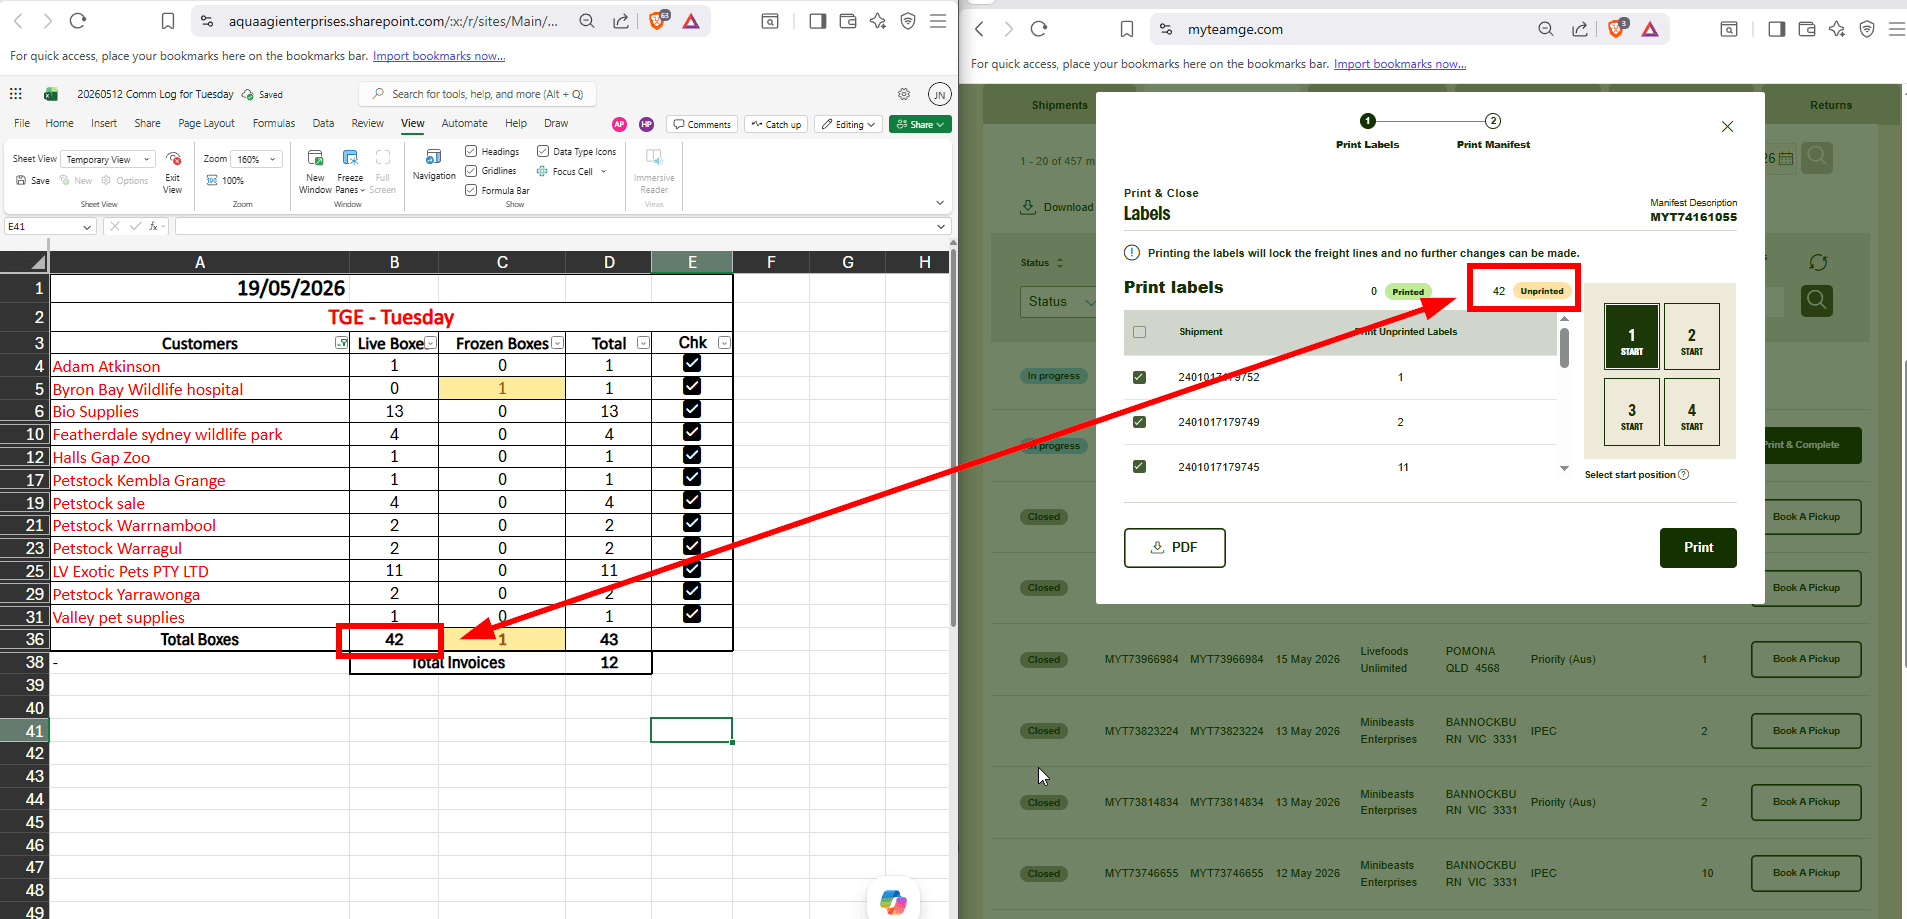
Step #25: To ensure all boxes have been booked in:Total Boxes (Live For IPEC), and Total Labels should be equal.

Glossary

Term

Definition

Manifest

A consolidated document listing all shipments, packages, and tracking numbers handed over to a courier during a single dispatch event.

Box Balancing

The internal process of verifying that the physical number and sizes of boxes packed match the data recorded in the logistics tracking system.