Icon

Understanding the Invoicing Process

Explore the detailed invoicing process for joint ventures, including contract management, invoice creation, and submission guidelines.

By Abby Brumfield

In this guide, we'll learn how to navigate and manage invoicing processes. The focus will be on accessing and organizing invoicing folders, understanding the structure of invoice files, and the steps involved in creating and updating invoices. We'll also cover how to track invoicing due dates and maintain records of contract billing. This guide aims to provide a clear understanding of the invoicing workflow, including the use of specific file naming conventions and the submission of invoices to the government's wide area workflow system.

Let's get started

First, go to the Invoicing folder. You can find it under Programs and Operations Management, then Invoicing.

1
Click on "Programs and Operations Management"
Step #1: Click on "Programs and Operations Management"
2
Click on "Invoicing"
Step #2: Click on "Invoicing"

Under the Invoicing folders, there are several layers. For the Peerless JV, all individual contracts are included here.

3
Click on "SierTek - Peerless JV LLC ( SPJV )"
Step #3: Click on "SierTek - Peerless JV LLC ( SPJV )"

These are not SierTeK contracts. They are the joint ventures' copies of the contracts. These are the joint ventures' invoices to the government, not our invoices to the JV. The same applies to Q-Tech's invoices.

I keep records of the Q-Tech operations invoices that CDO enters into the system on behalf of the joint venture. Casetrack does not currently have an invoice process because there are no employees on contract.

4
Click
Step #4: Click

Generally, each invoice folder, when they are our invoices, contains at least these two files. The Invoicing file and the Form 1035 file.

5
Click here
Step #5: Click here

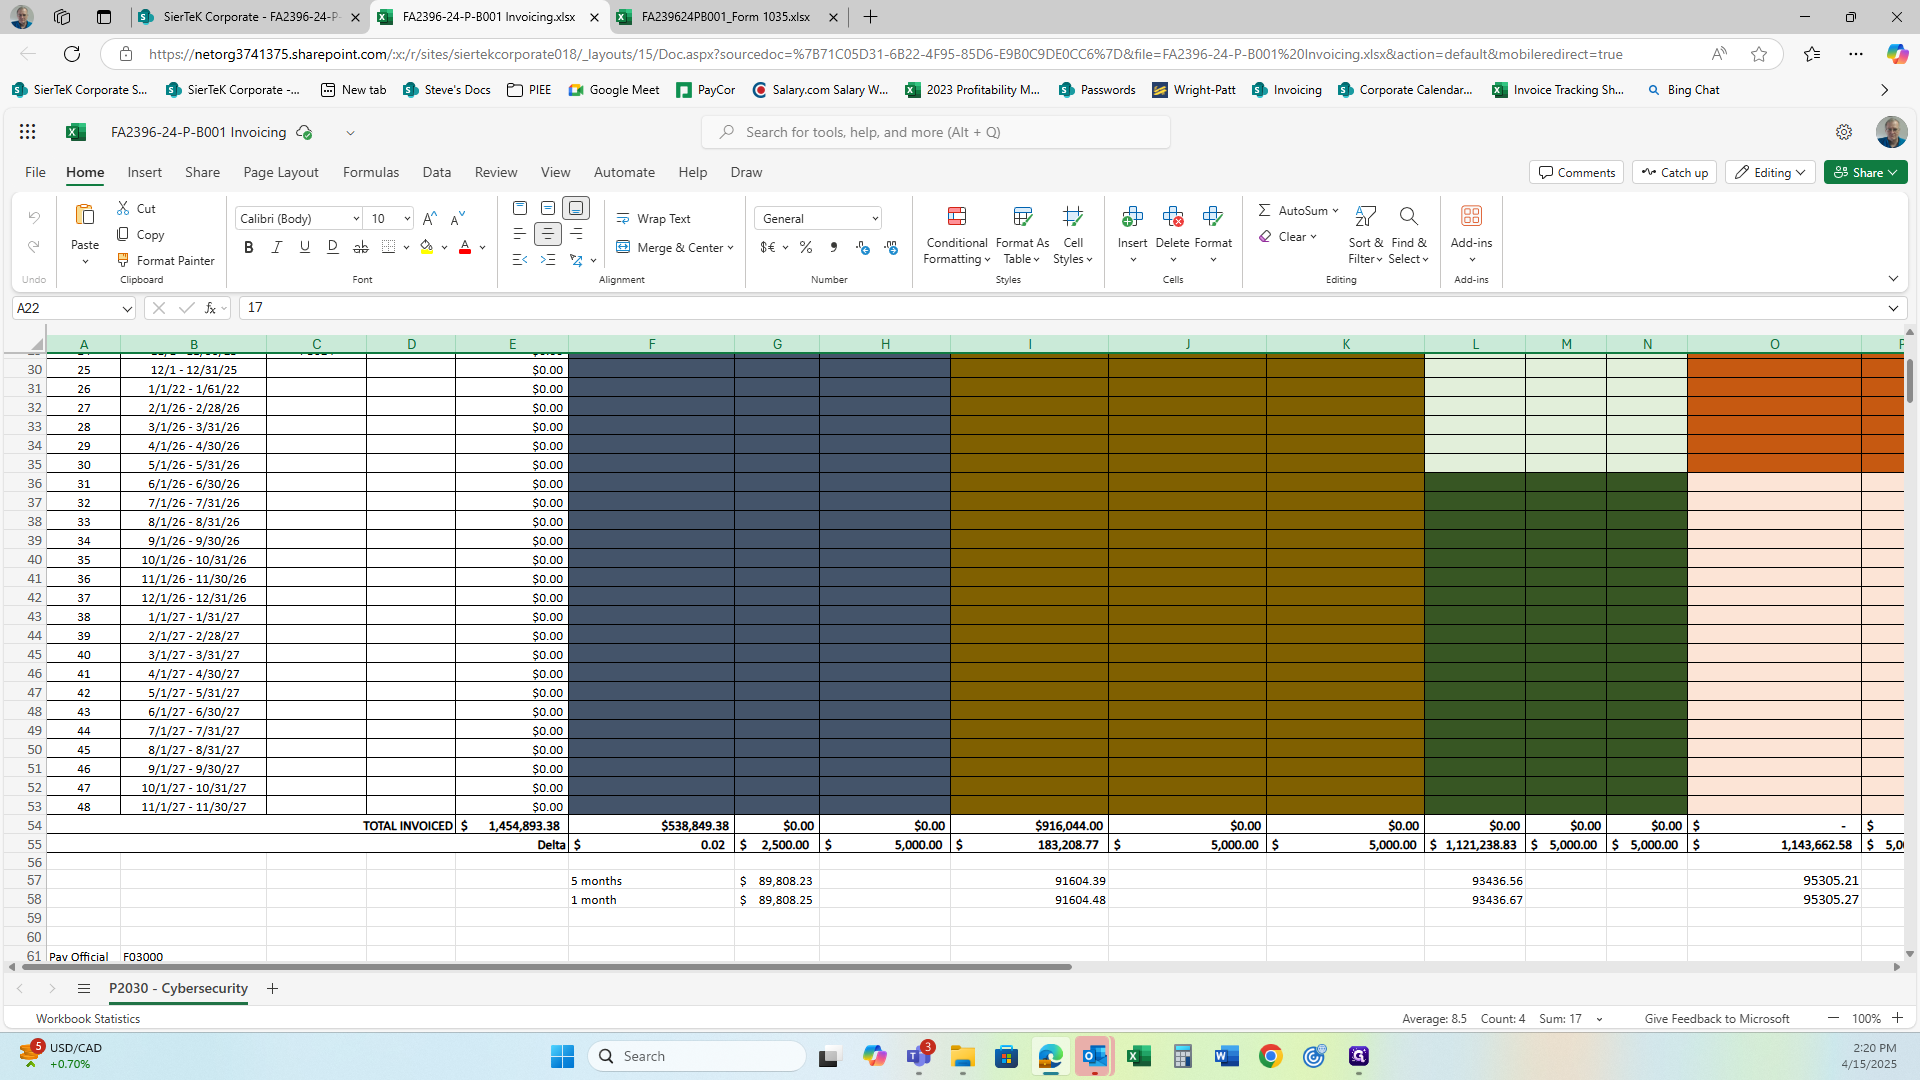
The invoice file is exactly what it sounds like. It contains every invoice entered into the system for each CLIN and each option available (Labor, Travel, etc.).

6
Drag "12/31/2023"
Step #6: Drag "12/31/2023"

At the top, you'll find the ceiling for that CLIN and the current amount funded for it.

7
Amount per CLIN.
Step #7: Amount per CLIN.
8
Amount Funded.
Step #8: Amount Funded.

There are invoicing instructions at the bottom. This section contains the information we use to input data into the government's wide area workflow system.

9
Drag here
Step #9: Drag here

The 1035 is the invoice sent to the government.

10
Right-click on "FA239624PB001 Form 1035.xlsx"
Step #10: Right-click on "FA239624PB001 Form 1035.xlsx"

The government form number for an invoice is 1035. This is what I use for the invoice. When creating an invoice, since most are fixed price, I duplicate the last sheet and rename it with the current number.

11
Right Click
Step #11: Right Click
12
Click on "Duplicate"
Step #12: Click on "Duplicate"
13
Right-click
Step #13: Right-click
14
Click on "Rename"
Step #14: Click on "Rename"
15
Next, I update the header information.
Step #15: Next, I update the header information.

16
Click on "OK"
Step #16: Click on "OK"
17
In the top right-hand corner, you will see the Voucher Number, Invoice Date, Invoice Number, and Billing Period. This will all need to be updated with the current months information.

Example.
New Voucher Number: PB001-017
Invoice Date: 5/10/2025
Invoice Number: PB001-017
Billing Period: 4/1/2025-4/30/2025
Step #17: In the top right-hand corner, you will see the Voucher Number, Invoice Date, Invoice Number, and Billing Period. This will all need to be updated with the current months information. Example. New Voucher Number: PB001-017Invoice Date: 5/10/2025Invoice Number: PB001-017Billing Period: 4/1/2025-4/30/2025

Next, I go to the cumulative amount column and copy that number and paste it into the previously billed column as a number. It is currently a formula that adds this to the current amount.

18
Copy
Step #18: Copy
19
Paste
Step #19: Paste
20
Click on "Values only"
Step #20: Click on "Values only"
21
Click on "91,604.40"
Step #21: Click on "91,604.40"
22
Click here
Step #22: Click here
23
Click on "File"
Step #23: Click on "File"

Then print this to a PDF file.

24
Click on "Print"
Step #24: Click on "Print"

I go to the Download folder, find the file, and rename it to DB001, followed by the last five digits of the contract number, the invoice number, and an underscore. The underscore is used to separate these elements, as it is the only character allowed for uploads.

To ensure the WAWF doesn't reject it, avoid using dashes or similar characters. Use the underscore character instead. (ex. ContractNumber_InvoiceNumber_Date)

25
Click here
Step #25: Click here
26
Next to go the Invoicing Spreadsheet
Step #26: Next to go the Invoicing Spreadsheet

You'll go into the wide area workflow. I would then update this sheet so that the $91,000 is included. This way, it's in the total, and we can see our residual amount.

27
Click on "183,208.77"
Step #27: Click on "183,208.77"

Next, we will once again, go to the Corporate SharePoint Home, but this time we'll focus on the accounting folder.

28
Click on "Accounting"
Step #28: Click on "Accounting"
29
Click on "Steve's Docs"
Step #29: Click on "Steve's Docs"

There are two spreadsheets that will need to be updated here. First, is "Invoicing Due Dates."

30
Right-click on "Invoicing due dates.xlsx"
Step #30: Right-click on "Invoicing due dates.xlsx"

The Invoicing Due Dates section is where we track when an invoice is created. We would record the date and we processed the invoice to confirm it's done and know when it was completed.

31
Click on the corresponding month and contract and add the date.
Step #31: Click on the corresponding month and contract and add the date.

The next folder is the Master Invoicing List and this information is reported on weekly in our corporate staff meetings.

32
Click on "Master Invoicing"
Step #32: Click on "Master Invoicing"

This file is where all the information about each contract we're billing is tracked.

The contract number, the invoice creation date, the invoice number, the invoice amount, the date it was entered into WAWFE, and the payment receipt date is all tracked here.

33
Step #33:
34
Step #34:
35
Notes for any specific contract steps are on the right-hand side of the spreadsheet.
Step #35: Notes for any specific contract steps are on the right-hand side of the spreadsheet.

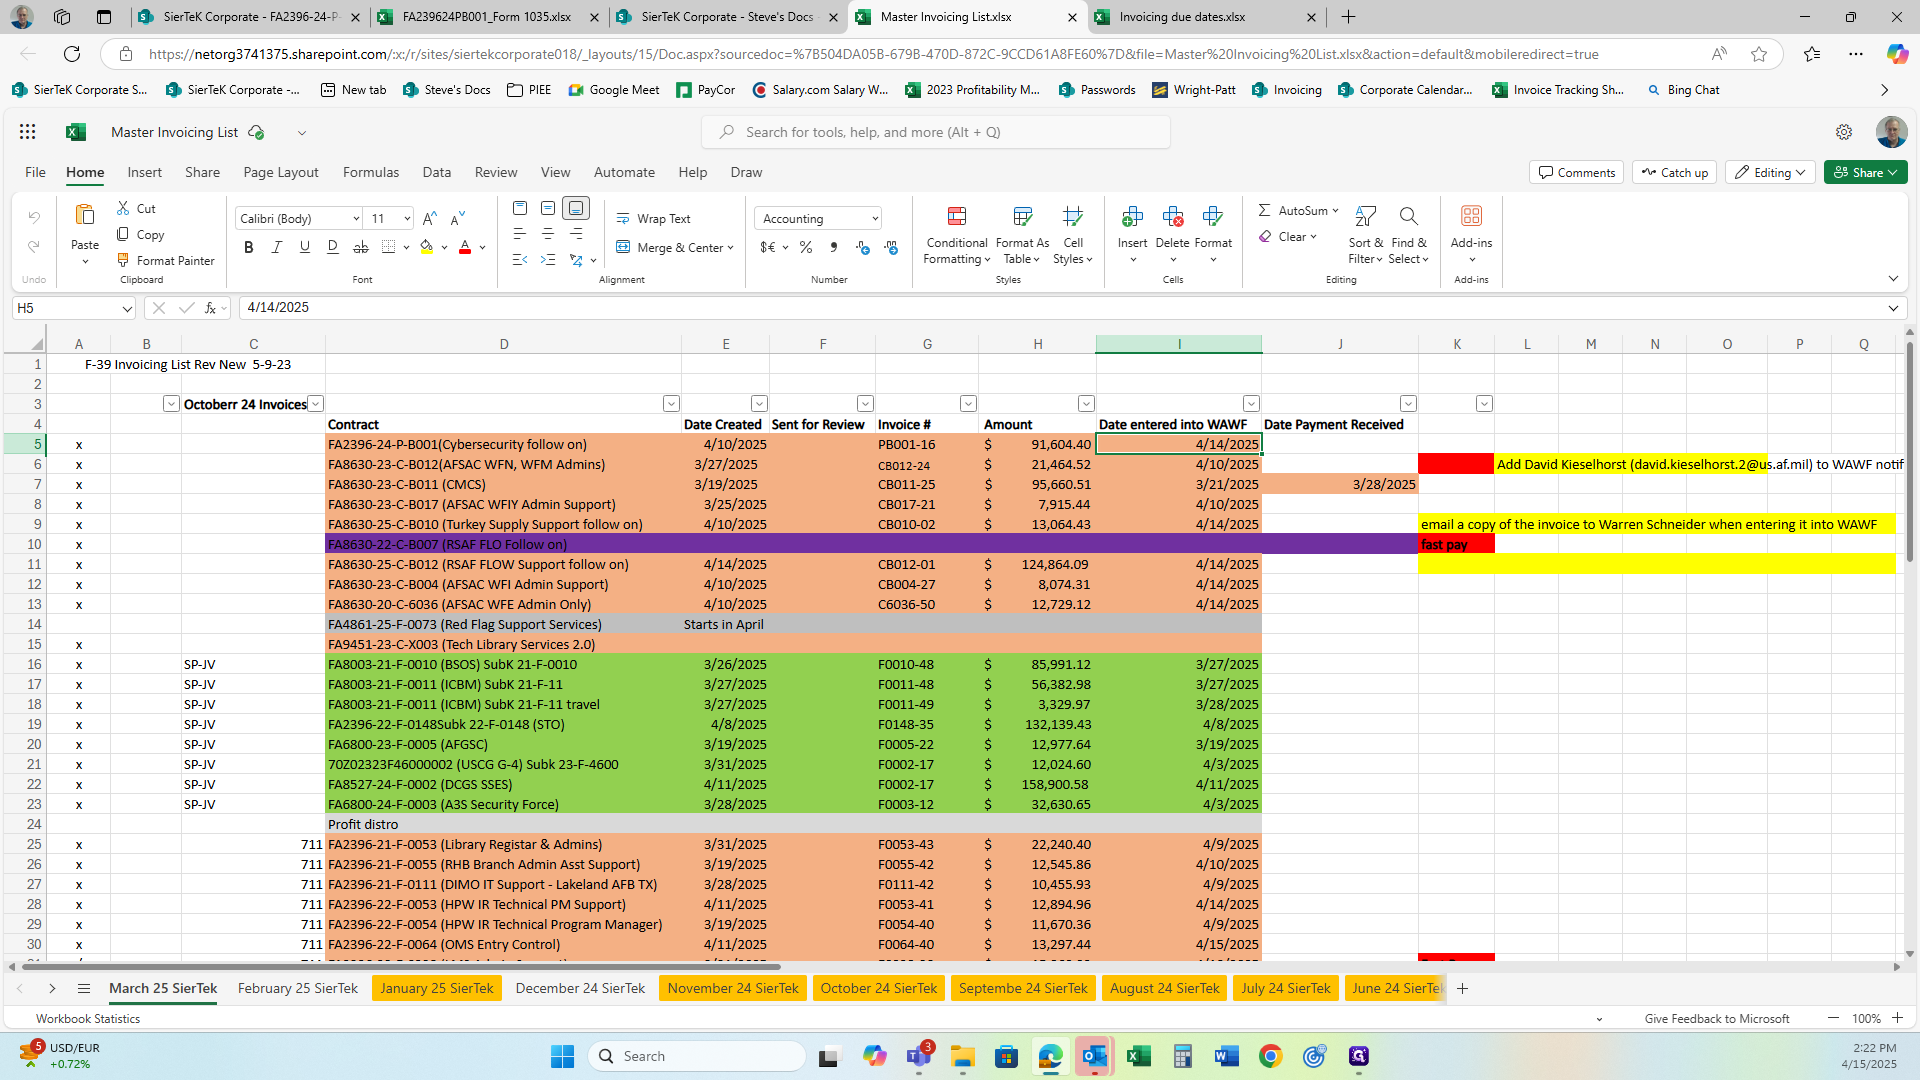
At the bottom, you'll find the total sum, which is the dollar amount of all the invoices created.

36
See below.
Step #36: See below.
37
This number, though not labeled, represents all the dollars currently entered into the wide area workflow.
Step #37: This number, though not labeled, represents all the dollars currently entered into the wide area workflow.
38
The green section indicates the invoices we send to Peerless JV.
Step #38: The green section indicates the invoices we send to Peerless JV.
39
The blue ones represent the other subcontracts we send, either to Marvel, Q-Tech, or similar entities.
Step #39: The blue ones represent the other subcontracts we send, either to Marvel, Q-Tech, or similar entities.
40
You can find the color-coded key in the bottom left-hand corner.
Step #40: You can find the color-coded key in the bottom left-hand corner.
41
This number indicates what has been invoiced for the month.
Step #41: This number indicates what has been invoiced for the month.
42
The 95% indicates that we have invoiced 95% of the total amount that was generated this month.
Step #42: The 95% indicates that we have invoiced 95% of the total amount that was generated this month.
43
The 97% here is a check number for our reference. It indicates that we've invoiced 97% of the total value we invoiced in December 2024. This helps us track how much we've invoiced by the end of last year. It serves two purposes: first, it shows our progress in dollar amounts or percentages compared to the end of last year. Second, during weekly status meetings, we can report that I've currently invoiced 97%. We usually use this number because it's lower. However, this week, for some reason, it was higher. As a result, we reported that we didn't invoice 95%. Normally, this serves as the catch-all that I use to base my monthly invoices on, assessing how far I have progressed.
Step #43: The 97% here is a check number for our reference. It indicates that we've invoiced 97% of the total value we invoiced in December 2024. This helps us track how much we've invoiced by the end of last year. It serves two purposes: first, it shows our progress in dollar amounts or percentages compared to the end of last year. Second, during weekly status meetings, we can report that I've currently invoiced 97%. We usually use this number because it's lower. However, this week, for some reason, it was higher. As a result, we reported that we didn't invoice 95%. Normally, this serves as the catch-all that I use to base my monthly invoices on, assessing how far I have progressed.
44
45
Once the item is paid, we pick it up to keep a running total of how much we've received for the monthly invoices.
Step #45: Once the item is paid, we pick it up to keep a running total of how much we've received for the monthly invoices.
46
The 0.05% represents the percentage of how much we've been paid for this month.
Step #46: The 0.05% represents the percentage of how much we've been paid for this month.
47
The number below, 41.4 million, is the total amount we've invoiced for the current year.
Step #47: The number below, 41.4 million, is the total amount we've invoiced for the current year.
48
The total amount received for the current year is 64.8%.
Step #48: The total amount received for the current year is 64.8%.
49
This number performs the same function. It shows the total year-to-date billings, allowing us to see the total dollars billed. We've received $4.1 million out of $6.8 million, which is 64%.
Step #49: This number performs the same function. It shows the total year-to-date billings, allowing us to see the total dollars billed. We've received $4.1 million out of $6.8 million, which is 64%.
50
The tabs in a different color indicate that we have been paid 100% of the invoices in those categories.
Step #50: The tabs in a different color indicate that we have been paid 100% of the invoices in those categories.
51
The Marvel invoice in December is still outstanding, so the tab is still grey.
Step #51: The Marvel invoice in December is still outstanding, so the tab is still grey.
52
The invoices in green for the SPJV should be sent to Jana at Peerless.
Step #52: The invoices in green for the SPJV should be sent to Jana at Peerless.
53
The top two invoices include instructions on the invoice itself on where to send them.
Step #53: The top two invoices include instructions on the invoice itself on where to send them.
54
The Q-Tech invoice is sent to Q-Tech's email at CDO. After the third or fourth invoice, they created a specific email for submissions.
Step #54: The Q-Tech invoice is sent to Q-Tech's email at CDO. After the third or fourth invoice, they created a specific email for submissions.
55
If we ever receive work from Case Track again, the Case Track invoice will be used. A formal process has not been created yet, as we do not have any work to bill on that contract. Robin Sgrosso is the administer for the account we have to use to submit our invoices. If Steve H., is not available to pay the invoice Robin will have to add the new person or submit it herself.
Step #55: If we ever receive work from Case Track again, the Case Track invoice will be used. A formal process has not been created yet, as we do not have any work to bill on that contract. Robin Sgrosso is the administer for the account we have to use to submit our invoices. If Steve H., is not available to pay the invoice Robin will have to add the new person or submit it herself.
Understanding the Invoicing Process