Read summarized version with
The most expensive document at my first startup wasn’t a contract. It was a work instruction nobody could follow.
There was a fulfillment task that exactly one person knew cold. She went on vacation. The guy covering for her followed our “documentation” - a wall of text, zero screenshots - and shipped the wrong configuration to a customer. For two weeks. Nobody noticed until the customer did.
That cost us more than a month of that employee’s salary. The reason was almost embarrassingly simple. We had a procedure, sure, but we never had a real work instruction. What we had was a paragraph wearing one as a costume.
I’m Yuval, founder of Glitter AI. I’ve spent years writing process documentation - clumsily at first, then a lot better - and these days I help manufacturing and ops teams do it too. Below you’ll find a free work instruction template you can use today. I’ll walk through every section, and I’ll explain why visual work instructions keep beating text-only ones.
Teach your co-workers or customers how to get stuff done – in seconds.


What Is a Work Instruction?
A single-task how-to document is a step-by-step set of directions that tells one person exactly how to do one task. It’s the most granular layer of process documentation. No policy, no strategy. Just which button to press, which torque setting to use, and what “done correctly” actually looks like.
People mix this up with SOPs all the time, so it’s worth being precise. A standard operating procedure describes what process to follow and why it matters across a department. A work instruction describes how to do a single task inside that process. There’s a full breakdown in our dedicated piece on SOPs vs work instructions, but the short version goes like this:
- SOP: “All finished units must pass final inspection before packaging.” (the rule)
- Work instruction: “Step 1: Place the unit on the inspection jig. Step 2: Check the four weld points against the photo below.” (the task)
On a factory floor, your production-line standard procedure sits at the top. Underneath it, a stack of work instructions does the actual teaching. A good work instruction template keeps that line clean, so operators get exactly the level of detail they need right at the station.
Why Most Work Instructions Fail
Before we get to the template, let me explain why so many of these documents end up ignored. I’ve audited a lot of them, and the failure modes barely change:
They’re walls of text. Nobody reads a paragraph while holding a part in one hand. If a step can’t be glanced at, it won’t be followed.
They assume context the new person doesn’t have. “Configure the settings as usual” means nothing to someone on day two.
They’re out of date. The line changed, the software updated, and the instruction still describes last year’s process. The moment an operator catches one wrong step, they stop trusting the entire document.
They have no clear “done” state. A step like “tighten the bolt” with no torque spec and no photo isn’t an instruction. It’s a guess. All of these failures feed the same number: the American Society for Quality puts quality costs - scrap, rework, inspection, and failure - at 15 to 20 percent of annual sales for a typical manufacturer.
The fix for all four is the same. A consistent structure, plus visuals on every step. That’s what the template enforces.
Teach your co-workers or customers how to get stuff done – in seconds.
The Work Instruction Template Structure
Here’s the structure I recommend. It’s exactly what the downloadable template gives you, and every section earns its spot.
1. Header and Document Control
Work instruction number, revision number, effective date, author, approver. Sounds bureaucratic, I know. But on a regulated floor it’s the difference between an audit passing and failing, and it tells operators at a glance whether they’re holding the current version.
2. Task Overview
One or two sentences: what this task is, and what the result looks like when it’s done right. If someone can’t tell from the overview whether this is the document they need, the overview is too vague.
3. Scope
Exactly which task, machine, station, or product this applies to - and what it does not cover. Reference the parent SOP here so the instruction stays tied to the bigger process.
4. Roles
Who performs the task, who verifies it, who owns updating the document. Vagueness about “who signs off” is where quality escapes happen.
5. Tools, Materials, and PPE
A simple list. If the operator has to go hunting for a tool mid-task, you’ve already burned time and handed them a chance to skip a step.
6. Safety and Compliance
The primary hazard, the control that prevents it, and any standard the task has to comply with. Put this before the steps, not buried at the end where nobody reads it.
7. Step-by-Step Instructions (with a visual per step)
This is the heart of it. One action per step. Plain language. And, critically, an image on every single step. More on why in a minute.
8. Quality Checks
A small table of checkpoints with acceptance criteria and a pass/fail box. This turns “I think it’s fine” into something you can actually verify.
9. Troubleshooting
A problem / likely cause / corrective action table. This is what keeps your most experienced person from getting tapped on the shoulder twenty times a day.
10. Related Documents
Links to the parent SOP, related instructions, and any drawings or specs. Documentation that points nowhere becomes an island, and islands die.
Why Visual Work Instructions Win
I’ll be blunt. A text-only work instruction is a draft, not a finished document.
People process images far faster than text, and on a production floor speed and accuracy aren’t a nice-to-have. A visual work instruction - one with a clear screenshot or photo on every step - closes the gap between “what the document says” and “what’s actually in front of me.” That gap is where errors live. Research published in the International Journal of Advanced Manufacturing Technology found that workers using digitally illustrated step-by-step instructions completed tasks significantly faster and with fewer errors than those using paper-based text documents - with the gap most pronounced when learning unfamiliar tasks.
I’ve watched the same task documented two ways. The text version generated questions and mistakes for weeks. The version with an annotated image per step generated almost none, because there was nothing left to interpret. Want proof? Our roundup of visual work instruction examples shows what good ones look like across industries. The deeper guide on creating visual work instructions covers the capture and annotation techniques.
The catch has always been effort. Capturing a screenshot for every step, annotating it, dropping it into a document, and keeping all of it current is genuinely tedious work. That tedium is the single biggest reason teams settle for text. It’s also the exact problem I built Glitter AI to kill.
The screenshot-capture shortcut
Here’s the honest pitch. With Glitter AI, you do the task once while it records. It captures a screenshot at every step, writes a first draft of the instructions, and lets you edit the text and blur anything sensitive. What used to eat an afternoon of screenshotting and pasting takes a few minutes.
So the template gives you the structure. Glitter fills in the part everyone hates - the visuals - automatically. You still own the wording, the safety notes, the quality criteria. You just don’t lose a week of your life to screenshots.
Teach your co-workers or customers how to get stuff done – in seconds.
How to Write Work Instructions That Get Used
The template solves structure. These habits solve adoption:
- Write for the least experienced person who’ll do the task. Not the expert. The expert doesn’t need the document.
- One action per step. If a step contains the word “and,” it’s probably two steps.
- State the expected result. Every step should end with what the operator should see or measure. “Done” has to be observable.
- Show, don’t describe. Swap “go to the configuration panel” for a screenshot of the configuration panel with the relevant button circled.
- Date it and assign an owner. An instruction with no owner is an instruction nobody updates.
- Validate it with a real operator. Hand it to someone who’s never done the task and watch in silence. Every place they hesitate is a place the document failed, not where they did.
If you’re building a broader documentation system around these, our guide to building SOP templates covers the layer that sits above work instructions. The walkthrough on how to write an SOP goes step by step through that higher level.
Downloads
Download this free work instruction template to get started today:
Download the Work Instruction Template
A free Word template with task overview, scope, roles, safety, step-by-step instructions, quality checks, and a troubleshooting table. Fill in the brackets and ship it.
Download Work Instruction Template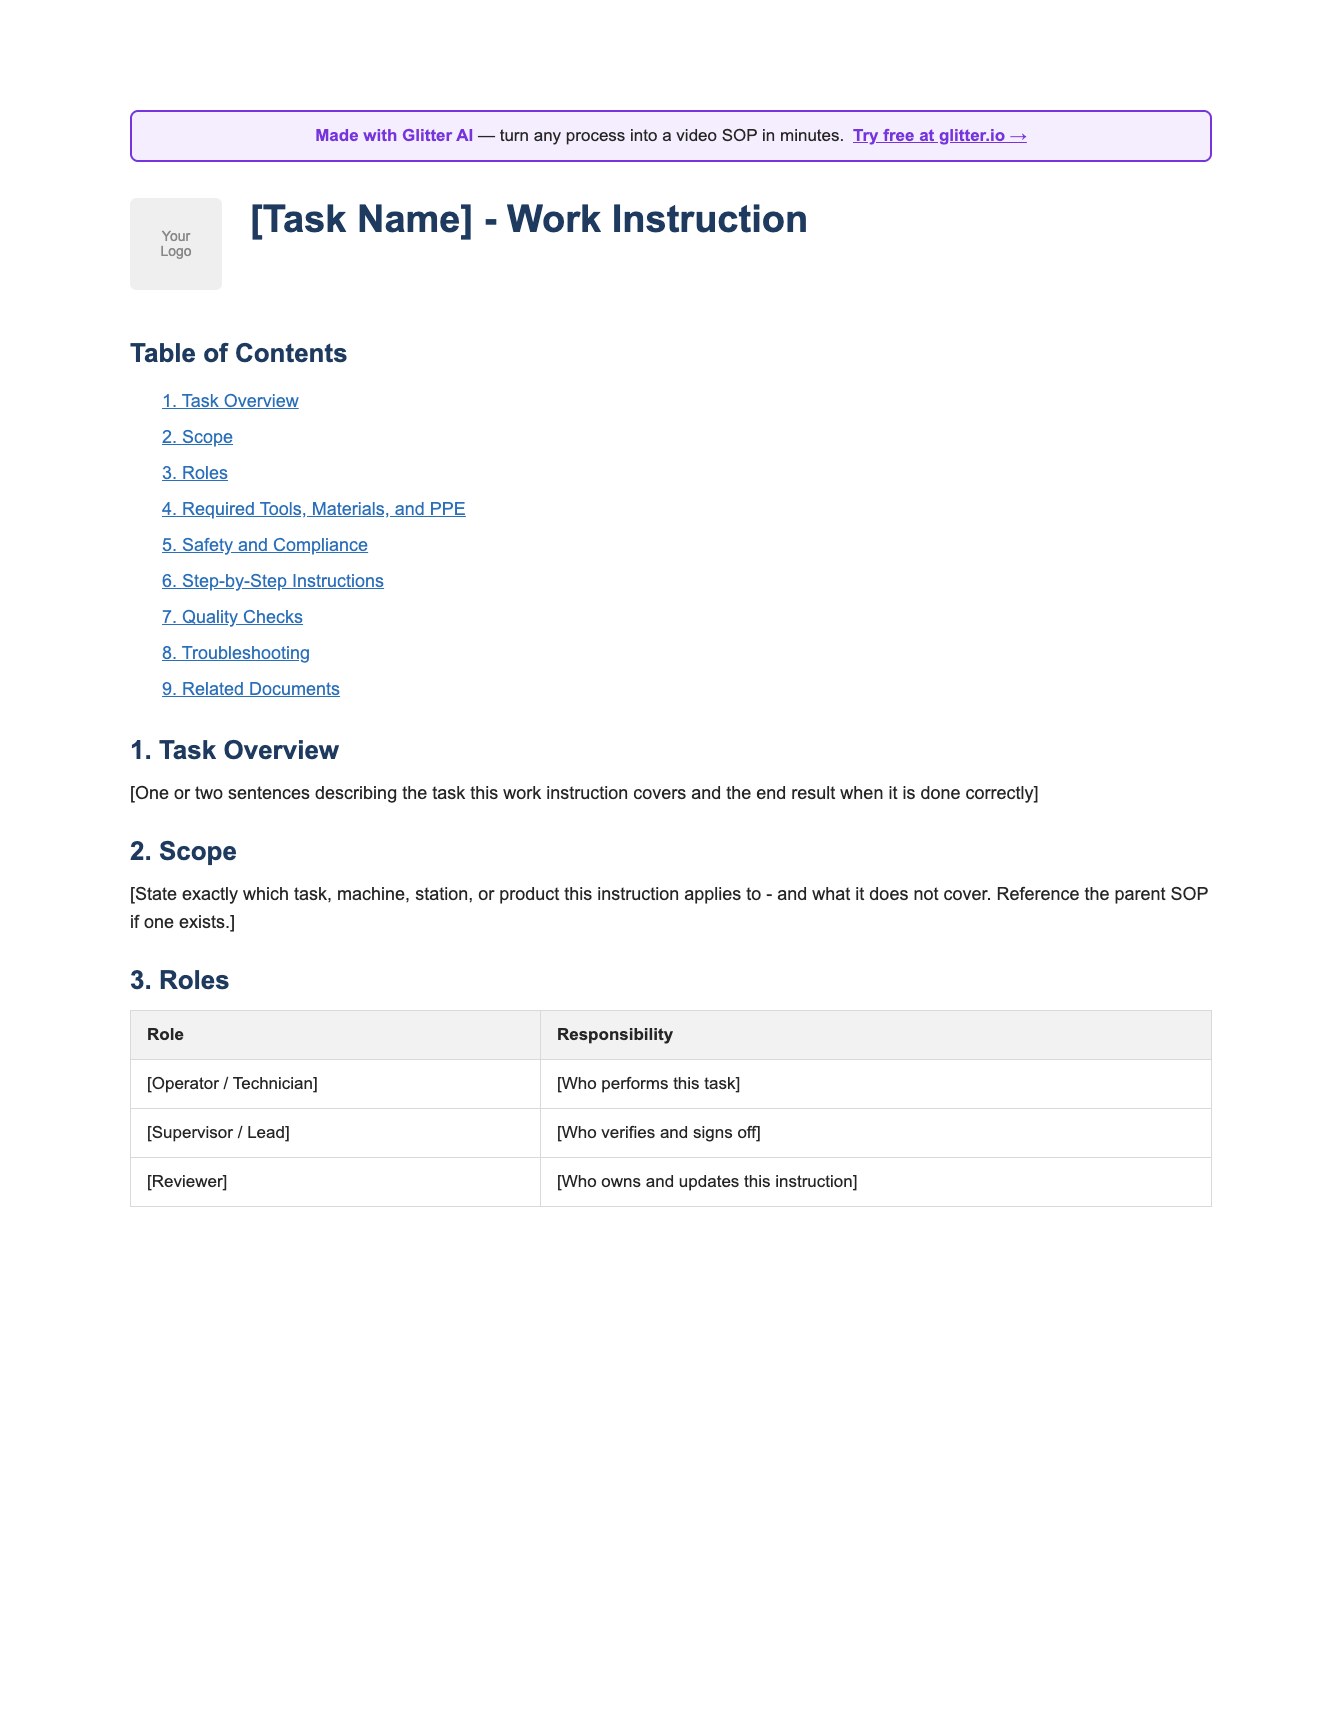
Use it as-is for a quick task, or treat it as the skeleton and let Glitter AI capture the visual steps for you so you’re not stuck screenshotting all afternoon.
Frequently Asked Questions
What is a work instruction template?
A work instruction template is a reusable document structure that defines exactly how a single task is performed, including scope, roles, required tools, safety notes, step-by-step actions with visuals, and quality checks. It keeps every instruction consistent so operators always know where to find the information they need.
What is the difference between a work instruction and an SOP?
An SOP describes what process to follow and why it matters across a department, while a work instruction describes how to perform one specific task within that process. SOPs are higher-level and policy-focused; work instructions are granular and task-focused, often referencing a parent SOP.
What should a work instruction template include?
A strong template includes document control (number, revision, dates, approver), a task overview, scope, roles, required tools and PPE, safety and compliance notes, numbered step-by-step instructions with a visual per step, quality checkpoints, troubleshooting, and links to related documents.
Why are visual work instructions more effective than text?
People process images faster than text, and visuals remove the gap between what the document says and what is actually in front of the operator. A screenshot or photo on every step reduces interpretation errors, speeds up training, and increases the chance the instruction is actually followed.
How do you write a work instruction for manufacturing?
Define the task and its scope, list required tools and PPE, state safety hazards and controls up front, then break the task into one action per step with an annotated image and an expected result for each. Add quality acceptance criteria and a troubleshooting table, then validate it with a real operator.
How detailed should a work instruction be?
Detailed enough that the least experienced person who will perform the task can complete it correctly without asking questions. Use one action per step, plain language, and a visual for anything that involves a screen, machine state, or physical position.
How often should work instructions be reviewed?
Review work instructions on a fixed cycle (commonly every 6 to 12 months) and immediately whenever the line, software, tooling, or specification changes. An out-of-date step is the fastest way to lose operator trust in the entire document.
Who should own a work instruction?
Assign a single named owner, typically the process or area lead, who is responsible for keeping it current and approving revisions. Document control fields in the template make ownership and the current revision visible at a glance.
Can I create visual work instructions without taking screenshots manually?
Yes. With Glitter AI you perform the task once while it records, and it automatically captures a screenshot at every step and drafts the instructions. You then edit the wording, add safety and quality details, and blur anything sensitive, skipping the manual screenshot work.
Is a free work instruction template good enough for a regulated environment?
A well-structured template that includes document control, scope, roles, safety, quality criteria, and revision history covers the core requirements of most regulated environments. Always confirm the exact fields and approval workflow your specific standard or auditor requires before rollout.
Bad work instructions cost real money. I learned that the expensive way. Good ones are quietly some of the highest-leverage documents in any operation. Grab the template, structure your task properly, and let the visuals do the heavy lifting.
Yuval / Founder & CEO, Glitter AI